• Untitled Document

    The 2024-2025 Fund Raising Season has Opened!

    EricsonYachts.org has opened the season for raising funds to support the expenses of the site. If you would like to participate, please see the link below for additional information.

    Thanks so much for your continued support of EricsonYachts.org!

    2024-2025 Fund Raising Info

  • Untitled Document

    Join us on January 24th, 7pm EDT

    for the CBEC Virtual Meeting

    EY.o January Zoom Meeting

    All EYO members and followers are welcome to join the fun and get to know the people you've met online!

    See the link below for login credentials and join us!

    January Meeting Info

    (dismiss this notice by hitting 'X', upper right)

E32-200 How to repair a fiberglass keel stub

I’m writing this note in mid-July, 2021. The repair work described was completed in June of 2021.

I hit a rock fairly hard with the keel of my boat in February. The impact pulled the front of the keel away from the hull and shoved the back of the keel up into the keel stub. I’m calling the “keel stub” the portion of the hull that is shaped to meet flush with the flat top of the keel.

This repair work was performed by KKMI of Sausalito. The yard removed my keel, pulled my engine out, replaced two of my keel bolts, and then started to repair and re-assemble the boat.

Forward Keel Repair

With the keel removed, from the outside of the boat, one could observe stress cracks in the keel stub. The forward-most keelbolt only connected to the hull of the boat, while most of the other bolts spanned both the hull and the Ericson Triaxial Force Grid. The hull fiberglass flexed and cracked when the keel struck the rock. This picture shows the bolt through the hull glass alone.

t31VeRkYO3qzmhzMZWlSzy3Mq6YiPy4w-8sM7Uk-3yPxiyg-lP06ZL5tMI4kLTNblwkCHKq9818Z34TL_ZBcbAVemv0VeFYBsBOoDniXmK1YJ6BEd8mneL5rD3tWqanubrr4zYTL

The first step was to add multiple layers of glass as a base for the repair.

IMG_2215-1-1024x768.jpg


To strengthen the connection, after adding a layer of thickened epoxy to even out the surface, the boatyard installed a backer plate made from ¾” G10 material in the same position.

CFAT986W17eeGUF3NrvSGgY7nbtow2sRuxstOujXCvaLXJwgwDINMpuEGO6Hi8aG9A3EEDLQBX65ydRoEYbM8wz0sT3tQvUAUiX-fH_8nbu_JWXeiMjLMgMVP51Q16rVCPNbh806

The blue-green plate works like a giant washer, and I am confident this would do a great deal to spread out the impact loads should my boat ever (and let’s hope not) strike another rock. I think this is stronger than the OEM factory version.

Aft Keel Stub Repair

At the aft end of the stub, the lead keel was knocked up into the fiberglass of the hull. Some cracking was evident on the exterior once the boat was out of the water.

gQTCOvnGuGaCzAT7MNRg_e-_xg0h_FRTW64HDnrEmKCX0sHGtAKHwLKUrptIpoiEzX4deVIkqNCg1XBQFytZDh0bdCPiYtSXFdOmyGii3yMMK4ecXmrDv-Lf-6JyiXl1Q5unQFmZ

There were no masses of broken fiberglass visible on the outside of the boat, but to be sure, the yard pulled out my engine and cut open the engine pan to reveal the inside of the hull surface. There was no great damage visible.

HAUGasvglQFCOJ0Wb4OJyZ1SJhtoAzx90vb1_R67KoP5tdmbujXapdqXtpf5glWpsuApBxX-hUrUnm3ZYgRMnpSu5seEf-0bP8AAE--INJDfRqpQUkbk-mBIMx6zQr95eVMtYTCL

In the small section where sunlight was shining through, the yard gooped in some thickened epoxy and sanded the outside of the hull to good glass. Some of thickened epoxy drizzled through as it cured:

LLXx-CuddivTx4ASupYozO-RJ-U-1dPACVfIecAp0tAaKfJSSFzusoAYZWXhoaDrZ1_7KTKj4RH9zydH4xOZCLLNpGCr3IlGppsQm_JfpXUepe_JCcbYnXPWnyCwW13JcvprN1dc

Then multiple layers of glass were laid over the thickened plug layer. The combined repair yielded a stiffer, stronger stub area than the factory build.

QrGg086pfsHYSHGlWVYnN0tFjBPwBx_2A7kIPOXIqLCbmxbpOEg6xzq9wjiWTuv80pHOJT-DQ_jJ7FEcZcha1K1a7n-BjrOewfAjegXlTsqlUuFiTbLOrFRfI0EUDymTvfnMwPPN

Many layers of glass were added inside and outside the hull.

cuVV1Rop7sWvG418X7Tk_9daCiO6l3JoN8tfxKkeCVrnGzWxoPLSuLsDoXAef9wJQfeasbzUnYDvr-qMGL0Uhvd2DVHHuId9SFihoufhaXizp0ujNU5lkDuBRt6rK-96nuassJM3

By the end, the bottom of the engine compartment was bonded into the boat and it is virtually impossible to tell that any work has been done beneath the engine.

IMG_0014-5.jpg


The keel was re-bolted to the boat, the connection faired, and then a new coat of bottom paint was applied. The lowermost leading edge of the keel that actually struck the rock was also built back with epoxy and faired.

K9AGFDq0EpF20ME6TXb-KHt3V-CwaVIhS_5Sep4hFqLYEfOl5NjiFEHImBn0DUHJzPey-eREKKV3lEPZpz_I2AW3Kd-_d_FiaRq_4jASXzTPHpBNVNtpAms2eXXIl7fI0kvWZ3px

This was the most serious “surgery” I hope I will ever have to put my boat through. For financial reasons, I don’t recommend anyone take actions that will require removing his mast, keel, engine, rudder, steering gear, propeller and shaft all at once. Unless someone gives you a boat for free and you own a boatyard.

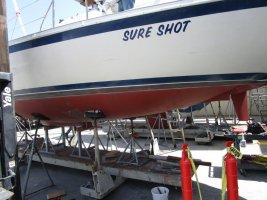
But after all the hassle, gosh she’s pretty when she’s all dressed up and ready to go sailing again:

lkPyQiF9MhzHmHkvyDG0NvrHDgacv6X0Q2V66JnFLHjzTH6JsISPK0xNP12JrA5srONDSJ1tYmQV85ApsQKBfJ3d35NALpMrKmpqammBFA0j1296wei1Bn0ZPLrzB_cuh2A2UIVN
  • IMG_0013 (3).jpg
    IMG_0013 (3).jpg
    108.8 KB · Views: 1,915

Blog entry information

Author
goldenstate
Views
832
Comments
9
Last update

More entries in Hull, Deck, Keel & Rudder

More entries from goldenstate

Top