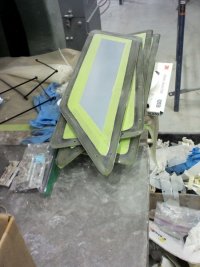
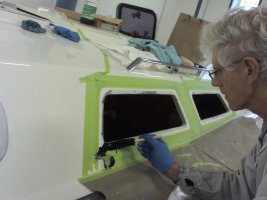
The four external lens fixed ports are now in place. Standard on the Olson models, and I note that some older Ericson's have converted to this scheme when their framed ports defied attempts to seal or refurbish them.
There is a process to follow to get to a multi-decade solution for zero leaks. I did this when replacing the factory leaking ports back in '95, and have had no leaks since. UV had badly clouded the surface of the polycarbonate, however. Even with the optional UV-resistant coating, they seem to only keep the initial shine about a decade at most. Beyond that you can polish them every few months. (This type of material does not craze like the acrylic lens in the Lewmar ports and hatches, however.) I have also not found any information that indicates that a hazed surface on the polycarbonate material degrades the strength.
Note that, unlike the very adequate "glued on" lenses on O'Day and C&C, these are mechanically fastened with screws in addition to high strength adhesive. Given the design brief for construction suitable for continuous offshore sailing, this seems logical to me. The chance that green water might flex one of these enough to pop it (inward) out of place is extremely remote.
Note B: After the adhesive sets, I would judge the screws to be mostly unneeded, in any case.
Unlike the adhesive I used in 1995, BoatLife "LifeSeal", the chosen adhesive -Sikaflex -this time can be cleaned up with paint thinner. This is marvelous, because thinner will not affect the new Awlgrip surface and is reasonably benign to human skin, as well. That said, a roll of paper towels was sacrificed to the effort, along with several vinyl gloves. (Also, do not give in to the urge to scratch your nose while doing the work........)
")
Note also that this adhesive requires a proprietary primer on both sides of the joint, and the mating surfaces were roughed up with 220 grit.
:eek:IMPORTANT: To get a long term seal, you MUST allow for the difference in thermal expansion of the lens vs the cabin side. If...... you simply screw down the lens flat and squeeze out most of the sealant, that lens will leak soon, and forever.
It has to 'float' on a bed of flexible sealant/adhesive so that it remains adhered in temperatures from freezing to 100 degrees. That is the reason for the O-ring spacers.
I did this the last time around, and never had a leak in 25 years.
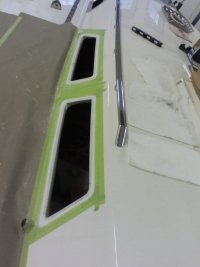
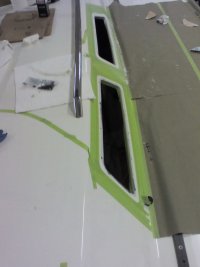
Note Also: the deck does NOT have the new non skid applied yet, in these photos. That will happen very soon. The taping off of the pattern had to wait until all of the rest of the parts were in place.
The method of getting a uniform layer of sealant - about 1/16" - under the whole rim was to put O-rings in the sealant under each screw. This was pretty easy, by putting toothpicks in each screw hole after the final Dry Fit, and dropping the O-rings over each toothpick. Then the sealant was gunned on heavy all around, the lens dropped into place and pressed down to engage the O-rings and squeeze out excess sealant. Screws tightened down, with only moderate force. They are sized so as to stop before penetrating the inside layer of teak veneer (and that part was also done by EY).
After all the prep, it took an afternoon, with two of us, to install them and do all of the cleanup. Results... are really quite nice.
Comment: framed windows would install much faster, but later you do have to sometimes chase leaks between the lens and frame and also around the frame itself. IF.... we wanted to change the opening shape to accommodate new framed Lewmar ports, they are quite expensive compared to paying less than $200. for all four polycarbonate ports, cut and drilled.
Like most everything about boat construction there tend to be several "right ways" to do things.
There is a process to follow to get to a multi-decade solution for zero leaks. I did this when replacing the factory leaking ports back in '95, and have had no leaks since. UV had badly clouded the surface of the polycarbonate, however. Even with the optional UV-resistant coating, they seem to only keep the initial shine about a decade at most. Beyond that you can polish them every few months. (This type of material does not craze like the acrylic lens in the Lewmar ports and hatches, however.) I have also not found any information that indicates that a hazed surface on the polycarbonate material degrades the strength.
Note that, unlike the very adequate "glued on" lenses on O'Day and C&C, these are mechanically fastened with screws in addition to high strength adhesive. Given the design brief for construction suitable for continuous offshore sailing, this seems logical to me. The chance that green water might flex one of these enough to pop it (inward) out of place is extremely remote.
Note B: After the adhesive sets, I would judge the screws to be mostly unneeded, in any case.
Unlike the adhesive I used in 1995, BoatLife "LifeSeal", the chosen adhesive -Sikaflex -this time can be cleaned up with paint thinner. This is marvelous, because thinner will not affect the new Awlgrip surface and is reasonably benign to human skin, as well. That said, a roll of paper towels was sacrificed to the effort, along with several vinyl gloves. (Also, do not give in to the urge to scratch your nose while doing the work........)
Note also that this adhesive requires a proprietary primer on both sides of the joint, and the mating surfaces were roughed up with 220 grit.
:eek:IMPORTANT: To get a long term seal, you MUST allow for the difference in thermal expansion of the lens vs the cabin side. If...... you simply screw down the lens flat and squeeze out most of the sealant, that lens will leak soon, and forever.
It has to 'float' on a bed of flexible sealant/adhesive so that it remains adhered in temperatures from freezing to 100 degrees. That is the reason for the O-ring spacers.
I did this the last time around, and never had a leak in 25 years.
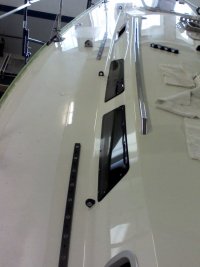
Note Also: the deck does NOT have the new non skid applied yet, in these photos. That will happen very soon. The taping off of the pattern had to wait until all of the rest of the parts were in place.
The method of getting a uniform layer of sealant - about 1/16" - under the whole rim was to put O-rings in the sealant under each screw. This was pretty easy, by putting toothpicks in each screw hole after the final Dry Fit, and dropping the O-rings over each toothpick. Then the sealant was gunned on heavy all around, the lens dropped into place and pressed down to engage the O-rings and squeeze out excess sealant. Screws tightened down, with only moderate force. They are sized so as to stop before penetrating the inside layer of teak veneer (and that part was also done by EY).
After all the prep, it took an afternoon, with two of us, to install them and do all of the cleanup. Results... are really quite nice.
Comment: framed windows would install much faster, but later you do have to sometimes chase leaks between the lens and frame and also around the frame itself. IF.... we wanted to change the opening shape to accommodate new framed Lewmar ports, they are quite expensive compared to paying less than $200. for all four polycarbonate ports, cut and drilled.
Like most everything about boat construction there tend to be several "right ways" to do things.
-
 Sealant for the fixed ports.jpg
 -
 Priming the port mating surface.jpg
 -
 Mating surfaces sanded.jpg
 -
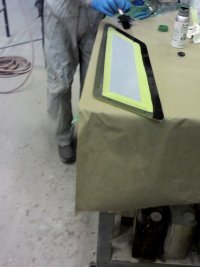
 Taping done:ready.jpg
 -
 Taping and paper in place.jpg
 -
 Primer being applied.jpg
 -
 New Polycarbonate Fixed Ports.jpg