Given the recent climate events affecting many of us, and many of our forum members, I thought it would be useful to develop a consolidated resource of winterization best practices and tried and true methods from the perspective of an Ericson owner who does this annually in a cold environment. My approach is not the only approach and I am sure by writing this I will end up learning new things - the benefit of this community is that we can learn so much from each other.
Early spring and late fall are special times for boaters in Chicago... In the spring we are hoping for the windows of weather and warming sunshine that allow us to start checking boxes off of our spring checklist, install or otherwise finish some winter "take home" project, and knock out one of those yearly upgrades we think about and plan for during the off season. When our sailing season begins to wind down, typically during the end of September/ early October, we begin to think about the winterization process ahead. Boat storage deposits are paid and haul out dates scheduled. Time is blocked off on the calendars of our crew and friends to make the journey from serene harbor to functional yard. Then the day comes where we wake up before dawn, dress in layers and high performance clothing, and step onto the dock for the last time of the year. A cold, bittersweet farewell occurs as we push off the dock and motor out the harbor for the last time of the season... a one way trip to conclude a year. For us here in Chicago, that trip involves a sail in less than ideal conditions and often <40F temps for approximately 2 hours, a trip through the locks of the Chicago River, and then 23 bridge lifts in an urban environment with sailboats coordinated as a flotilla working their way down the river as "pack" (taking anywhere from 5 hours to 2 days in our experience), and then finally arriving at our off season storage location.
What follows is the procedure and commentary on how we winterize "Danu", a 1990 Ericson 28 with a Universal M2-12 diesel engine.
Topic One: Marine Sanitation System
Prior to leaving the dock on our "one way trip" the head is pumped out completely, the holding tank filled with water through the waste deck fitting, air vent, and head, and the process is repeated at least two times. Our approach here is to do our best to "clean" the system using rinsing and dilution while not introducing any chemicals into the system. Once that process is completed the raw water seacock is closed, raw water intake hose is removed from the seacock, and a winterization hose (my term for an approximately three foot long piece of tubing properly sized to snugly fit inside the hose you are working with) is inserted inside the raw water intake hose. The bitter end of the winterization hose is placed into a gallon of pink (-50F) antifreeze and using the head pump it and another one-half gallon of antifreeze is pumped through the system while leaving some of the antifreeze in the bowl of the toilet. The remaining one-half gallon is poured into both the waste deck fitting and the air vent to coat those lines. At this point the sanitation system is winterized and a bucket is used for that one way trip previously mentioned.
Topic Two: Engine & Batteries
Upon arrival at the dock of our functional yard the first winterization exercise involves the engine. While the engine is still warm we start by changing the oil, oil filter, fuel filters, transmission fluid, and heat exchanger anode. As a best practice, we write the date with a Sharpie marker on all of the filters to remind ourselves this task has been completed and when it was done (especially helpful when the river trip takes a long time and some steps are left for later). Side note: Procure an oil extractor - after years of buying a one time use, $10.00 pump the oil extractor was a complete game changer and also helps with the transmission fluid change which all of you know is a pain. The last step involves closing the seacock, removing the raw water intake hose, inserting a winterization hose into intake hose, and placing the bitter end of the winterization hose into a gallon of blue (-100F) antifreeze, having another gallon of blue antifreeze at the ready for a quick changeover, starting the engine with a spotter watching the exhaust, and running the engine until the exhaust "spits" blue.
We then remove the knot meter transducer and replace with the plug so there is no damage to the unit from the straps when the boat is hauled out.
Now that the engine is winterized we remove the batteries to be taken home and placed on a trickle charger (this is actually the last step of the entire process because it is October in Chicago and definitely dark outside - we need light). In the spring we will check the water level using proper PPE and top them off with distilled water if necessary.
Topic Three: Water System & Bilge
During our one way trip we run the pressured water system to drain the water tank. During winterization we first disconnect the water heater inlet and outlet from the appliance and connect them together using a male-male fitting specific to this purpose (during the sailing season it lives zip-tied to the water heater so it is not lost). The water heater is drained into the bilge by threading a winterization hose (they are labeled now... there was a time when they were not) onto the drain plug and opening the expansion valve. We prefer to drain the water heater completely and not introduce antifreeze as it can promote algal growth.
The next step is to pour three gallons of pink (-50F) antifreeze into the water tank and then run the faucets under pressure, one at a time, starting furthest from the water pump until they discharge antifreeze. For us, we start with Hot and Cold in the head and then move to Hot and Cold in the galley. We then operate the manual foot pump in the galley sink until it, and its separate faucet, discharges pink antifreeze.
Moving onto the bilge, one gallon of pink (-50F) antifreeze is poured into the shower bilge and then the shower bilge is run until pink antifreeze is observed discharging the boat through the fitting on the transom. The process is then repeated with two gallons of pink (-50F) antifreeze being poured into the bilge with the bilge pump set to "Off". The next step is to operate the manual bilge pump in the cockpit until the antifreeze is observed discharging. Repeating a similar process, the main bilge pump is then run until the pink discharge is observed. After the boat is shrink wrapped, we will come back to our functional yard and use a shop vac to remove any antifreeze/water mix so the bilge is as dry as possible.
Topic Four: Miscellaneous
After the major systems are winterized we do a review off all compartments, cabinets, and nooks and crannies to find and remove items that would not do well in a Chicago winter. Sunblock in the head cabinet - check. Bottles of wine in the wine rack - check. Sodas that got squirreled away in that forepeak compartment - check. The icebox/refrigerator is emptied, dried with a sponge, a small amount of pink (-50F) antifreeze poured down the drain that goes to the bilge and the cover is left off. Pillows and blankets are folded up and placed in large, reusable Ziploc totes for easy storage (and movement during projects). Port holes and hatches are secured. Everything is put away in its proper spot and a light wipe down/cleaning occurs. We then deploy DampRid products with the hanging version placed in the hanging locker and a few of the small pails placed in the head, forepeak, and main cabin (in my experience home improvement stores have this product at the best cost). Bilge covers are left open as are all cabinet doors as well as other covers to allow for airflow.
Topic Five: Topsides and Up
The primary objective in winterizing Danu's topsides is preparing for shrink wrap. Items that are attached to rails are removed and/or folded in (e.g., grill, GPS unit, solar panel, etc.). All running rigging (sheets, vang, halyards, etc.) are removed with halyards being replaced with painter lines (note: we store with the mast up). Canvas for the dodger and Bimini is also removed and carefully stored. At this point Danu is ready to be shrink wrapped and will be safe for whatever the Chicago winter may bring.
While I am certain that I have missed a few crucial steps in our approach to winterization I do hope that my summary provides some guidance, fosters discussion, and keeps all of our Ericsons sailing in fair winds and following seas.
-
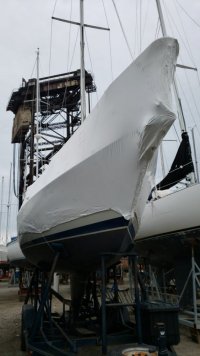 PHOTO-2020-11-14-11-45-49.jpg