• Untitled Document

    The 2024-2025 Fund Raising Season has Opened!

    EricsonYachts.org has opened the season for raising funds to support the expenses of the site. If you would like to participate, please see the link below for additional information.

    Thanks so much for your continued support of EricsonYachts.org!

    2024-2025 Fund Raising Info

Bilge Hose Replacement Battle

Nick J

Contributing Partner
Moderator
Blogs Author
One of the items I was dreading the most on my engine compartment cleanup list was to replace the bilge hoses. I put it off as long as I could, but this weekend was the time it had to go in. I chose Trident's 147 Vac XHD Bilge hose for the cockpit drain since it was below the water line. It's usually best to purchase in larger quantities or complete units, so I ordered a 50' box thinking it would work for the manual bilge hose as well. Trident 147 is a stiff hose that has a lot of memory. It worked well for cockpit drains, but the manual bilge run requires snaking it through conduits and regions of the TAFG not typically accessible whiteout considerable deconstruction.

The first plan was to install a 1.5" to 1.5" hose barb connector in the old and new hose and use the hold hose to guide the new one into place. Seemed like an easy plan, but both the local chandleries were out of stock.

The next idea was to pull the old hose out in sections and use an electrical fish rod to pull the new hose in. The old hose came out easily enough with one ominous hint to one of the problems I would later figure out, it was covered in thick oily muck. In an attempt to clean the conduit out, I snaked a few paper towels through half a dozen times. The last one was marginally cleaner than the first and it was getting late, so I decided it was good enough.

The first item to figure out was how to attach a pull line. At work, we use pulling socks to pull cables through conduits. They're everywhere, hanging from every line truck and stocked in the tool room, but in the boat yard or hardware stores open on the weekend, no-one had ever heard of them. Time to summoned my inner MacGyver, aka sheer desperation to get this done. There was an old 1 1/2 elbow and a screw sitting on the table I thought I could jury rig into a pulling device. With some tap on the outside to transition from the pulling wire to the hose I thought it would do the trick.
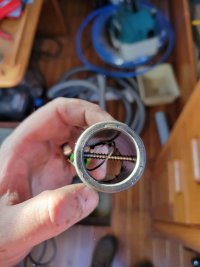
20221112_143649.jpg

Unfortunately, the only tape I could find was painters tape. It quickly tore and exposed the edge of the hose which caught on an edge of one of the conduits below the cabin sole. Instead of following the path of the pulling rod, the conduit turned and coiled up in the cavity under the sole directly in front of the engine. When I pulled it out, it was caked in the muck I had found before. I'm now thinking all the muck I found under the fiberglass pan below the stuffing box had been draining to this area waiting for someone to find. It has to be completely packed in there to account for what was on the end of the hose. That's going to be a long day when I cut an access hole or replace the sole.

The pulling attachment seemed to be working well, but the tape transition wasn't doing a good job. I needed something stiffer and more abrasion resistant than the tape to rub against the edge of the conduit and guide the hose into the correct path. The only think I could think of was hose itself, then it hit me, just taper the hose! heating up the hose allowed me to burry the end of the elbow deeper into the end. With the remaining 4 inches, I cut four relief triangles and tapered it down to the pulling line.
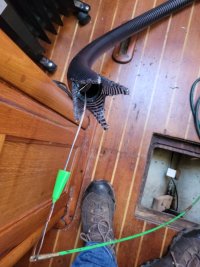
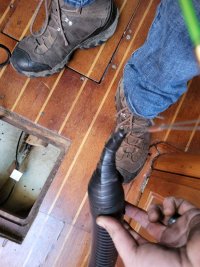
20221112_154251.jpg

20221112_154611.jpg
This solution was far from easy, but it was doable. after 3 hours two broken, line fishing rods, and being covered in the mystery sludge it was finally in place.
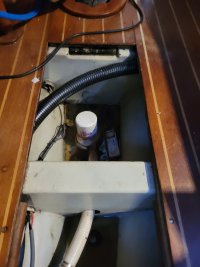
20221112_163255.jpg
 

KS Dave

Dastardly Villain
Blogs Author
The old hose came out easily enough with one ominous hint to one of the problems I would later figure out, it was covered in thick oily muck.
Great ideas! Replacing the old hose is on my short list; I even have the same hose (147) on-hand. As a former cable-jockey, I contemplated a few ideas for accomplishing this same task that involved pull lines. Accounting for the obvious difference in design between the E35 and E26, did you encounter places where the old bilge pump hose was "trapped" between the two layers? If so, how did you get it untrapped? I've thought about abandoning it, but that drives me nuts to think about.

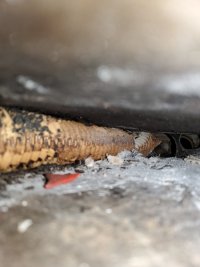
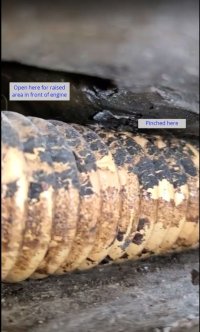
Here's what I'm referring to; this is just forward of the engine looking forward to the first bilge compartment:
UnderSole-FwdFace.jpg

Port-facing:
UnderSole-PortFace.jpg

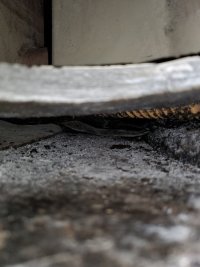
Aft-facing; the wall to the left is where it passes through and runs under quarter-berth to egress:
UnderSole-AftFace.jpg
 

Jerry VB

E32-3 / M-25XP
Thoughts worth the paper they are printed on...

Air power: Deflate a small bumper, push it in the gap next to the pinched hose, and then carefully inflate it to flex the floor and release the hose.

Hydraulic power: Same idea but probably better chance of success... Use a "Hydraulic Jack Body Frame Repair Kit Auto Shop Tool Lift Ram" with the pry-apart wedge to flex the floor and release the hose. Also available via Amazon and at Harbor Freight (costs more and you get less!).
 

Nick J

Contributing Partner
Moderator
Blogs Author
My 25+ didn't have the TAFG, so there was just the hull and the pan and there was just enough room between the two where I could install a 1-1/8" bilge hose. It actually didn't come with a bilge pump when I bought it, so where was no hose to trap. The 35-3 has conduits passing between sections of the TAFG, so there wasn't any hoses pinched between two laminates. It looks like your hose is already crushed so you might be able to pull from both sides and break it free (mine crumbled when I pulled a section out).
 

KS Dave

Dastardly Villain
Blogs Author
Air power: Deflate a small bumper, push it in the gap next to the pinched hose, and then carefully inflate it to flex the floor and release the hose.
Good thoughts, actually. I wonder if one of those inflatable wedges would do the job. I would use one of those for other things and it would fit better in this VERY small space. 300lbs of pressure should be enough to flex the floor to wiggle the hose out.

It looks like your hose is already crushed so you might be able to pull from both sides and break it free (mine crumbled when I pulled a section out).
Also a possibility - it's definitely brittle. The trick is getting the right tool in there that is both flexible enough to maneuver through the 4" hole I drilled and in the 1 1/2" high space in between and is strong enough to exert force on the hose to pull it out.

Well, didn't mean to hijack your thread. Thanks for the tips!
 

Nick J

Contributing Partner
Moderator
Blogs Author
With the boat back on the water and the strut project wrapped up, it's time to continue the bilge and potable water hose replacement.

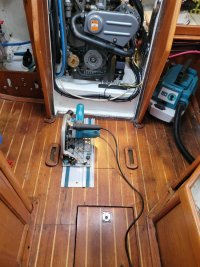
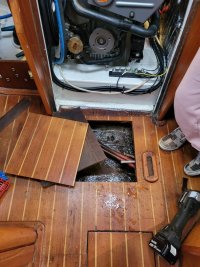
I've been putting this part of project off because it involves cutting a large access hatch in the cabin sole. The sole needs to be replaced in the near future for all the typical reasons, but it's not something I want to take on after the last few months. This provided a little more comfort than cutting into a brand new sole, but not enough to make it easy.

20230107_132837.jpg
20230107_134217.jpg

If you don't already own a track saw, I highly recommend getting one. They are so useful and have made projects like this a little less stressful. The finished edge they leave saves countless hours on the back end cleaning up rough and uneven cuts. I finished the corners off with an oscillating saw using the track saw edge as a guide.

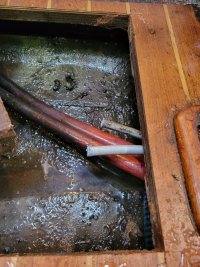
I found out the cavity wasn't as bad as I originally thought, but it was still pretty filthy. There was 40 years of oil and gunk trapped in there.

20230107_134222.jpg

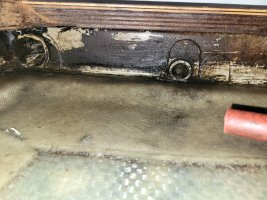
Here's a good shot of the other end of the elusive conduit and stuffing box drain. I have a lot of work left in cleaning those out before I can install the new hoses.

20230107_142344.jpg

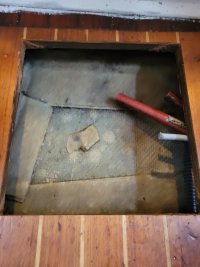
And the current state of the cavity after quickly blowing through a roll of paper towels, half a bottle of simple green, and three scrub brushes.

20230107_142336.jpg

I got a definitive answer on my two sole question. This is pretty solid evidence that a previous owner just overlaid 1/4 teak and holly ply instead of a full replacement.

20230107_134230.jpg


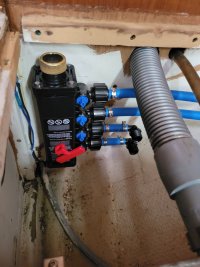
I also installed another manifold forward of the starboard water tank to switch between tanks and individualy control the pressure supply line and non pressurized foot pump. Hopefuly this will stop the pressure pump from pulling a vacuum on the foot pump diaphragm and dripping water every time the pump cycles.

20230107_125725.jpg

I originally planned to replace all the old qest house with pex, but I realized I built myself into a corner when I replaced the head plumbing last year. There isn't enough room behind the new plumbing to replace the line. Instead, I'm going to connect the pex to the qest tube in the new cavity. Does anyone have a good method to connect qest with pex?
 

Loren Beach

O34 - Portland, OR
Senior Moderator
Blogs Author
Precise cutting work! :)
Here is a link that shows the wide aft sole section that I divided and added an access panel to, many years ago, I copied the method that EY had used for the existing bilge access lift out sole panels, with teak finger rings. This involved cutting back all sides and epoxying in solid teak pieces on all edges. Like all projects it grew in complexity as I got into it! The result tho was that it does look "just like factory".
Note the photo that shows the wide sole area located just in front of the companionway steps.
 
Last edited:

Nick J

Contributing Partner
Moderator
Blogs Author
The next pressing decision is what to replaced the original red bilge pump hoses with and should I replace my bilge pumps?

They look like double wall reinforced heater hose to me. I would like to replace with 1 1/8" Shields 141 hose, but the conduit passthroughs in the TAFG aren't large enough to accommodate. I test fit 2 x 5/8" heater hoses and 2 1/2" Pex hoses and found out that's the absolute max that will fit. I'm thinking my options are:

Replace like for like for around $1.50 per foot
Use reinforced water line like Trident 162 at $1.32 per foot.
or ???

I'm currently using centrifugal pumps in the bilge with reducer fittings to step down from the 1 1/8 outlet to the factory 5/8" bilge hose. I'm thinking of replacing these pumps with flexible vein pumps mounted in one of the port side lockers. I know they have less capacity than the pumps I have now and are susceptible to impeller failure if run dry, but it may be worth it to avoid air locked centrifugal pumps and the added benefit of being able to move the intake when cleaning out the bilge. If I added impeller replacement to my annual maintenance, this may be a good way to go. What do others think?
 

Loren Beach

O34 - Portland, OR
Senior Moderator
Blogs Author
I'm currently using centrifugal pumps in the bilge with reducer fittings to step down from the 1 1/8 outlet to the factory 5/8" bilge hose. I'm thinking of replacing these pumps with flexible vein pumps mounted in one of the port side lockers. I know they have less capacity than the pumps I have now and are susceptible to impeller failure if run dry, but it may be worth it to avoid air locked centrifugal pumps and the added benefit of being able to move the intake when cleaning out the bilge. If I added impeller replacement to my annual maintenance, this may be a good way to go. What do others think?
My opinion, boringly restated again, is to upgrade to the late-80's EY system of check-valve pumps. More expensive, but a positive displacement pump is way better than the overstated capacity of a centrifugal pump, IMHO.
No more concerns about syphoning back, either.
We have two of the Jabsco 37202 series in our boat, originally installed by EY.

Keep that water out!
:)
 
Last edited:

Nick J

Contributing Partner
Moderator
Blogs Author
Although keeping all the water out is the ultimate goal, If I ever actually achieved it, I wouldn't know what to do with myself. Isn't that part of the "fun" of owning a boat? What else would I do at 3am?

Aside from cost, I'm thinking rotary vein pumps would be smaller and less susceptible to debris damage (either by something getting in one of the valves or the strainer getting clogged). Is there any reason not to go with a rotary vein pump?

I did kind of shoot myself in the foot by repurposing the original bilge pump mounting area with water manifolds
 

Christian Williams

E381 - Los Angeles
Senior Moderator
Blogs Author
I have the same diaphragm pump Loren does. No problem with debris (two strainers in the line), and still about $250 or so. One filter is handy, installed in the bilge pickup line in plain sight, and I clean it out every few months...as I did this morning after our heavy rains (I had to look up "rain," which I had forgotten about).

I also had to look up vane bilge pumps (thanks), which have an impeller like an Oberdorfer sea water pump. I saw a note " Finally, while rotary, positive-displacement pumps are capable of pumping water, their primary application is for oils and viscous liquids because of the need to keep rubbing surfaces lubricated and the difficulty in sealing very thin fluids. For most applications where water is the media, the centrifugal, or dynamic-displacement, pump has been the clearer choice."

If you install one, let us know how it comes out.
 

Nick J

Contributing Partner
Moderator
Blogs Author
I think I found a suitable replacement for the bilge hose. Shields 146 is a smooth wall hose capable of pulling a full vacuum (much more than a bilge pump needs), can be bent around a tight radius without kinking, and it's available in 5/8“. I originally thought it was just a different color of the Shields 141, but after seeing it in a store I realized it's very different. The helical reinforcement is flat which reduces the OD for the same ID. Unfortunately the local shop didn't have it in a long enough section so I had to order it form another shop.


Nick J

Contributing Partner
Moderator
Blogs Author

goldenstate

Sustaining Member
Blogs Author
@trickdhat

Have you found any of your bilge hoses zip-tied to the underside of your TAFG?

I tried replacing Qest tubing in a couple of semi-accessible sections last spring and it was a real pain.

I have written off trying to replace actual bilge pump hoses due to the zip tie problem.
 
Top