Replacing rubber seals on main (large) windows/ports [Master Thread]

Kif

Member I
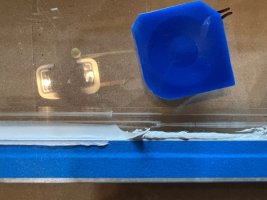
Worth noting is the rubber seal has a mind of it's own when it comes to the radius. I placed a heavy object on top of the seal in place to help get it to take the shape (attached photo). A little bit of heat from the heat gun also helps relax the rubber.
Hope this will be of help to others!

Curious if you have any tips for corners and the seam with the rubber seal. I just got my first window set in and the rubber seal was popping out at the corners (particularly the acute corner) and also wanted to get squeezed into the gap as I brought the two halves together creating wrinkles. Got it done, but a bit of a mess and some puckers I'm not happy with. Might leave em, but might pull apart and try again. I see you used a weight to hold it in shape for a bit (with heat gun). You happy with that approach for the corners?
 

frick

Sustaining Member
I has used aluminum foil, rolled into a ball to rub off corrosion on my mast. It is softer then the mast so it does not mar the finish, but help clean it up.
 

hvantrigt

Junior Member
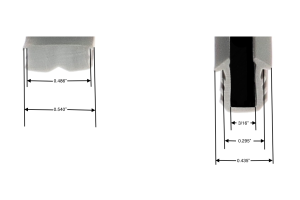
From some earlier posts on our site, the original manufacturer of the glass weather strip and the channel weatherstrip was Wefco Rubber, which is still in business. I called them and they do still have the channel one, but not the same one for the window. They were still the same price as below, and I believe a 25 foot minimum.

Window channel - Die Number 2154 - 2.00 per foot
Window Filler - Die Number 1256 - 2.00 per foot
Rub Rail - Die Numer 4107 - 2.75 per foot

Their address is wefcorubber.com

As an alternative (again from previous posts here) many have used the Catalina 25 kit:


I've decided to go that route. I'd hate to order 25 feet of the widow filler if it wasn't going to fit and the price was about the same (and you get more product)

Don

Still working on our "Never Ending Project" of refurbishing our E-32 Mk II ("CaryOn").
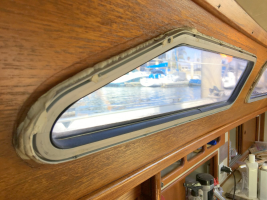
We're currently replacing all of the rubber seals on ALL of the ports.

The smaller ones went fairly easy (not really) but the larger ports/windows are a REAL problem on the small hard radius corners. The rubber seal just won't allow the aluminum frames to go back. Beyond the obvious of coating the rubber with soapy water, using clamps and a rubber mallet - is there anyone out there who has replaced their window/port seals and if so - what did you do to resolve the tight fit issues???

View attachment 17308...View attachment 17476

I'm slowly making progress with the large ports. The old glass is slightly thicker than the new glass used in the smaller ports and the new rubber seal is a tiny bit thicker. This is why I've invented a whole lot more four letter sailing terms. ;-))

View attachment 17478
View attachment 17535

The biggest problem is clamping the two frames together tightly to get the screws and backing plates back in place due to the overly tight fit. I made up a jig that allows the clamps to still hold on the angled design of the ports (photos now attached). It's still difficult but at least do-able now. Of course the forward port is slightly smaller than the aft so two top frames had to be created. (Be sure to leave enough room to access the screws for the locking plates.)

Worth noting is the rubber seal has a mind of it's own when it comes to the radius. I placed a heavy object on top of the seal in place to help get it to take the shape (attached photo). A little bit of heat from the heat gun also helps relax the rubber.
Hope this will be of help to others!

12-09-15 Just a couple more photos to better show how I managed to get the larger port windows back together....FINALLY, the last large window/port is complete!

View attachment 17536

The two new photos show the last port sitting in the template/jig I made to allow better clamping pressures on the tapered ends to get the two halves back together. Note the extra long clamp in the photo. I had to use that horizontally on the two ends to align them up as it went together. Seems they didn't want to meet up perfectly and this brought them back in line and avoided pinching the rubber seal and/or damaging it.

The last photo shows a detail of the area I left between the two wood jigs to allow putting the frame screws back in before releasing the clamps.
...Hope all of this can be of help to any of you taking on this project. (It IS a tough one to say the least!!)

Do you remember where you bought the rubber seal that goes around the glass
 

shard7

1974 E27 'Bluey'
Hey folks, I'm in the midst of doing the windows on my E27. Everything is taken apart, glass is still in great shape, and I'm slowly cleaning up the frames. Other than some 4200 that a PO had attempted to squirt behind on of them, there was nothing but very old (and crusty) foam weatherstripping between the frames and the boat (I'm amazed that they didn't leak more than they did). On the plus side it's easy to remove and clean up.

I was hesitant to order the kit from Catalina Direct because I was unsure if the seals were the correct size for my specific frames (they don't offer refunds for non-Catalina owners!). But I contacted their tech support, and they kindly updated their product page with detailed rubber seal dimensions, so now we can confirm if they'll fit our windows and order with confidence! :)

Catalina Aluminum Window Reseal Kit C25 C27

1728950356577.png
 

kapnkd

kapnkd
Do you remember where you bought the rubber seal that goes around the glass
Apologies for the response but I’ve been away from the site for a while now. (Life and other things like our first - finally - granddaughter do get in the way!)

At any rate, there IS a company located close to Cleveland, Ohio that specializes in a multitude of rubber extrusions that has what you need.

Best part, it’s at better than the Catalina kit offerings prices. Look at my previous posts on EYO as I’ve listed their contact information. Meanwhile, I’ll see if I can find it again as well for you.

I’ll also, again, recommend Capt Tolly’s crack sealer which is but a very very thin water based silicone caulk sealant that creeps into tiny crevices via osmosis and actually works well on window/port sealing issues. (Ports on CaryOn have remained dry for several years now!)
 

kapnkd

kapnkd
Hey folks, I'm in the midst of doing the windows on my E27. Everything is taken apart, glass is still in great shape, and I'm slowly cleaning up the frames. Other than some 4200 that a PO had attempted to squirt behind on of them, there was nothing but very old (and crusty) foam weatherstripping between the frames and the boat (I'm amazed that they didn't leak more than they did). On the plus side it's easy to remove and clean up.

I was hesitant to order the kit from Catalina Direct because I was unsure if the seals were the correct size for my specific frames (they don't offer refunds for non-Catalina owners!). But I contacted their tech support, and they kindly updated their product page with detailed rubber seal dimensions, so now we can confirm if they'll fit our windows and order with confidence! :)

Catalina Aluminum Window Reseal Kit C25 C27

View attachment 51212
Found it!!…My original post with the address for window/port seals:


LK Technology, Inc.
5116 Warrensville Ctr Rd
Cleveland, Ohio 44137

(888.663.9830)

GOOD LUCK!!
 

Stefouellet

Member I
We found this too, though the actual cut-outs weren't as bad as some people have shown and there was a tight contact between FG outer shell and plywood inner fascia.
View attachment 47415 . . View attachment 47416

However, like yours, in some spots there was precious little overlap between the portlight frame and the cabin sides.
View attachment 47417

Before reinstalling, I was inside adjusting the port for even placement in the hole. Then from the outside Donna drew a pencil line around the frame. We used this to lay out the tape which, in addition to aiding cleanup, allowed us to align the port. It was still tricky because of the caulk squeeze-out over the tape. By the fourth portlight we about got it right.
View attachment 47418
Good day,

I am also about to tackle portlights re-bedding and I thought about the tape on the outside to assist with alignment and clean up. When you put the portlight back in place, do you need to apply any pressure on the portlight to get it to bond in place? As well, do you need to apply caulking from the inside? Finally, how much caulking should you use on the outside? One bead or maybe two beads?

Thank you,

Stéphane Ouellet
 

Loren Beach

O34 - Portland, OR
Senior Moderator
Blogs Author
Finally, how much caulking should you use on the outside? One bead or maybe two beads?
One observation after helping install all of the ports and deck gear after our re-paint: Mask off thoroughly, and then be liberal (!) with the sealant. It's a lot easier to clean up excess squeeze-out when doing this the first time, than if you apply too little and miss places under the parts that need to be laboriously worked on later. While the sealant may seem a bit expensive, it is prep time/labor that really costs the most. Referring to the pix in my blog, I really "wasted" considerable sealant from the re-install of all the ports and deck hardware. I was using a sealant that cleans up quickly and cleanly with "paint thinner" which is not too toxic to your skin and does not harm paint or gel coat. I did go thru a lot of vinyl gloves and paper towels, also.
We launched in 2021, and as of now have zero leaks or seeps, anywhere.
 

Christian Williams

E381 - Los Angeles
Senior Moderator
Blogs Author
Stephane,

I would say no special pressure needed, as the unit will fit nicely into the hole in the cabin house without clamping.

No caulk on the inside is needed, as caulk will fill caps. This is what the factory caulk job looked like from the inside:

portlight caulk .png
 

Stefouellet

Member I
One observation after helping install all of the ports and deck gear after our re-paint: Mask off thoroughly, and then be liberal (!) with the sealant. It's a lot easier to clean up excess squeeze-out when doing this the first time, than if you apply too little and miss places under the parts that need to be laboriously worked on later. While the sealant may seem a bit expensive, it is prep time/labor that really costs the most. Referring to the pix in my blog, I really "wasted" considerable sealant from the re-install of all the ports and deck hardware. I was using a sealant that cleans up quickly and cleanly with "paint thinner" which is not too toxic to your skin and does not harm paint or gel coat. I did go thru a lot of vinyl gloves and paper towels, also.
We launched in 2021, and as of now have zero leaks or seeps, anywhere.
Thank you Loren!
 

Stefouellet

Member I
Stephane,

I would say no special pressure needed, as the unit will fit nicely into the hole in the cabin house without clamping.

No caulk on the inside is needed, as caulk will fill caps. This is what the factory caulk job looked like from the inside:

View attachment 53562
Thank you Mr. Williams. What is your post number that I should look at for Portlights re-bedding? I remember seing it but I could not find it again. I did note your post about sealant versus butyl and I will use sealant.
 

Prairie Schooner

Jeff & Donna, E35-3 purchased 7/21
Good day,

I am also about to tackle portlights re-bedding and I thought about the tape on the outside to assist with alignment and clean up. When you put the portlight back in place, do you need to apply any pressure on the portlight to get it to bond in place? As well, do you need to apply caulking from the inside? Finally, how much caulking should you use on the outside? One bead or maybe two beads?

Thank you,

Stéphane Ouellet
Hi Stéphane,

Good advice from Loren and Christian. No, it didn't take any more pressure than that provided by snugging up the frame screws. Don't over tighten those as it will warp the frame.

I don't recall that extra caulk from inside was necessary. Though in some places the hole in the cabin side was too big and there was very little landing for the outer frames to rest against. In those areas I might have smooshed a little extra sealant into the corner. The advantage of the pre-placed tape for fitting is that you know where those spots are going to be.

There's a learning curve and after a couple you'll have a good feel for the nuances.

On our fixed portlights I used sealant. For the opening portlights I used butyl tape, but only because they are very old and I expect they will need replacement in X number of years. I didn't want it to be too hard. That said, we're on the second year and no leaks from either set so far. Touch wood. Whatever sealant you get, it's a good idea to be sure it is UV resistant.

Cheers,
Jeff
 

JSM

Sustaining Member
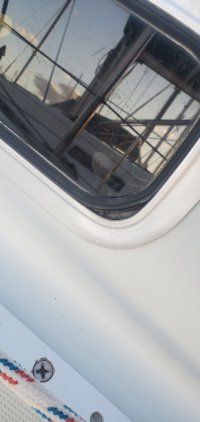
The outside gaskets on the fixed trapezoidal ports on our 34-2 are shrinking and coming out of the frames. After reading thru all of the posts up thread I'm a bit confused on what these gaskets are called and exactly where new ones can be sourced.
The affected gaskets are rock hard and I am wondering if it is possible to install the new gaskets with the ports in place or if I will have to pull the ports to do it.
Thanks
 

Attachments

  • 20250825_191345.jpg
    20250825_191345.jpg
    57.4 KB · Views: 14

Prairie Schooner

Jeff & Donna, E35-3 purchased 7/21
The outside gaskets on the fixed trapezoidal ports on our 34-2 are shrinking and coming out of the frames. After reading thru all of the posts up thread I'm a bit confused on what these gaskets are called and exactly where new ones can be sourced.
The affected gaskets are rock hard and I am wondering if it is possible to install the new gaskets with the ports in place or if I will have to pull the ports to do it.
Thanks
John, are those leaking? The way the gaskets are trapped in place it seems like they'd need to have torn to shrink that far away. The only way I can see to replace the gaskets is to remove the portlights and take the upper and lower halves of the frame apart. Leaving the portlights in place, you could use a utility knife to trim the outside portion away, with the inside half of the gasket remaining, then use a good caulk on the outside only, similar to my post #53 here.
fixd prtlt dow 315 outer.jpg
It wouldn't be as good as a full rebuild, but should buy you some more years.
 

peaman

Contributing Partner
The outside gaskets on the fixed trapezoidal ports on our 34-2 are shrinking and coming out of the frames
I have a very similar issue on my 1987 32-3. I was unsuccessful in my search for a replacement gasket. Instead, I filled the gaps with black caulk. I think I used silicone, but it may have been polysulfide. I have had no issues in the two years since. Like Jeff said, it should buy you some more years.
 

bigd14

Sustaining Partner
Blogs Author
I would suggest Dow 795 for this application. I used that to replace the entire gasket. No leaks in 9 years. Did I just jinx myself?
 

JSM

Sustaining Member
John, are those leaking? The way the gaskets are trapped in place it seems like they'd need to have torn to shrink that far away. The only way I can see to replace the gaskets is to remove the portlights and take the upper and lower halves of the frame apart. Leaving the portlights in place, you could use a utility knife to trim the outside portion away, with the inside half of the gasket remaining, then use a good caulk on the outside only, similar to my post #53 here.
Thanks Jeff, the gaskets have been shrunken for more than a few years now but I never knew they were leaking until I was trapped below during a massive downpour and watched water dribbling down from a corner of the port onto a settee cushion ( no staining on the wood).
I was initially under the impression that were two gaskets, one internal and one external. Will run the hose on it today and try and determine if its leaking from the frame or the seal. If its not the frame I may opt to leave well enough alone and remove the outer portion of the seal and caulk the gap.
I would suggest Dow 795 for this application.
Great stuff ! used it nine years ago when I reglazed my hatches. Zero problems.
 

JSM

Sustaining Member
I was initially under the impression that were two gaskets, one internal and one external.
Did some further investigating this afternoon and discovered that my initial assumption was correct. There are two gaskets one internal and one external. A bit of tugging revealed that the gaskets are independent of each other and will easily come out. The frame of the window only has one seam located at the top. The two halves of the frame appear to separate front from back instead of top to bottom.
Has anyone else had these type frames and been able to source the gaskets ?
 

bigd14

Sustaining Partner
Blogs Author
I have the frames that separate into a top and bottom piece which seems to be the standard arrangement for most Ericsons. Do you have pics? Or do you mean the interior trim ring? That is what holds the window in place. The inside gasket on mine is just cosmetic. I went through two sets of the external gaskets that didn’t quite fit. I thought that the thickness of the glass was standard for the Ericson lineup, so I ordered what someone else had found worked for them. The tempered glass in my windows was too thick for this first gasket profile, and the second gasket profile fit the glass but was slightly too small for the frame. Very frustrating. Ultimately I just cleaned up the frames (took forever due to silicone contamination) and bedded the glass in Dow 795. This has held up well, but will be nearly impossible to fix if the bond fails. Measure the thickness of the glass and the channel carefully and hopefully you can find a gasket profile that works.
 
Last edited:
Top