• Untitled Document

    The 2024-2025 Fund Raising Season has Opened!

    EricsonYachts.org has opened the season for raising funds to support the expenses of the site. If you would like to participate, please see the link below for additional information.

    Thanks so much for your continued support of EricsonYachts.org!

    2024-2025 Fund Raising Info

35-3 New Strut [Master Thread]

Nick J

Contributing Partner
Moderator
Blogs Author
I just spoke with Pete from Port Townsend foundry and the strut is ready to be picked up. He confirmed that struts are made from Manganese Bronze (I was incorrect above listing it as Manganese Aluminum Bronze) for the reason listed above. The alloy is apx 25% zinc, so it's important to install a zinc anode to avoid dezincification.

My wife was pretty jealous of my trip to Port Townsend last week, so I asked Pete if a weekend pickup was possible and it sounds like we're going to make it work. It doesn't get much better than PT Foundry.
 

Kenneth K

1985 32-3, Puget Sound
Blogs Author
The alloy is apx 25% zinc, so it's important to install a zinc anode to avoid dezincificaton.
That seems to be the conventional wisdom (I did it, too). What no one (before adding a zinc anode) seems to be able to answer is,

"What is the dissimilar metal that the strut sacrifices itself too?"

The rubber cutlass bearing isolates the strut from the shaft, so it's not the shaft, prop, or engine. Even if the strut is installed with SS fasteners (up inside the hull) the SS bolts are isolated from the saltwater "electrolyte" that is necessary for galvanic corrosion. Everything else the strut is in contact with is fiberglass or epoxy. So what is it?

Maybe Pete could shed some light on that....
 

Nick J

Contributing Partner
Moderator
Blogs Author
We took another trip over to Port Townsend yesterday to pick up the strut. It was a lot of fun seeing my wife and kids experience the foundry as well. I asked Pete about the strut not being bonded to any other metal and he said it was a lot more complicated than that. He recommended leaving the zinc off for the first haul out and inspect next time to see the rate of dezincification. He reminded me that the first one lasted almost 40 years like that. I did some googling after getting back and it does seem like there is much more going on than galvanic corrosion. here's a some snippets of text with somewhat of a summary of the potential mechanisms acting on the zinc:


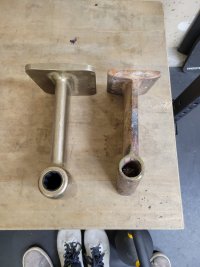
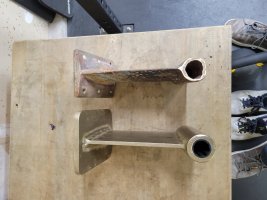
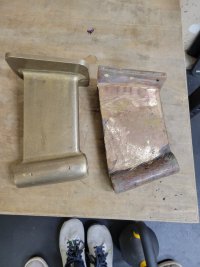
The new strut looks very stout. it's 2 lbs heavier than the original. Most of the weight comes from the additional thickness around the bearing and the larger strut. The web is also slightly thicker. This really isn't by design, it just happened to be from the plug that was closest to the original. Placing the new strut next to the old is a little unnerving because of the difference in angles. There's quite a bit of bedding compound below the flange pocket in the hull, so there's a lot of room to accommodate the difference and the original reason for going with this one was it better aligned with the angle of the hull.


20221022_201529.jpg20221022_201511.jpg20221022_201501.jpg

The final invoice was for $1,200 + Tax and it was done in 12 days from selecting the plug to receiving the call that it was ready. I can't overstate how fantastic Port Townsend foundry is to work with so far. I'm not generally a fan of the look of bronze, but this experience has me looking around the boat to find more work I can do with PTF. They even had a strut from another Ericson sitting on the table (Pete thought it was from a 31, but couldn't remember). Another interesting project was the body of a Whale Gusher hand pump a customer had asked Pete to replicate in bronze siting his frustration with the aluminum body constantly corroding beyond being able to seal the
 

Christian Williams

E381 - Los Angeles
Senior Moderator
Blogs Author
Maybe it's the lighting, but the strut looks very different color than classic tin bronze.

And--do I see welding (brazing)? But it was cast.....
 

Nick J

Contributing Partner
Moderator
Blogs Author
It does look a little darker and the area around the flange looks a little off in that light. I'm 100% positive it's all cast. When I picked it up it was sitting next to the plug it came from. To cast separate pieces and braze it together would be far more work than casting it as a single piece.

From what I've read and what Pete said, props and struts are made from manganese bronze which is different than tin bronze. In fact it's technically brass because it has around 25% zinc. I'm not sure if the difference noticeably affects the color of the material and I certainly don't have enough experience to tell.
 

Prairie Schooner

Jeff & Donna, E35-3 purchased 7/21
It's always surprised me how much detail a sand casting can pick up. I can see the weld like texture in the fillet on the wood pattern you showed earlier. It really does look like welding in the final piece.
If you're curious about the color, you could sand both with the same grits down to bare metal. I'm betting you'd notice a difference, even if subtle.
I'm enjoying your field notes.
 

Christian Williams

E381 - Los Angeles
Senior Moderator
Blogs Author
Yes, great thread.

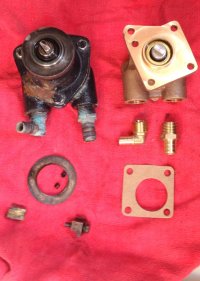
Regarding color comparision, here's a typical (tin) bronze look--a new Oberdorfer fresh from the box. Below it are brass fittings ( copper and more than 25 percent zinc) and not for use in salt water. Some basic copper, brass, bonze definitions here.

Although the new cast strut alloy has its own coloration, apparently all brass, copper, bronze are considered in the category "red metals."

two water pumps.jpg
 

bigd14

Contributing Partner
Blogs Author
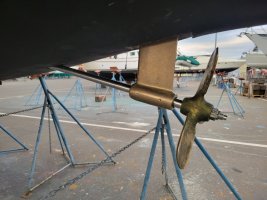
Adding a data point to the “color of bronze” discussion. This is a photo my manganese bronze strut from Marine Hardware in Washington when it was brand new. I recall being surprised by how yellow-gold it appeared.

1666625367544.jpeg
 

Nick J

Contributing Partner
Moderator
Blogs Author
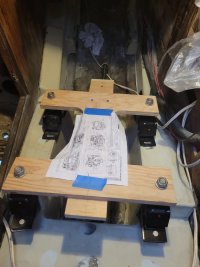
I stopped by the boat today and it looks like they are making progress. They have it roughed in with the original shaft (just back from the prop shop with a new coupling), prop, and engine template. I was there after they closed up shop for the day, so I wasn't able to ask what the final install plan was. Hopefully I'll be able to touch base with them tomorrow. For now, here are some pics:
 

Attachments

  • 20221027_173211.jpg
    20221027_173211.jpg
    115.2 KB · Views: 23
  • 20221027_173022.jpg
    20221027_173022.jpg
    196.3 KB · Views: 21
  • 20221027_173243.jpg
    20221027_173243.jpg
    131.1 KB · Views: 19
  • 20221027_173247.jpg
    20221027_173247.jpg
    155.1 KB · Views: 22

Christian Williams

E381 - Los Angeles
Senior Moderator
Blogs Author
I'm curious how they can get the angle right without the engine in place. Is there a simple explanation? Is that a template plan specifically for that, maybe?
 

Loren Beach

O34 - Portland, OR
Senior Moderator
Blogs Author
Cool. The motor mount mockup looks a lot like the one that our Betamarine dealer loaned to me so we could fit the new bed log risers. :)
 

Nick J

Contributing Partner
Moderator
Blogs Author
The original plan was to have the motor in before mounting the strut, but that required the engine beds to be completed and painted, the plywood to be painted, the engine and transmission work done, and the insulation to be installed. All in that order. The yard got behind and wasnt able to start on the engine bed until this week so that set everything back. To avoid a larger delay, I offered to make a template and they agreed. The template should be a lot easier to manipulate. When they're done, I can remove it and finish the engine compartment cleanup work. Thankfully they agreed to pay for some lay days to make up for their scheduling mistake.

I also had one of the thru hulls break when I pulled a hose off. Having the engine out isn't necessary to replace the thruhulls, but it's a lot easier.

In theory, the template should function exactly like the engine for the function of aligning the strut, at least within adjustment range of the mounts. I lost count of how many times I checked my measurements against the drawing and the actual engine. This is going to be the main topic of discussion next time I touch base with them.
 

bigd14

Contributing Partner
Blogs Author
I'm curious how they can get the angle right without the engine in place. Is there a simple explanation?
Theoretically the shaft log and engine beds should be installed at the same angle from the factory. The shaft log centerline plane will necessarily be above the engine bed plane to align with the transmission output. So if you can center the prop shaft in the shaft log using shims or some kind of spacer (I used two polyethylene spacers with the correct ID and OD from McMaster-Carr) it should align at the proper angle and height where the transmission output will be. Any slight differences can be corrected using the engine mount adjustments.

I did have to account for the weight of the aft end of the prop shaft and the strut causing the prop shaft to droop and throwing the alignment off a little (the shims were very slightly undersized). So I had to devise a jig to hold it in place. Details in this blog and its subsequent edition:

https://ericsonyachts.org/ie/ubs/1984-e30-strut-replacement-part-3.497/


Nick J

Contributing Partner
Moderator
Blogs Author
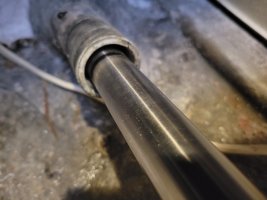
We ran into a snag yesterday. I received an email from the yard saying they had mocked everything up and found the cutlass bearing was "extremely tight". When they looked into why, they found 2 cutlass bearings pressed into the new strut so they pressed them out. They replace the two bearings with a single 4" one because they said 1" x 1 1/4" bearings don't come in 6" length.

I'm a bit frustrated and confused. Port Townsend Foundry said the same thing about the bearing length, but they said it's a common problem and they install two bearings cut to length to accommodate. I also stopped by the yard on Thursday and noticed it was stiffer than I expected, but I assumed it was from the résistance of the shaft spinning in the coupling (it's bolted to the template which holds the coupling stationary). A quick search on Fishery Supply's site shows a 6" bearing is available:


Even if a 6" bearing isn't available, I don't see how using two bearings pressed into a machined strut would create an "extremely tight" fit. I'm also disappointed the yard didn't notify me of this issue until Friday night after pressing the brand new bearings out of the new strut and installing another new one. I asked them to stop work until calling me on Monday so we can discuss the issue. I'm wondering if they mocked it up, then felt the stiffness instead of bench testing the fit. The stiffness could be from an alignment issue or simply the coupling. If it's an alignment issue, I have concerns on how they're planning to install the strut.

Has anyone run into the issue of needing 2 4" bearings on their 35-3 or similar models? If so, was it a tighter fit than you expected with a single bearing?
 

Nick J

Contributing Partner
Moderator
Blogs Author
Theoretically the shaft log and engine beds should be installed at the same angle from the factory. The shaft log centerline plane will necessarily be above the engine bed plane to align with the transmission output. So if you can center the prop shaft in the shaft log using shims or some kind of spacer (I used two polyethylene spacers with the correct ID and OD from McMaster-Carr) it should align at the proper angle and height where the transmission output will be. Any slight differences can be corrected using the engine mount adjustments.

I did have to account for the weight of the aft end of the prop shaft and the strut causing the prop shaft to droop and throwing the alignment off a little (the shims were very slightly undersized). So I had to devise a jig to hold it in place. Details in this blog and its subsequent edition:

https://ericsonyachts.org/ie/ubs/1984-e30-strut-replacement-part-3.497/

I totally agree with this thinking. Especially when remounting the engine and installing a new strut, the shaft log is the only thing left. The location of the output flange on the engine is still important for the location of the strut along the centerline when reusing the original shaft or already having one cut to length.

How much deflection did you see before supporting the end of the shaft?
 

Pete the Cat

Sustaining Member
Adding a data point to the “color of bronze” discussion. This is a photo my manganese bronze strut from Marine Hardware in Washington when it was brand new. I recall being surprised by how yellow-gold it appeared.

View attachment 44809
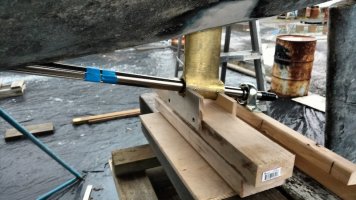
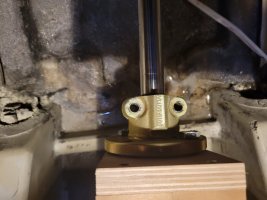
This is a great picture of how a first class boat yard sets up a new strut in the hull for proper alignment. The shaft is aligned in the center of the down tube. Nice to see first class yard work. Seems harder to find folks who know what they are doing these days.
 

Kenneth K

1985 32-3, Puget Sound
Blogs Author
This is a great picture of how a first class boat yard sets up a new strut in the hull for proper alignment.
I don't think that was a first class boatyard's work. I think that was bigd himself, which supports the earlier mentioned idea that sometimes, a thoughtful owner can do as good or better than the "professionals."
 

bigd14

Contributing Partner
Blogs Author
How much deflection did you see before supporting the end of the shaft?
I don't recall exactly but I remember being surprised that it was quite a bit more than I expected.

I think that was bigd himself, which supports the earlier mentioned idea that sometimes, a thoughtful owner can do as good or better than the "professionals."
Thanks Ken and Ray, it was indeed my own work, but it was backed up by the good people of this site (and a few others) who have gone before me and shared their experiences. Without that knowledge, I would never have the confidence to undertake such a project. Successful outcomes also inspire confidence, which makes the next job easier to take on. My wife often jokes that I have received the equivalent of a college degree in boat building from all these projects, along with equivalent costs!
 
Top