• Untitled Document

    Join us on March 29rd, 7pm EST

    for the CBEC Virtual Meeting

    All EYO members and followers are welcome to join the fun and get to know the guest speaker!

    See the link below for login credentials and join us!

    March Meeting Info

    (dismiss this notice by hitting 'X', upper right)

35-3 Port Chainplate Pics? [Disassembly issue]

Butch Bogan

Member I
Have you removed the bolts for the chainplate going through the bulkhead? Thats quite a bit of rust, I wouldn't be surprised if you have a bit of crevice corrosion going on.

As a side bit of information, I recommend to all of my customers, with boats 30 years old or older, to remove and inspect all chainplates. I've seen way too many that need to be replaced, even after just 10 years, if they're in a high corrosive environment.
 

Nick J

Sustaining Member
Moderator
Blogs Author
Butch,

I haven't removed the bolts yet. I guess I could do one at a time, but that wouldn't allow me to inpspect the chainplate on the aft side of the bulkhead or the backing plate. I need to loosen the tie down rod before I can remove the chainplate and that's where I'm stuck.
 

Butch Bogan

Member I
If there is a clevis pin through the toggle you may be able to remove that first. Don't be too concerned about taking all the load off the shroud turnbuckle on deck, with a halyard led to that side and everything else in place, that keel stepped mast won't go anywhere. You might want to take some tension off the opposing shroud so the mast load isn't too lopsided.

I saw a recommendation earlier about applying heat. This has almost always worked for me, you may want to get a welding blanket between the bulkhead and the terminal, and have a spray bottle of water handy :) If for some reason you can't get the below deck turnbuckle off I'd really recommend you consult with a professional rigger. I'd be happy to help, but I have a feeling you're not in Portland :)
 

Nick J

Sustaining Member
Moderator
Blogs Author
Yup, Clevis pin removed (I'm not beyond making this mistake, I just didn't do it this time;)). I backed off on both cap and intermediate shrouds prior to starting as well. The welding blanket is a good idea, I'm really concerned about applying heat to this area. I might just have to cross my fingers and give it a try though.

Despite living in the beautiful Puget Sound area, the boat is in Everett which is the black hole of the area as far as sailing is concerned. One of the largest public marinas on the West coast, but no rigging or sail shops near by. I sent out emails to all the riggers within 50 miles. Hopefully I can find someone that I can work with moving forward.
 

Butch Bogan

Member I
Perhaps I need to semi-retire in Everett?

Ian Weedman, who took over Brion Toss's loft in Port Townsend, is a good friend of mine. He might know of someone in your area that can help. Maybe a direct email to him? rigging@briontoss.com I believe his his direct email address.

There are some bad case scenarios that can derive from this, but you're doing the right thing by inspecting. I hope this helped a little.
 

Butch Bogan

Member I
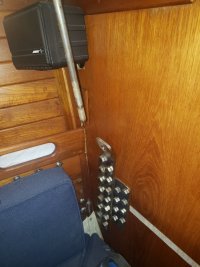
I forgot to ask. If you've removed the clevis pin from the toggle what is preventing you from pulling the chainplate free? From the photo it looks like you're discussing the chainplate with 14 bolts passing through the bulkhead. Is that correct? Seems to me you can remove all the bolts and the chainplate will drop from the toggle. Is there something I can't see?
 

Nick J

Sustaining Member
Moderator
Blogs Author
Thanks for your words of encouragement. Ian was the first to respond to my emails.

There's definitely a sailing hole here that's just waiting to be filled. Even a new Waterfront development being built that will probably have a few storefronts available.
 

Nick J

Sustaining Member
Moderator
Blogs Author
Sorry, I removed the cotter pin from the end of the tie rod, not the clevis pin. Yes, the plate with the 14 bolts is what I’m aiming to remove, but the whole thing is under tension from the tie rod. I’ve thought about just removing the 14 bolts, but I’m concerned the tension will deform the holes in the bulkheads when I’m down to the final bolts. I would also have an issue re assembling everything if I’m not able to turn the tie rod.
 

Loren Beach

O34 - Portland, OR
Senior Moderator
Blogs Author
Hmmmm. There is really zero stretch in that stout rod and turnbuckle assembly. Once the bolts are loose it it should not harm the bulkhead. It's "tight" now, but unless it is pulling down ("deforming") the deck, it should not have any excess tension on it.
Been a while, but I got to watch as a friend's E-33RH had the inside rod tightened slightly -- the rigger had one of us sight up the side deck where there was a very slight upward 'bulge' in the surface at the shroud connection. He turned the rod with the machined-in flats, on the inside, and we let him know when the deck was flat. Actually, if you did not want to lay your head down of the deck, you could place a 4' straightedge on the deck by the shroud fitting.
 
Last edited:

Pacific Spirit Marine

Junior Member
I've had to tackle a fair number of stuck and corroded fasteners and fittings. The best thing I've found for breaking them loose is a "50/50 mix" of Acetone and Automatic Transmission fluid mixed in a spray bottle. The acetone seems to thin out the ATF and allows it to penetrate deep inside the threads. I would also apply heat with a small plumbers torch as I also found the heating allowed the mix to penetrate deep into the turn buckles. Have managed to coax some extremely stuck dissimilar metals apart using this method. That and a little luck.

Someone once told me "if you're forcing it, you're breaking it" and it seems to ring true at times like this.
 

Nick J

Sustaining Member
Moderator
Blogs Author
Success! I used a small butane torch to heat it up and it came off easily. It looks to be in ok shape. Now to get the actual plate off... 20210121_165202.jpg
 

Guy Stevens

Moderator
Moderator
I've had to tackle a fair number of stuck and corroded fasteners and fittings. The best thing I've found for breaking them loose is a "50/50 mix" of Acetone and Automatic Transmission fluid mixed in a spray bottle. The acetone seems to thin out the ATF and allows it to penetrate deep inside the threads. I would also apply heat with a small plumbers torch as I also found the heating allowed the mix to penetrate deep into the turn buckles. Have managed to coax some extremely stuck dissimilar metals apart using this method. That and a little luck.

Someone once told me "if you're forcing it, you're breaking it" and it seems to ring true at times like this.
This is the best penetrating lubricant for dislodging stuck fasteners ever.
HOWEVER it is extremely flammable!
Use it carefully in well ventilated spaces..
Guy
:)
 

Nick J

Sustaining Member
Moderator
Blogs Author
Guy,

can you proved some more detail on what was done and where the parts were sourced? I've been talking with a few riggers over the last few days and a lot of them said they've done jobs on E 35-3s and similar boats, but I haven't talked with someone who's replaced the whole system. So far I don't think I need to replace the rods or chain plates, but I haven't seen everything yet. I'm just trying to gather as much info as possible to see what's available and what I may be getting myself into. I'm sure there's quire a few other people on here who would be interested as well.
 

Nick J

Sustaining Member
Moderator
Blogs Author
Good info on the penetrating lubricant. My biggest concern with applying heat was having the penetrating oil or anything else used on the threads flash. There's a lot of wood and other stuff in that area that really doesn't need to be around an open flame. BP blaster seemed to work well with the heat. As soon as it started bubbling (maybe 60 seconds) I gave it a go and it came off easily. I felt a little better using a small handheld butane torch instead of the larger ones typically used for sweating pipes.
 

Nick J

Sustaining Member
Moderator
Blogs Author
I finally got the chainplates off and inspected by NW Rigging in Anacortes. All is good including the plywood bulkhead! Now I'm just polishing them up and getting ready to reinstall. A few items I wanted to follow up on before I forgot:

- I was wrong about the metric sizing. The lower forward chainplate uses 1/2" x 1 3/4 bolts and the main chainplate uses 5/8" x 2"
- I ended up using an adjustable wrench for the flats in the tie rod. It was just slightly larger than 1/2" if I remember correctly. I guess this makes sense as the flats are machined so there might be some margin for error there. 13mm was the closest fit, but I ended up rounding off a section of the tie rod before I applied heat to the turnbuckle. An adjustable wrench isn't ideal, but it was the best tool I had for this job.
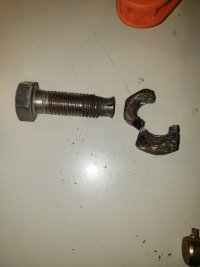
- I had two bolts gall on me. One was while it was half way out so I was able to cut the head off. The other one was much more difficult and I had to split the nut.
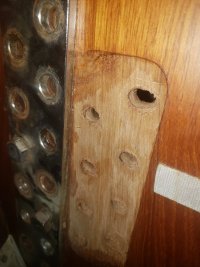
20210127_174858.jpg20210124_141648.jpg
 

Butch Bogan

Member I
Nice job, almost nothing worse than galled stainless fasteners. I'd recommend you paint the holes through the bulkhead wit a couple coats of epoxy and apply some Tea-Gel to the fasteners when you re-install.

The mis-shaped hole at the top right you might want to epoxy in a plug and re-drill if it's more than a couple of millimeters oversized.
 

Christian Williams

E381 - Los Angeles
Senior Moderator
Blogs Author
Butch, what's the cause of that galling when there are no dissimilar metals. Over tightening perhaps?
 

G Kiba

Sustaining Member
Not unusually for stainless to gall on stainless. I deal with large stainless nuts and stainless threaded rod on the pressure vessels at work. Without lubrication, you run a good chance that the threads can weld themselves together. Granted, we are talkin about 1 1/2' diameters. Not as likely with smaller sizes but i can see it happen if you have some about of corrosion.
 
Top