-
Untitled Document Join us on November 22nd, 7pm EDT
for the CBEC Virtual Meeting
Adventures & Follies
All EYO members and followers are welcome to join the fun and get to know the people you've met online!
See the link below for login credentials and join us!
(dismiss this notice by hitting 'X', upper right)
You are using an out of date browser. It may not display this or other websites correctly.
You should upgrade or use an alternative browser.
You should upgrade or use an alternative browser.
E27 Replacement Handrails
- Thread starter ignacio
- Start date
try here
I have never used them and have no affiliation.
I came across them on the web and save the site address
http://www.pyacht.com/hl-handrails.htm
I have never used them and have no affiliation.
I came across them on the web and save the site address
http://www.pyacht.com/hl-handrails.htm
Handrail source.
All, One can also contact H&L Marine directly out here in SoCal at 310.638.8746 2965 E. Harcourt Rancho Dominguez CA 90221. They are an old world company and resistant to the computer age, therefore they do not have a web site to direct you to. That makes it a bit difficult but if you call, they'll happily mail you the relevant pages of their catalog. H&L made some of the wood for our Ericsons such as the hatch boards and I think our handrails. I'm not sure how much else though. Glyn Judson, E31 hull #55, Marina del Rey, CA
All, One can also contact H&L Marine directly out here in SoCal at 310.638.8746 2965 E. Harcourt Rancho Dominguez CA 90221. They are an old world company and resistant to the computer age, therefore they do not have a web site to direct you to. That makes it a bit difficult but if you call, they'll happily mail you the relevant pages of their catalog. H&L made some of the wood for our Ericsons such as the hatch boards and I think our handrails. I'm not sure how much else though. Glyn Judson, E31 hull #55, Marina del Rey, CA
simdim
Member II
Glyn,
I just dropped my broken handrails to our local Woodcraft store (woodcraft.com for store close by - I have absolutely no affiliation with them except I go to drool there from time to time ) and they had made beautiful replicas (drilled and with plugs) for $50 material (teak) and $90 mill work. There is always a Don Casey method that will run you only $50 http://books.google.com/books?id=H_...&resnum=2&ved=0CBcQ6AEwAQ#v=onepage&q&f=false
Cheers,
I just dropped my broken handrails to our local Woodcraft store (woodcraft.com for store close by - I have absolutely no affiliation with them except I go to drool there from time to time
Cheers,
Found mine at the local chandlery. Although the originals were 8 loop I went with a 6 loop, since the shrouds are at hand where the forward two loops used to be and that is where I like to sit on the cabin roof sometimes. I have also seen photos where two 4 loop handrails replace the original. Also H&L makes replacement tillers for the E27 (I think its model 1157). I just installed one!
Last edited:
Handrail choice
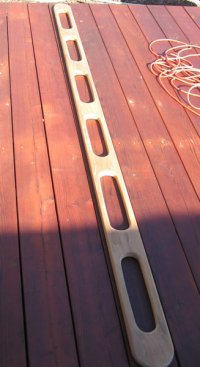
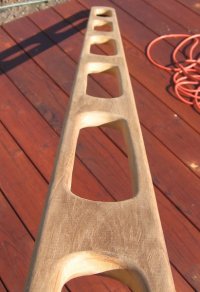
I ended up going the Don Casey route, though it was a little more than $50. He calls for a 1 1/4" thick teak board, which is already almost twice as thick as what was on my E27. My handrails were also about 93" in length with 6 loops. The only pre-manufactured rails that I found online that were that long had more loops than 6, which meant more hole-drilling on the cabin top. Holes and boats don't mix.
And besides, what better excuse to go out and get a new router.
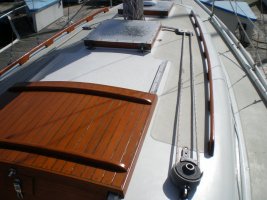
Here's my progress thus far. I used my old rails as a template for the cuts. I'll post more pics as I make progress.
Thanks for the info. on H&L. I do need a new tiller. You think they'll make a sliding hatch for an E27 too? Mine is wasted.
I ended up going the Don Casey route, though it was a little more than $50. He calls for a 1 1/4" thick teak board, which is already almost twice as thick as what was on my E27. My handrails were also about 93" in length with 6 loops. The only pre-manufactured rails that I found online that were that long had more loops than 6, which meant more hole-drilling on the cabin top. Holes and boats don't mix.
And besides, what better excuse to go out and get a new router.

Here's my progress thus far. I used my old rails as a template for the cuts. I'll post more pics as I make progress.
Thanks for the info. on H&L. I do need a new tiller. You think they'll make a sliding hatch for an E27 too? Mine is wasted.
Attachments
Nice work! Now just make sure you cut it right down the middle 
Unfortunately I think you are on your own for the hatch... I managed it with my fairly basic woodworking skills. But I learned along the way that there are much better ways to do it than I did. There should be a bunch of posts on here about hatch building and I documented my trials and tribulations (or what not to do) over at plasticclassicforum.com. Good luck!
Doug
davisr
Member III
Nice job Ignacio. Almost makes me want to forget about the original teak hand rails I sanded down a few months ago. They've been sanded many times and are definitely not a hearty 5/4 inch thickness like the material you used.
On the subject of hatches, I noticed your forward hatch in the picture. Looks like fine work. Do you have any more detailed pictures of it?
On the subject of hatches, I noticed your forward hatch in the picture. Looks like fine work. Do you have any more detailed pictures of it?
Full disclosure
Ahhh yes, the forward hatch. Thanks for the compliment. No detailed pictures, but I got my inspiration from John Keenan over at this thread, which has lots of good discussion on the topic:
http://www.ericsonyachts.org/infoexchange/showthread.php?t=4959
In the spirit of full disclosure, that was my first "complex" wood project. Prior to that, I'd never engaged in any involved wood work, much less wood joinery. I had a great time and learned much, but definitely made mistakes that I need to correct now that the hatch has been sitting in summer sun for about a month. :headb:
But hey, at least it looks semi-decent. Just need to fix the mistakes before it rains.
Nice job Ignacio. Almost makes me want to forget about the original teak hand rails I sanded down a few months ago. They've been sanded many times and are definitely not a hearty 5/4 inch thickness like the material you used.
On the subject of hatches, I noticed your forward hatch in the picture. Looks like fine work. Do you have any more detailed pictures of it?
davisr
Member III
Thanks Ignacio. I too have followed Martin's advice in terms of making a companionway hatch. It's helpful seeing John's approach as well.
I'm wondering, though, specifically about that forward hatch in the picture. I still need to rebuilt mine. The original has lexan on top of a teak frame. Screws secure it to the top of the frame. Your lexan appears to be recessed within a rabbet in the frame. If that's the case, how have you secured it? I don't see any screws.
Thanks,
Roscoe
I think the second page of that thread has a photo of the forward hatch I modelled mine on (and few others as well).
My hatch definitely has screws that secure the acrylic to the frame. I already had the acrylic from a perior version of my hatch, so just decided to use that. The acrylic is recessed into the frame using a 1/2" rabbet.
Edit: whoops...that would be page 3 of the thread I mentioned previously.
My hatch definitely has screws that secure the acrylic to the frame. I already had the acrylic from a perior version of my hatch, so just decided to use that. The acrylic is recessed into the frame using a 1/2" rabbet.
Edit: whoops...that would be page 3 of the thread I mentioned previously.
Thanks Ignacio. I too have followed Martin's advice in terms of making a companionway hatch. It's helpful seeing John's approach as well.
I'm wondering, though, specifically about that forward hatch in the picture. I still need to rebuilt mine. The original has lexan on top of a teak frame. Screws secure it to the top of the frame. Your lexan appears to be recessed within a rabbet in the frame. If that's the case, how have you secured it? I don't see any screws.
Thanks,
Roscoe
Last edited:
davisr
Member III
Thanks Ignacio. Not sure why I thought the thread ended on page one. The forward hatch discussion on page three deserves a thread of its own. John did nice work on that forward hatch of his. I like the way he built the frame. Looks like he rabbeted the frame, and then set the top boards within the frame so as to hide the end grain. I also like the lip that runs around the lexan. Still trying to figure out how he did that one. A hand-planer?
Roscoe
Roscoe
Trade secret.  I tried sending him an email recently because I'm not sure yet if I want to tackle building a sliding hatch or just pay someone to do it. However, my email to him bounced, so not sure if he's still around.
You know....now that you point that out, it does look like the top boards also rest on a rabbet on the frame. I hadn't considered doing that as my frame was already pretty thin. I did manage to hide the end grain from the front and back of the hatch with just a 1/2" teak strip screwed onto front and back, which i thought turned out fairly well. We'll see how she holds up. If not, then the cost and time was simply an investment in my own learning.
Not sure about the lip on the Lexan and wondered about that myself. I kind of liked the rounded corners of the Lexan by another guy further in that threadl. The Lexan on his hatch shows maybe 1/8" or so above the top boards. Whatever the case for either of them, it wasn't an option for me, as my acrylic is pretty brittle and didn't want to take the risk.
You know....now that you point that out, it does look like the top boards also rest on a rabbet on the frame. I hadn't considered doing that as my frame was already pretty thin. I did manage to hide the end grain from the front and back of the hatch with just a 1/2" teak strip screwed onto front and back, which i thought turned out fairly well. We'll see how she holds up. If not, then the cost and time was simply an investment in my own learning.

Not sure about the lip on the Lexan and wondered about that myself. I kind of liked the rounded corners of the Lexan by another guy further in that threadl. The Lexan on his hatch shows maybe 1/8" or so above the top boards. Whatever the case for either of them, it wasn't an option for me, as my acrylic is pretty brittle and didn't want to take the risk.
Thanks Ignacio. Not sure why I thought the thread ended on page one. The forward hatch discussion on page three deserves a thread of its own. John did nice work on that forward hatch of his. I like the way he built the frame. Looks like he rabbeted the frame, and then set the top boards within the frame so as to hide the end grain. I also like the lip that runs around the lexan. Still trying to figure out how he did that one. A hand-planer?
Roscoe
I guess we are getting a bit off of the handrail topic  . By the way Ignacio, nice work on the handrails!
I think I'm "another guy". The rounded corners are a result of using a rabbeting bit to make the 3/8" deep by 5/8"wide rabbet. The bevel on the lens was done at the shop I ordered the plastic from. I brought the frames to the shop and they made them up to fit. They also drilled for the screw holes to hold the lens to the frame. If I do it again I do not think I would use the screws. The lens is bedded with black Butyl tape, I tried to remove one of the lenses from the frame recently and there is no way I was going to get them apart without destroying the lens or the frame.
I think I'm "another guy". The rounded corners are a result of using a rabbeting bit to make the 3/8" deep by 5/8"wide rabbet. The bevel on the lens was done at the shop I ordered the plastic from. I brought the frames to the shop and they made them up to fit. They also drilled for the screw holes to hold the lens to the frame. If I do it again I do not think I would use the screws. The lens is bedded with black Butyl tape, I tried to remove one of the lenses from the frame recently and there is no way I was going to get them apart without destroying the lens or the frame.
Thanks, "other guy"!  Seriously Mark, that's a badass hatch you got there. It's those rounded edges that are cool. The plastics shop made those? That seems to imply that that you made the rabbet after the frame was assembled, right (which then required having the plastics shop determine the radius/size of the rounded edge)?
BTW: I lived in Santa Cruz in the late 90's. I hope to one day return there....just a gorgeous place.
BTW: I lived in Santa Cruz in the late 90's. I hope to one day return there....just a gorgeous place.
I guess we are getting a bit off of the handrail topic. By the way Ignacio, nice work on the handrails!
I think I'm "another guy". The rounded corners are a result of using a rabbeting bit to make the 3/8" deep by 5/8"wide rabbet. The bevel on the lens was done at the shop I ordered the plastic from. I brought the frames to the shop and they made them up to fit. They also drilled for the screw holes to hold the lens to the frame. If I do it again I do not think I would use the screws. The lens is bedded with black Butyl tape, I tried to remove one of the lenses from the frame recently and there is no way I was going to get them apart without destroying the lens or the frame.
Last edited:
Patti Wood
Member I
New sliding hatch
Hi Ignacio,
She is looking good! I had a new sliding hatch custom-made at North Bay Boatworks in Sausalito. I am very happy with the hatch and process. It was not cheap ($500), but I do get lots of compliments, and get to enjoy it a lot. Oh yeah, I decided not to sell my 27. Couldn't do it!
Hi Ignacio,
She is looking good! I had a new sliding hatch custom-made at North Bay Boatworks in Sausalito. I am very happy with the hatch and process. It was not cheap ($500), but I do get lots of compliments, and get to enjoy it a lot. Oh yeah, I decided not to sell my 27. Couldn't do it!
Attachments
Patti Wood
Member I
Hi Mark,
Oh that. That's for the mainsail in-boom furling system that was on the boat when I got it. Never worked well and drove me crazy, so last summer I converted the sail back to the traditional style. Huge improvement. I still use the roller for reefing. That continuous line runs through the weird-lookin' winch to wind the roller. It's just ok as a reefing system. I pretty much put a reef in for spring and summer and take it out for fall and winter. Not real fast, but I don't race so I'm not concerned too much about it.
Oh that. That's for the mainsail in-boom furling system that was on the boat when I got it. Never worked well and drove me crazy, so last summer I converted the sail back to the traditional style. Huge improvement. I still use the roller for reefing. That continuous line runs through the weird-lookin' winch to wind the roller. It's just ok as a reefing system. I pretty much put a reef in for spring and summer and take it out for fall and winter. Not real fast, but I don't race so I'm not concerned too much about it.
I finally decided to build my own sliding hatch. There's lots of good information on the site elsewhere, so took the plunge and got myself a decent tablesaw (had been drooling about one for a while). I'll start a new thread to document that project.
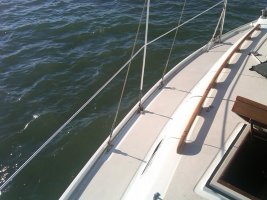
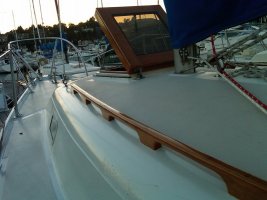
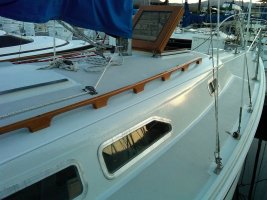
Returning to the original topic: I found the handrail project relatively easy and extremely rewarding. By removing the old handrails, I also noticed that the holes on the cabintop were really large, so I took the opportunity to close them off with expoxy and redrill the holes for the new bolts I put in when I installed the new handrails. I am pleased with the results and am excited with just how much better Symbiosis looks.
Returning to the original topic: I found the handrail project relatively easy and extremely rewarding. By removing the old handrails, I also noticed that the holes on the cabintop were really large, so I took the opportunity to close them off with expoxy and redrill the holes for the new bolts I put in when I installed the new handrails. I am pleased with the results and am excited with just how much better Symbiosis looks.

