• Untitled Document

    Join us on March 29rd, 7pm EST

    for the CBEC Virtual Meeting

    All EYO members and followers are welcome to join the fun and get to know the guest speaker!

    See the link below for login credentials and join us!

    March Meeting Info

    (dismiss this notice by hitting 'X', upper right)

E32-2 restoration thread

kapnkd

kapnkd
I have the paper that shows the original rudder superimposed over the new design. Have a look and see what you make of it. The leading edge has been reduced and the aft edge extended. Extended overall length, and the tip has been given a more forward sweep. I didn't weigh either rudder, but this one weighs a fraction of the old one. Either way, its the rudder I have so it will have to work :)View attachment 43133
It should work nicely with minimal differences I would think.

You are lacking a portion forward of the rudder post on the originals at the top that helped reduce turning efforts on the helm.
My guess is the differences will be minimal.
…Anxious to hear your results!
 

cdh4088

Member II
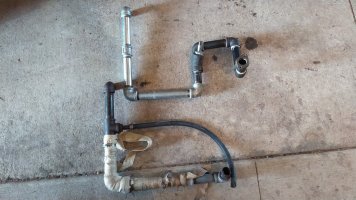
Built a new exhaust system. The old one did not have a drop or a water trap in it at all, it was just horizontal, which explains the rust damage to the valves and seats. I added a drop leg to the new one: KIMG1045.JPG

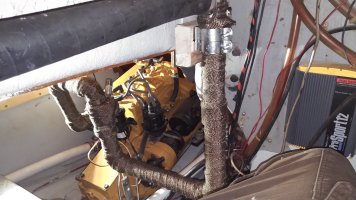
I was told not to use galvanized for the hot section due to hazardous fumes. The hot section is black iron, the wet section is galvanized. It is heavier than the original so I added a board and double hangars to take the weight: ex2.JPG
The engine compartment is getting awfully cramped to work in. I will be glad when it is all done in there. I did not install a muffler. Its Missouri after all, everyone has a loud exhaust on everything so it is no problem. :D
 
Last edited:

kapnkd

kapnkd
Built a new exhaust system. The old one did not have a drop or a water trap in it at all, it was just horizontal, which explains the rust damage to the valves and seats. I added a drop leg to the new one: View attachment 43227

I was told not to use galvanized for the hot section due to hazardous fumes. The hot section is black iron, the wet section is galvanized. It is heavier than the original so I added a board and double hangars to take the weight: View attachment 43228
The engine compartment is getting awfully cramped to work in. I will be glad when it is all done in there. I did not install a muffler. Its Missouri after all, everyone has a loud exhaust on everything so it is no problem. :D
LOOKING GOOD!!!

The original standpipe system wasn’t much of a muffler to begin with anyway. When we re-powered with a diesel, we went with an Aqua Lift system which took up a lot less room. Regardless… the 32 engine area is tight and cramped to work in for sure!
 

kapnkd

kapnkd
How is this on sound?
The Aqua Lift system is as (or more quiet) than the original cumbersome “Rube Goldberg” Ericson factory installed standpipe.

…More importantly, it is STILL going strong as ever, yet today, after having been installed way back in ‘91 or ‘92 when we installed our then new diesel!
 

Loren Beach

O34 - Portland, OR
Senior Moderator
Blogs Author
FWIW, when I replaced the OEM water lift muffler in our boat in 2018, because the hose size was different for the new engine, the old muffler looked barely used. Those are a fiberglass/composite construction, and unless you have a failure in the raw water pump and run some straight exhaust thru them and overheat or melt the material, seem to have very long life.
 
Last edited:

kapnkd

kapnkd
The Aqua Lift system is as (or more quiet) than the original cumbersome “Rub Goldberg” Ericson factory installed standpipe.

…More importantly, it is STILL going strong as ever, yet today, after having been installed way back in ‘91 or ‘92 when we installed our then new diesel!
FWIW, when I replaced the OEM water lift muffler in our boat in 2018, because the hose size was different for the new engine, the old muffler looked barely used. Those are a fiberglass/composite construction, and unless you have a failure in the raw water pump and run some straight exhaust thru them and overheat or melt the material, seem to have very long life.
Loren, as always, GOOD POST!

FYI…For many of us now - WAY - older Ericson’s from the early 70’s, the so called muffler was but a simply designed upright (standpipe) wrapped in (of all things) multiple wrappings of the then legendary anti-fire miracle material of asbestos.

…Ericson even once sent me a standpipe update kit, of sorts, that included another lengthy piece of asbestos wrap …long before the hazards were realized of course!

(Today, when looking back, the USPS would go totally spastic with such a mailing!!! ;-))).)

Ericson certainly had come a long way over the years with addressing these issues. …Yet, for those of us now (can’t believe it) old time owners, or - the new ones of older early 70’s boats; replacement issues abound be it of practical, monetary or optimal concerns.

This IS a good/GREAT thread for said conversations of experiences and solutions for all of us. I feel mine were resolved with the “Aqua Lift” system but am anxious to hear of others’ experience/solutions.
 

cdh4088

Member II
July update:
Time to tackle whats left of the electrical system.
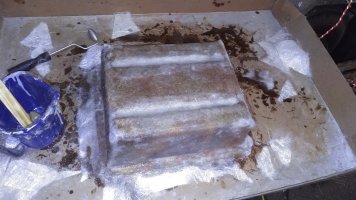
The battery tray is thin and very weak. I could not easily locate a similar part so I glassed it back to full strength: KIMG1070.JPGI also added a pair of battery holders to the bottom with buckles to keep them snug.


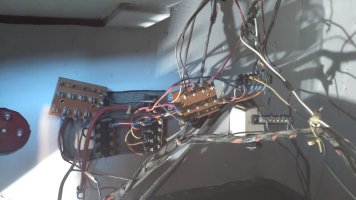
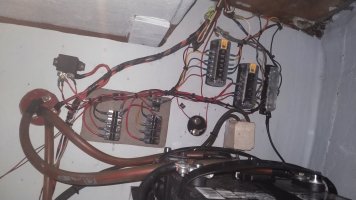
All of the wiring is present and in good shape but the panel looks like this: KIMG1097.JPG

I am guessing boat fires were commonplace in the seventies due to the fact that none of the circuits from the main switch panel had fuse protection at all. The glass fuse holders were only connected to accessory circuits such as the vhf, stereo system and instruments.
All of the circuits on the panel draw through the main "on" switch at the top of the panel, the whole setup is one rubbed wire away from a full blackout or a fire. Unsealed connections and tape everywhere. I don't like it one bit.

Here is the fix:

KIMG1103.JPG
I reused most of the wiring but with sealed terminals, the main panel "on" switch is now wired to a constant rated 85A relay so that switch no longer carries the panel load. Two blue sea fuse panels added so every function has protection, and various other functions were re-routed. Blower control can be ran from the engine panel, or the interior. I have also added a few extra circuits for later additions including usb wall sockets to charge all the kid's gizmos without stringing cable everywhere. It isnt fancy, but should be good enough for a budget lake boat.

Engine starts and runs, no major issues. I investigated the shore power breaker box and it was all in fine shape, no changes there.
I also managed to rehab the old autohelm 4000 unit with a new belt and some elbow grease. It seems to be working. I think the auto-tack function will be useful later on.

I plan to move the boat outside of the shop, have the mast raised and start working on rigging and paint soon. I have spent so much time working in the engine compartment this summer that sanding the deck is starting to look appealing, and I hate sanding!
 

Frank Langer

1984 Ericson 30+, Nanaimo, BC
July update:
Time to tackle whats left of the electrical system.
The battery tray is thin and very weak. I could not easily locate a similar part so I glassed it back to full strength: View attachment 43749I also added a pair of battery holders to the bottom with buckles to keep them snug.


All of the wiring is present and in good shape but the panel looks like this: View attachment 43746

I am guessing boat fires were commonplace in the seventies due to the fact that none of the circuits from the main switch panel had fuse protection at all. The glass fuse holders were only connected to accessory circuits such as the vhf, stereo system and instruments.
All of the circuits on the panel draw through the main "on" switch at the top of the panel, the whole setup is one rubbed wire away from a full blackout or a fire. Unsealed connections and tape everywhere. I don't like it one bit.

Here is the fix:

View attachment 43747
I reused most of the wiring but with sealed terminals, the main panel "on" switch is now wired to a constant rated 85A relay so that switch no longer carries the panel load. Two blue sea fuse panels added so every function has protection, and various other functions were re-routed. Blower control can be ran from the engine panel, or the interior. I have also added a few extra circuits for later additions including usb wall sockets to charge all the kid's gizmos without stringing cable everywhere. It isnt fancy, but should be good enough for a budget lake boat.

Engine starts and runs, no major issues. I investigated the shore power breaker box and it was all in fine shape, no changes there.
I also managed to rehab the old autohelm 4000 unit with a new belt and some elbow grease. It seems to be working. I think the auto-tack function will be useful later on.

I plan to move the boat outside of the shop, have the mast raised and start working on rigging and paint soon. I have spent so much time working in the engine compartment this summer that sanding the deck is starting to look appealing, and I hate sanding!
 

Kenneth K

1985 32-3, Puget Sound
Blogs Author
The hot section is black iron, the wet section is galvanized. It is heavier than the original so I added a board and double hangars to take the weight.

Nice job on the exhaust rebuild. Almost all common iron pipe parts are available in 316 stainless if you go to a plumbing distributor. Could re-do with 316 if the black iron ever rusts out.

Also, caution on the rigid pipe hold down (hangar). These engines can vibrate a lot and they sit on flexible mounts. If the engine moves but the pipe is fixed, it could lead to cracking of the pipe or exhaust flange. The fix would be to install a short section of flexible exhaust hose somewhere in the middle of the pipe run.
 

Kenneth K

1985 32-3, Puget Sound
Blogs Author
On second thought, while your exhaust rebuild is a big improvement from what you had before, it could still suffer from a similar flaw. If your engine is ever hard-starting, repeated cranking attempts could fill the exhaust piping with water, resulting in hydro-locking/destroying of your engine. The same thing can happen with water-lift muffler systems, but a muffler also gives some reserve water capacity (I think mine holds 0.7 gal) and, mufflers have a drain hole at the bottom. This is why Ericson recommends draining the water-lift muffler after 6 or 7 start attempts.

If you don't want to install a muffler, perhaps you could install a flexible hose section (to handle the vibration issue) as well as a Tee fitting with a drain plug at the low point of the system.
 

cdh4088

Member II
Hello again,
The work continues, I am currently prepping the boat for the move outside of the shop. This week I have finished up the hatches.
I had originally planned to update to modern units. The cost was high, but the deal breaker was the fact that I would have to chop off both hatch areas of the cabin roof and reconstruct to fit the new ones, since none of the modern hatches are the same size.
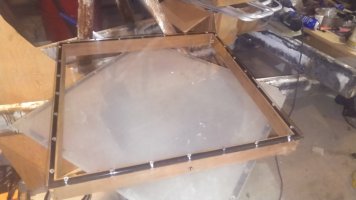
So to save time and money I went back to the old-school box hatches. I used acrylic instead of plexiglass due to its superior uv resistance and less occurence of cracking. I had the new pieces professionally rounded and profiled on the edges, and built new "boxes"
KIMG1122.JPG

I will add window tinting later if needed. I was told by a couple of different sources that tinting film is better than tinted acrylic due to the tinted material absorbing and retaining much more heat. A mirror tint film should stay much cooler.
Hinges and hardware attached, pardon the mess:
KIMG1124.JPG

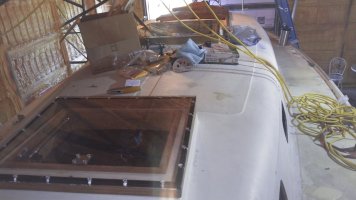
I think they turned out nice. I was worried that I would crack the material while drilling and countersinking the fastener holes, but I used the correct bits, and lots of patience. Total cost $322 for acrylic, wood, and new hinges.
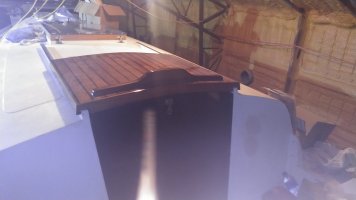
The companionway is complete as well, I deleted the holes for the old instruments while I was at it.:
KIMG1133.JPG

Next I have to finish repairing the port light surrounds, install the port lights, and remove all trailer wheel hubs for maintenance. I have thrown a trailer wheel before and have no intention of repeating that.

If everything goes well the next update should be outside of the shop.
The plan is to install the mast, work on the exterior paint and running rigging until winter sets in, then set up heaters and finish up the interior over the winter. My goal is to splash by Memorial day.
 

goldenstate

Sustaining Member
Blogs Author
Hello again,
The work continues, I am currently prepping the boat for the move outside of the shop. This week I have finished up the hatches.
I had originally planned to update to modern units. The cost was high, but the deal breaker was the fact that I would have to chop off both hatch areas of the cabin roof and reconstruct to fit the new ones, since none of the modern hatches are the same size.
So to save time and money I went back to the old-school box hatches. I used acrylic instead of plexiglass due to its superior uv resistance and less occurence of cracking. I had the new pieces professionally rounded and profiled on the edges, and built new "boxes"
View attachment 44385

I will add window tinting later if needed. I was told by a couple of different sources that tinting film is better than tinted acrylic due to the tinted material absorbing and retaining much more heat. A mirror tint film should stay much cooler.
Hinges and hardware attached, pardon the mess:
View attachment 44386

I think they turned out nice. I was worried that I would crack the material while drilling and countersinking the fastener holes, but I used the correct bits, and lots of patience. Total cost $322 for acrylic, wood, and new hinges.
The companionway is complete as well, I deleted the holes for the old instruments while I was at it.:
View attachment 44387

Next I have to finish repairing the port light surrounds, install the port lights, and remove all trailer wheel hubs for maintenance. I have thrown a trailer wheel before and have no intention of repeating that.

If everything goes well the next update should be outside of the shop.
The plan is to install the mast, work on the exterior paint and running rigging until winter sets in, then set up heaters and finish up the interior over the winter. My goal is to splash by Memorial day.
Bravo! I salute the amount of work you have completed. Making your own hatches? That’s not easy!
 

fixntheboat

Member II
I also test fitted my entry hatch I purchased from Kapnkd, It fits perfectly, and is likely better than anything I can make on my own: The old hatch was nonexistant. Thank you Kapnkd! Old boats are a lot of work, I still intend to splash this year.
kimg0814-jpg.41884
Kapnkd do you sell and make these hatches ??need more info.
 

kapnkd

kapnkd
Kapnkd do you sell and make these hatches ??need more info.
Sorry but no…

Said hatch was salvaged/bought from a yard that was about to cut up a worn out and sinking E-32. Planned to use it on our 32 but the crown was to high to fit properly (Found that out after I did an extensive restoration of the hatch.)

…Worked out for the best though as it now has a truly GOOD home and fits his boat properly.

It’s a standard Ericson hatch from the mid 70’s (??). Best thing to probably do is keep your eyes peeled for the salvage of old Ericson’s and watch eBay/Craigslist.
 

fixntheboat

Member II
Hello again,
The work continues, I am currently prepping the boat for the move outside of the shop. This week I have finished up the hatches.
I had originally planned to update to modern units. The cost was high, but the deal breaker was the fact that I would have to chop off both hatch areas of the cabin roof and reconstruct to fit the new ones, since none of the modern hatches are the same size.
So to save time and money I went back to the old-school box hatches. I used acrylic instead of plexiglass due to its superior uv resistance and less occurence of cracking. I had the new pieces professionally rounded and profiled on the edges, and built new "boxes"
View attachment 44385

I will add window tinting later if needed. I was told by a couple of different sources that tinting film is better than tinted acrylic due to the tinted material absorbing and retaining much more heat. A mirror tint film should stay much cooler.
Hinges and hardware attached, pardon the mess:
View attachment 44386

I think they turned out nice. I was worried that I would crack the material while drilling and countersinking the fastener holes, but I used the correct bits, and lots of patience. Total cost $322 for acrylic, wood, and new hinges.
The companionway is complete as well, I deleted the holes for the old instruments while I was at it.:
View attachment 44387

Next I have to finish repairing the port light surrounds, install the port lights, and remove all trailer wheel hubs for maintenance. I have thrown a trailer wheel before and have no intention of repeating that.

If everything goes well the next update should be outside of the shop.
The plan is to install the mast, work on the exterior paint and running rigging until winter sets in, then set up heaters and finish up the interior over the winter. My goal is to splash by Memorial day.
where did you purchase plexi/ and thickness?
 
Top