• Untitled Document

    Join us on April 26th, 7pm EST

    for the CBEC Virtual Meeting

    All EYO members and followers are welcome to join the fun and get to know the guest speaker!

    See the link below for login credentials and join us!

    April Meeting Info

    (dismiss this notice by hitting 'X', upper right)

E32-2 restoration thread

cdh4088

Member II
Hello again,
I have still been working on the old tub as time and weather allows, I have made some progress:

Firstly, I have been moved outside.
The nice gentleman that sold me the boat and let me work on it in his shop for minimal rent was ready to have his space back, which is understandable: KIMG1157.JPG

I have completed the hardware install on the cabin top in preparation for ceiling installation: KIMG1218.JPG
I plan to run all mast controls aft, So a mast plate, deck organizers, clutches, and winches have been added. I poked around in the wood core under the mast socket and found no signs of moisture or wood deterioration in the mast support, which was a huge relief. All hardware holes in the entire deck have been drilled out to 5/8", filled with epoxy, then drilled again before parts installation. It was extra effort, but now no balsa core is exposed in any of the fastener holes, hopefully preserving the deck for many years to come.
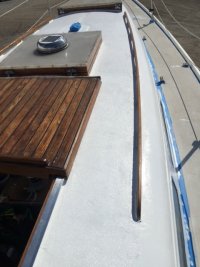
I found replacement teak hand rails that were the original size and length, but they were $450 each. My checkbook did not like that so I went with the shorter universal rails and installed two on each side. They were on sale for $67 per unit. The old-fashioned stainless steel Garhauer line clutches were also a bargain at $140 per. I doubt I would see any benefit using the pricey spinlock or other modern clutches for my application anyway. I think the stainless looks better than plastic.

Now that the cabin top has all the hardware installed I can start on the ceiling. I do not want to use any wood or foam backed vinyl for the overhead, so I am going with vinyl beadboard planking. It is expensive, but immune to moisture and mold:KIMG1214.JPG
I reused the original decorative teak ceiling beams as firring strips for mounting, with a sandwich layer of foam between. Only one section is done so far, it will probably take another 20 hours or so to complete. Hopefully it looks good when done.

The mast is being prepped for install and it is still set up for wire halyards, I want to upgrade to rope. The mast head sheaves have the wire v-groove in them. The only ones I could find in the right size were $110 each!
Just as an experiment, I chucked one into my mill-lathe combo machine and ran both ends at the same time:
KIMG1219.JPG
Thats definitely not the way the machine is intended to be used but it worked. the sheaves now have a 1/2" circular groove for rope at no cost.
KIMG1220.JPG


Thats all that has been accomplished this winter.
I hope all of you are doing well and making progress on your own boat projects, spring is just around the corner!
 
Last edited:

kapnkd

kapnkd
Your doing an incredible job and doing it to perfection!! …Nice job and touch on the cabin headliner choices too!!!

You’ve accomplished an amazing amount of work to say the least!!!
 

kapnkd

kapnkd
One more thing for you to maybe consider since your boat is sitting outside.

As the weather starts to warm, we in Michigan wrap our rudders in aluminum foil to keep the sun from heating the rudders up too much and expanding the inside that sometimes causes splits and cracks in the fiberglass. (Mostly, we use VC 17 which is black in color, hence the heat problem.)
7B39AA5B-D578-4548-93FC-4590D4510D90.jpeg
 

william.haas

1990 Ericson 28-2
As I have mentioned before on this site I often get made fun of at my yard for having the only white rudder of 1000 or so boats. It’s a pain to source a separate bottom paint, switch out tools when doing the bottom job, etc. In all my years and with all my cleverness - aluminum foil. I learn something here every time I visit… though I wonder how much ridicule I will be subjected to when I pull out the Reynolds wrap.
 

KS Dave

Dastardly Villain
Blogs Author
As the weather starts to warm, we in Michigan wrap our rudders in aluminum foil to keep the sun from heating the rudders up too much and expanding the inside that sometimes causes splits and cracks in the fiberglass.
That's brilliant! I used some disposable white drop cloths when I had mine out in August/September in Kansas as TotalBoat Spartan doesn't come in white (and I couldn't afford two diff colors, anyway).
 

kapnkd

kapnkd
As I have mentioned before on this site I often get made fun of at my yard for having the only white rudder of 1000 or so boats. It’s a pain to source a separate bottom paint, switch out tools when doing the bottom job, etc. In all my years and with all my cleverness - aluminum foil. I learn something here every time I visit… though I wonder how much ridicule I will be subjected to when I pull out the Reynolds wrap.
When I had the boat brought to Michigan, coming from no seasonal haul out Florida, and gone from traditional light blue bottom color to the VC 17…I regretted not covering the rudder like the others did. …Spent a lot of time fixing, filling and fairing it out again come warm weather.

Funny you should mention white - My son got hold of a newer brand sample of white bottom paint and we did just the rudder in white. It worked amazingly well overall but didn’t dry as smooth as the VC 17. Since we still race, we reluctantly sanded it again and switched back. We didn’t get laughed at to our faces, but got lots of questions about it during that season.
23549B60-7CFD-416B-A024-F8D766519CEA.jpeg
 
Last edited:

cdh4088

Member II
Progress continues but is slow going, my job has became extremely demanding as of late.
I have completed the main cabin ceiling:

KIMG1257.JPG

Not perfect, but good enough for amateur hour.

I have began to tackle all the wood refinishing. This boat, a 78', has the wood upgrade interior, which is neat. The down side is that all of this wood is black, or purple, or sticky, or water damaged and faded. And It all sands about as easily as cast iron!
To keep from burning out on the repetitive and labor intensive work I am focusing on one section of the interior at a time, and then moving on.
I have mostly finished up the settee area : KIMG1319.JPG
KIMG1320.JPGThe wood does not perfectly match, as it has all aged a bit differently. But at least it isn't nasty anymore. Maybe the colors will mellow and settle in a bit more with age and oiling.

I have blown my timeframe to launch yet again this year. I guess it will get done when it gets done, hopefully before my kids are grown :)

I hope all of you are having a great summer!
 

kapnkd

kapnkd
FANTASTIC work and progress!!! I faced similar problems when I put in the new bulkheads for a grain match along with the ageing and discoloration issues. Not sure what stain you’re using but it really looks GOOD! …We used Minwax “Gunstock” which did a great job of closing the variation gaps.

Your headliner looks AWESOME!!! Nicely done!!! Love the wooden ribs!

I can appreciate your feelings of burnout and it becoming “The NEVER ENDING Project”!! What we thought originally to be a two year project turned into eight if memory serves me right. At least we launched every Spring and worked on her dockside for most of it. That helped take the bite out of not actually sailing.

Guess doing things right and to one’s satisfaction really can’t have an accurate timeline, but IS definitely worth it at the end for sure! (So we can attest to finally)

GOOD LUCK, keep up the incredible work and keep those photos coming!!!
 

cdh4088

Member II
I have now completed the quarter berth:
KIMG1331.JPG
The ceiling install was difficult to create all of its angles and mounting. Few will ever see it.


Much of the wood is coming along nicely, pardon the dust:
KIMG1329.JPGThere will be some evidence of staple holes, and a few dings and deep scratches here and there. She's been though a lot, but I think she wears her scars well.

I have shelved the interior work for now to prepare and paint the deck. I am dreading this task as my skillset leans more towards guts and gears, not fairing and paint. The fairing, sanding and scrubbing is complete, now I have to choose the product.
I was looking at Alexseal paint for the deck, but the price is quite steep. I have heard mixed reviews about the totalboat wet edge paints, I was also considering the interlux brightside product.
I must decide soon, as there is a small window of nice early fall weather to get it done.

Any advice for deck paint? also any idea how much deck paint for the E32? Its about impossible to guess the square foot coverage area needed.
 

Christian Williams

E381 - Los Angeles
Senior Moderator
Blogs Author
A freelance boat painter did the deck of an E38 next to me for about $2500, including the Awlgrip. It would be worth it to me to get a real painter to bid the job, even an experienced house painter who might like the challenge. No idea what they'd charge, and $2500 seemed low to everybody who heard it (but accurate in this case).

I could learn Awlgrip I think, some of us have, but it takes practice, and weather gets to be a big factor.


bigd14

Contributing Partner
Blogs Author
I would avoid Interlux Perfection two part deck paint. I used it on a boat about 12 years ago and it has recently started peeling off. I heard it was good for 10 years but seems it should do better. I was very diligent in following the directions and makings sure temperatures were ok when applying and curing.

I believe Awlgrip and Alexseal are much more durable, although possibly more finicky to get right. Make sure your primer is compatible and be aware that there is an issue with some kinds of sandpaper leaving a residue (stearate I think) that can cause paint adhesion problems. Prep is everything! Good luck with it and great work on the project.
 

jpginsu

Member I
I used the Total Boat Wet Edge on my deck in 2022. It was easy to use. Put 2 coats of the Total Boat primer on, 1 coat of Wet Edge. While the Wet Edge was still wet, I spread a layer Soft Sand Coarse grit over the area. Once dried, less than 24 hours, I applied 2 coats of Wet Edge as the finish. I used less than a gallon of Primer and about a gallon of Wet Edge for the entire deck. I have attached a picture of the cabin top that was finished. If you look closely, you will see the deck with the Soft Sand before I applied the finishing coats.

Good Luck.
 

Attachments

  • Jacks boat cabin top 3.JPG
    Jacks boat cabin top 3.JPG
    55.3 KB · Views: 17
Top