• Untitled Document

    The 2024-2025 Fund Raising Season has Opened!

    EricsonYachts.org has opened the season for raising funds to support the expenses of the site. If you would like to participate, please see the link below for additional information.

    Thanks so much for your continued support of EricsonYachts.org!

    2024-2025 Fund Raising Info

E35-3 replacing fuel tank

Prairie Schooner

Jeff & Donna, E35-3 purchased 7/21
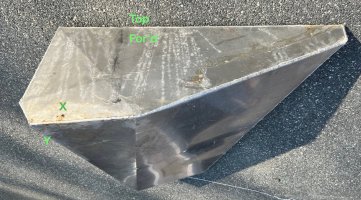
E35-3 fuel tank leaks sm.jpg

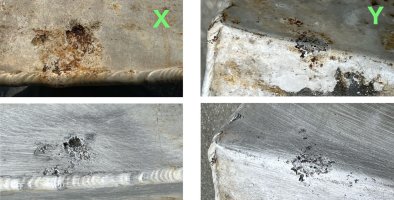
E35-3 fuel tank leak XY sm.jpg
These are images of the corrosion which seemed bad enough to leak. As with other folks, it’s in the areas which are lowest in the tank.


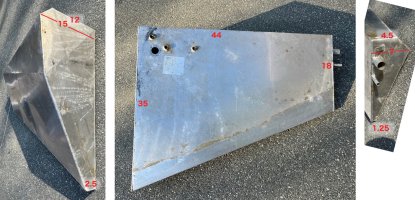
E35-3 fuel tank ortho sm.jpg
These are some basic dimensions for the tank from our boat. Probably not enough to build a new tank, but perhaps they will be helpful to someone, someday. It appears to only have one baffle. I'm trying to imagine this volume and eight 5 gal. buckets in the same space. It seems smaller than 40 gallons. But that's what the tank says. The fuel was about 1" - 2" below the top when I started pumping out diesel. It filled five 5 gal. jerry cans.

We went to the fabricator today. He said the rest of the tank didn’t look bad at all and he could weld patches. When asked, he said if it were his boat, he’d replace it. (of course to him, his labor is kind of free)

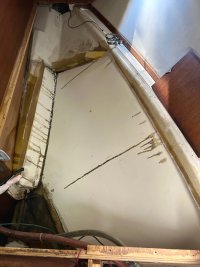
The installation in our boat is really tight. To create ready access to monitor the tank would require rebuilding part of the cabinetry to be removable. And we’d have to check it on a regular basis. If the tank did start leaking again, it could damage the new sole we’ll be installing. Donna and I discussed it and decided to go with a new tank.

I may still try to make some kind of ‘dipstick’ (maybe with aluminum flashing) with some cloth to slide down in front of the tank. After dealing with all this, we’ll likely be paranoid.

The fabricator gave us a rough price and lead time of 3-4 weeks. Once we get the firm quote, I’ll report on that and construction specifics. However, the new tank will have access ports for each side of the baffle.
 

Prairie Schooner

Jeff & Donna, E35-3 purchased 7/21
Fuel Gauge??

E35-3 fuel sender sm.jpg
This is what was in the tank. We’re responsible for providing the capacity monitor and pickup tube. We could put this old one in the new tank, or find a new float/dial unit, or put in a sending unit for a gauge to be mounted elsewhere (near the nav desk?). The tank mounted float gauge seems fine for us. It’s easier to install and has fewer parts to malfunction. But are there compelling reasons to go with an electric/electronic sensor/gauge?

These are the related posts I’ve found here thus far:
- https://ericsonyachts.org/ie/threads/fuel-tank-35-mkii.9315/
- https://ericsonyachts.org/ie/threads/fuel-gauge-whoas.19904/#post-157233
- https://ericsonyachts.org/ie/threads/fuel-sending-units.19417/
- https://ericsonyachts.org/ie/threads/e26-fuel-gauge-sender-and-ground.18913/

Thanks,
Jeff
 

Loren Beach

O34 - Portland, OR
Senior Moderator
Blogs Author
Prior thread with pix of our sender and also the gauge mounted near the main power panel:
That gauge and sender are still working with no problems. Our OEM tank did have the pivot type float on an arm, as pictured above. It's really nice to have the tank level info adjacent to the main panel at the nav desk.
As built, the cushion needed to be lifted aside and then I'd remove the panel above the tank top in order to read the gauge. If doing this again, I would follow the same design parameters as our replacement tank.
 

Prairie Schooner

Jeff & Donna, E35-3 purchased 7/21
We got the quote. $1150. Gulp. - But, we're going to proceed. "The bends are rather complex." This price includes inspection ports. .125 aluminum.
 

bigd14

Contributing Partner
Blogs Author
We got the quote. $1150. Gulp. - But, we're going to proceed. "The bends are rather complex." This price includes inspection ports. .125 aluminum.
Jeff, it's just a single boat buck! I actually think you're getting a good deal, mine was $750 for a 19 gallon aluminum tank in 2016...

After I had it made and installed I thought I should have specified a drainage port at the front bottom of the tank so I could easily drain any sludge or water out. I'm not sure if this is up to ABYC spec but I would certainly draw a little sample out every so often if I had such a thing.
 

Christian Williams

E381 - Los Angeles
Senior Moderator
Blogs Author
The floating-arm style gauge I bought wouldn't fit in my boat because the arm hit a baffle. I went with a similar model in which the float rises and falls vertically, and doesn;t need "room."

Before ordering, probably wait to have the tank in hand, since depth of tank and location of baffles can matter.
 

Prairie Schooner

Jeff & Donna, E35-3 purchased 7/21
The floating-arm style gauge I bought wouldn't fit in my boat because the arm hit a baffle. I went with a similar model in which the float rises and falls vertically, and doesn;t need "room."

Before ordering, probably wait to have the tank in hand, since depth of tank and location of baffles can matter.
The vertical float on a spiral strip is what I'm looking at Christian. I wondered if it would get stuck more than the floating arm style. Have you had good experience with it?
 

Prairie Schooner

Jeff & Donna, E35-3 purchased 7/21
Jeff, it's just a single boat buck! I actually think you're getting a good deal, mine was $750 for a 19 gallon aluminum tank in 2016...

After I had it made and installed I thought I should have specified a drainage port at the front bottom of the tank so I could easily drain any sludge or water out. I'm not sure if this is up to ABYC spec but I would certainly draw a little sample out every so often if I had such a thing.
$1.15BB sounds a lot better, doesn't it? (Do I recall correctly, it's Doug?) And with your price, I feel a little less bad about our quote.
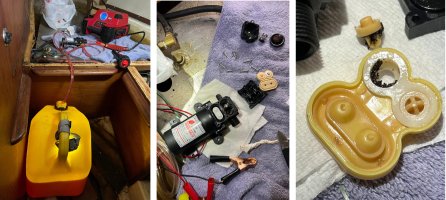
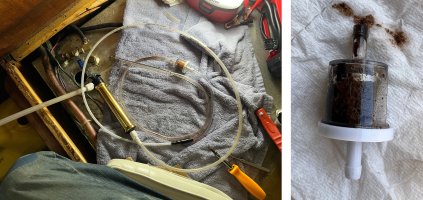
The drain port would be tempting, tho I've heard others say it's verboten by ABYC or Coast Guard. The other thing is there is no room in the 35-3. In my post #19 you might be able to see (area A) where there is less than 1" clearance between the tank front and the cabinetry for the Q-berth. And about the same below it. I'll just rely on the inspection ports to look at things. I got fairly adept at using the 12v and hand pumps to pull out fuel.

fuel extraction a.jpg

fuel extraction b.jpg

Even after cleaning, the electric pump wouldn't draw through the inline filter so I switched to the hand pump I use for oil changes. The filters are cheap enough to be disposable.
 

Christian Williams

E381 - Los Angeles
Senior Moderator
Blogs Author
wondered if it would get stuck more than the floating arm style [float fuel sensor]

The vertical design seems to work fine.

You know, I never believed in fuel gauges (or refrigeration). I have to admit I have been enjoying both.
 

Prairie Schooner

Jeff & Donna, E35-3 purchased 7/21
June 2023 - New Tank Installation
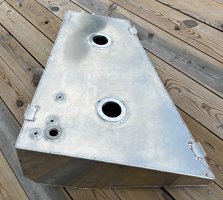
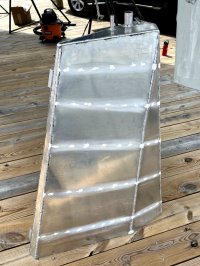
E35-3 new fuel tank 1 sm.jpg

E35-3 tank cavity sm.jpg

This video is pretty much how I did our installation except we didn’t use elastomer pads

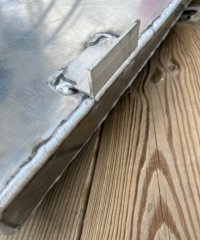
Our new tank was completed by the welder in mid-April of 2023 just before he went on vacation for two weeks. We were under pressure by the marina to launch so we had to take it as is and install it. It was acceptable, but with more time I would have asked him to weld the angle brackets more fully.
E35-3 new fuel tank 2 bracket sm.jpg

The tank has welded in mounts for pre-made access ports and components. The access holes are barely big enough for me to get an arm in. I neglected discussing this with the welder and would have liked those to be bigger. Otherwise, the fitting mounts worked out well. Another change I would make is the orientation of the fuel gauge. Right now the float lever pivots roughly athwartship so it bumps against the side of the tank. This makes the lower level readings less accurate. The screw pattern is not symmetrical so it can't be rotated. It should have been fore and aft.

Other things I would have done differently:
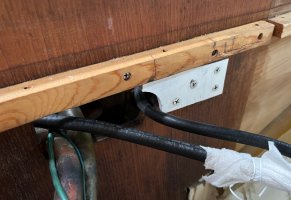
The cabinet hole where the hoses come in from the engine compartment is in the forward inboard corner. I should have specified that bracket to be mounted about 4” further aft than it is. It crowds the hose more than I’d like.

E35-3 tank mount FI a sm.jpg

Finally, I would have had a different vendor. There's a place that specializes in boat tanks. However, I was worried they wouldn't deliver early enough for us. These guys did fine with the actual construction. I'm not worried about it leaking. Just some of the design decisions, like gauge orientation, were less than optimal.

(In an earlier post here I explained our reasoning for getting a new tank made. In many situations tank repair is a perfectly valid option.)
 

Prairie Schooner

Jeff & Donna, E35-3 purchased 7/21
E35-3 new fuel tank 3 dots sm.jpg

I read a Lot about tank mounting. The term that kept surfacing was “crevice corrosion”. As I understand it, raw aluminum exposed to the air forms a protective oxide layer. However, if there is an area (especially thin enough to not dry out) where water can collect, corrosion is likely. To support/cushion the tank from below some people suggested attaching neoprene pads to the bottom with 5200. Other folks said rubber has carbon which aluminum will react with. But neoprene is synthetic. But it still has carbon. I’m no scientist but I crossed that off the list. Wood is out because it holds moisture. I'd originally planned to glue 3/16" pvc strips to the bottom of the tank, but it would have lifted it too much. Feeling it needed some spacer to hold the tank off the shell, I ended up just putting 5200 dots along the bottom.

Below are links that were the most helpful.
surveyor advises https://www.yachtsurvey.com/fueltank.htm
install overview https://stevedmarineconsulting.com/fuel-tank-installation/
corrosion prevention https://www.passagemaker.com/technical/tested-tankage

Point/Counterpoint Some light and some heat. -
corrosion re: rubber https://www.sailnet.com/threads/rubber-galvanic-corrosion.40451/
corrosion re: rubber https://patents.google.com/patent/US5100733A/en
Not Neoprene https://www.thehulltruth.com/boating-forum/1157599-boat-fuel-tank-installation.html
useful, if contradictory https://www.boatdesign.net/threads/proper-installation-of-aluminum-fuel-tanks.28605/
architectural ref http://fadelfacadedesign.blogspot.com/2012/08/aluminum-in-contact-with-other-materials.html

E35-3 tank mount blocks sm.jpg

The mount blocks were hardwood soaked in BilgeKote. I didn't realize at the time it requires a primer. Then, between each bracket and mount there was a Starboard strip. When I put the stainless steel screws in I used a liberal coat of Loctite LB 8023 Marine Grade Anti-Seize at the head. All this was an attempt to reduce galvanic corrosion. All elbows or fittings purchased for the tank were aluminum.
 

Prairie Schooner

Jeff & Donna, E35-3 purchased 7/21
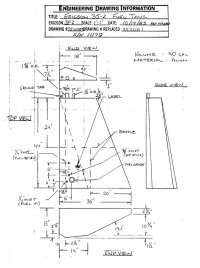
tank dwg E35-3 manual.jpg

The boat specs and original tank label said 40 gallons but I’m not convinced. This drawing is from the E35-3 manual. Not sure why it says 35-2. I pumped the nearly full tank into 5 gallon jugs and only filled 5. The widest part of the tank is at the top, which might have held an additional 10 gallons. I think this design is closer to 35.
 

Prairie Schooner

Jeff & Donna, E35-3 purchased 7/21
E35-3 tank guage panel b sm.jpeg
E35-3 tank guage panel a sm.jpeg

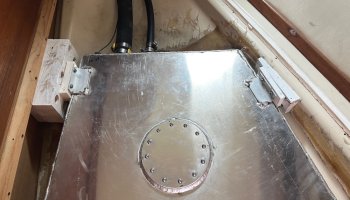
The primary access panel needed to be enlarged to reach the new cleaning port. I located the finger hole right over the fuel gauge which makes it readable without lifting the panel. I'm still working on correlating the gauge readings to reality.
 

Loren Beach

O34 - Portland, OR
Senior Moderator
Blogs Author
The hanger tangs are visible in some of the photos. The idea is not have the bottom of the tank touching the hull or other structure.
Our OEM tank also had the pivoting float arm with the analog gauge on top. It was always a hassle to lift the cushion and then a panel in order to read the gauge. That old gauge was seeping diesel around he screws when we decided to replace the tank, so it was easy to spec out a new sender and remote electric gauge. (One of our better decisions, gotta say.)
 
Top