• Untitled Document

    The 2024-2025 Fund Raising Season has Opened!

    EricsonYachts.org has opened the season for raising funds to support the expenses of the site. If you would like to participate, please see the link below for additional information.

    Thanks so much for your continued support of EricsonYachts.org!

    2024-2025 Fund Raising Info

E35-3, yet another thread on Sole Replacement

Parrothead

Member III
If there's interest, I have some material left over and would be happy to send a sample to anyone on this forum who asks.
 

dhill

Member III
Hi Neil,

I would be interested in getting a sample. I can send you my address.

Thanks!
Dave
 

Prairie Schooner

Jeff & Donna, E35-3 purchased 7/21
sole table 40.jpg

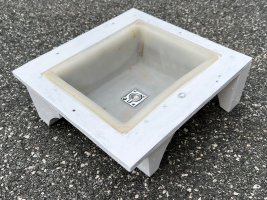
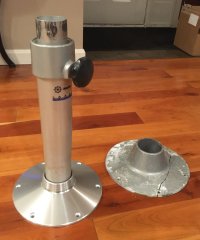
The new base by Zwaardvis/Taco base came in. The overall diameter is about 3/4" smaller and the hole pattern is thus different. Otherwise, it looks great and seems sturdily designed. About $75 from Fisheries Supply in Seattle, WA.
As @RCsailfast said, the lower tube is a bit loose in the base. Current plan is to fashion a shim sleeve out of scrap clear vinyl.
 

Prairie Schooner

Jeff & Donna, E35-3 purchased 7/21
See Also:

Thanks Christian. That master thread is referenced in post #1 here, and very helpful. I'm trying to keep this to things I haven't found in those posts or are specific to the E35-3.
Help stamp out and abolish redundancy!
 

Loren Beach

O34 - Portland, OR
Senior Moderator
Blogs Author
If there's interest, I have some material left over and would be happy to send a sample to anyone on this forum who asks.
If there is a scrap left, I would like one. If not, that's ok. You can message me for address details, and let me pay for postage.
Loren
 

Prairie Schooner

Jeff & Donna, E35-3 purchased 7/21
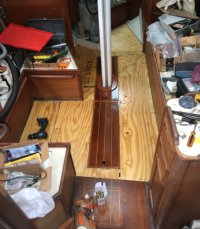
Well, this has turned into a two-year project. I think the end is in sight. We removed the sole forward of the galley over a year ago as well as purchasing two sheets each of 1/2” marine plywood and 1/4” teak & holly plywood. However, with all the other projects of that off-season, I didn’t get the new panels started. To use the boat last season we made a construction-grade plywood temporary sole.

2a temp sole 206.jpg

This January I took up the sole project again. What follows is how we’re doing it, but I want to make clear that I do not think this is better than other ways described on this forum. I’m lucky to have a friend with dual degrees in engineering and industrial design, who owns a classic Hinckley, and has a studio with a 4x8 CNC router. Dean offered to help me with this project so this is the route we went. If I didn’t have my friend’s help, I would have patterned this the way @Parrothead in this thread and others in this forum have, using strips. I thought folks might be interested in this process however. Perhaps it will make sense for something else you decide to tackle.

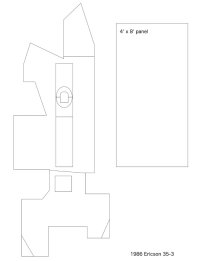
Early on, using rough measurements, I’d created a floor plan in Fusion 360 CAD.
2b Sole Map full crp.jpg

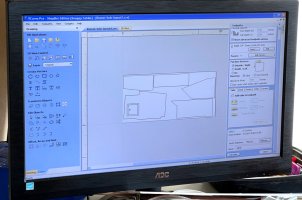
Laying the old sole panels on the router bed, Dean jogged the router head while I helped guide him to the right critical points. “X + .040, Y - .020, etc.” He’d then read the coordinates for that point which I’d write on the map of each piece. Using these coordinates, Dean created each of the panels in the software.

2c-e input sole.jpg

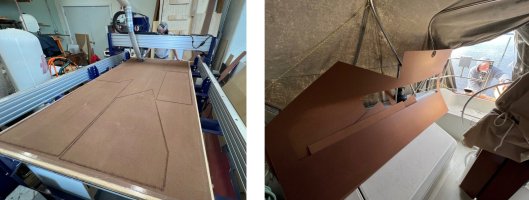
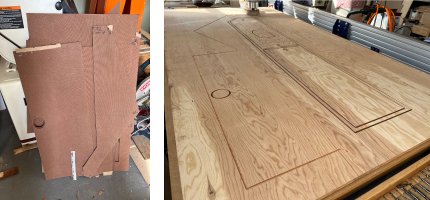
These were then arranged on two 4x8 sheet templates and we cut them out of 1/8” tempered particle board. Those panels went to the boat for fine tuning.

2f  panel file 1014.jpg

2g-h patterns sm.jpg
 

Prairie Schooner

Jeff & Donna, E35-3 purchased 7/21
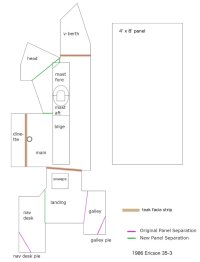
On the boat, refinements to the patterns were made. Based on the work of TKRonaBoat referenced in my post #1 I’d already decided to do the head sole separately and later on, maybe with teak grid work. One thing I didn’t think about until the moment I was dragging the masonite panels onboard was that the mast was now in. It was pulled when I took the sole out. We aren’t going to pay an extra $1K+ to lift the mast to install the sole so I had to cut the main panel somewhere. This is a diagram of what I decided for panel cuts.

2i Kismet Sole Map v2.jpg

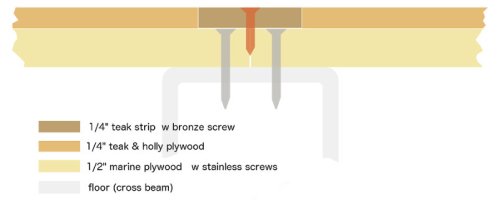
I want this install to all be removable. (plumbing upgrades are certainly in our future) It was very tight fitting the panels in with the vertical trim on the cabinets so I opted to make an additional seam next to the nav desk. For now I’m not going to replace the bungs, but I wasn’t crazy about two rows of screws where the ‘landing’ and ‘v-berth’ met the ‘main’ panel. I’m opting to join these with a teak cover strip which will sit flush with the T&H and will only require a couple screws. This will allow me to secure those joints to the floors with as many screws as I want and only have a few show. This will also compensate for any mismatch between T&H stripes where panels meet. At this point my plan is for visible screws to be bronze and hidden screws stainless steel. The E35-3 has trim strips along all the cabinetry.

2j construction layers.jpg

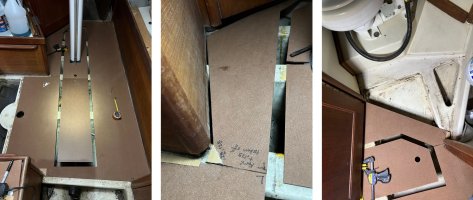
The masonite patterns needed tweaking for several reasons: The old sole had deteriorated quite a bit. The original sole was maybe installed before the deck went on. It was quite likely installed before the vertical cabinet trim went on. Ericson probably weren’t thinking about making it removable. Human error.

2k pattern tweaking.jpg
I’m going to install a removable support beam for the joint between the main panel and the head panel.

.
 

Attachments

  • 2i Kismet Sole Map v2.jpg
    2i Kismet Sole Map v2.jpg
    48.6 KB · Views: 4

Prairie Schooner

Jeff & Donna, E35-3 purchased 7/21
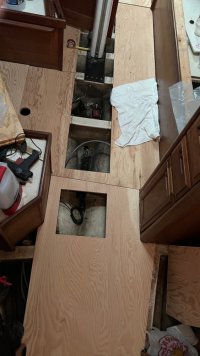
With the pattern modifications made to the digital files, we cut out the 1/2” plywood sub-sole panels.

2l sub-sole ply.jpg

2m sub-sole ply in.jpg

I put those in the boat. A few more tweaks were in order as the plywood was not nearly as flexible as the tempered particle board. These changes were integrated into the digital files. To align the T&H we created an overlay with the pattern on a 4x8 sheet.

2n TnH digital.jpg

We had to do some fidgeting to get the machine zeroed in on the holly stripe we wanted. Then we did several ‘air-cuts’ to see if it looked right. (air cut = running the program higher than cut depth) Finally, with a sign-of-the-Cross, we hit ‘cut’. The striping at some joints may not line up exactly. This might be especially noticeable where the galley meets the landing at an angle. But to get the wiggle room needed for exact matching, we would have needed a third sheet of T&H. We opted for ‘close enough’.

2o TnH cut.jpg

Some of you may be saying this looks like the hard way to do it and I’d probably agree with you. It’s definitely more complicated. However, I wanted to upgrade my digital fab skills so this was a great learning opportunity.

My assessment of the value of CNC vs Analog:
Pros- High accuracy. Except for a little edge sanding, when it’s done, it’s done. Kinda cool.
Cons- Set-up is tedious and time consuming. Requires expensive equipment and advanced knowledge. GIGO.


I was going to saturate the plywood sub-sole with penetrating epoxy. Dean isn’t a fan of that because if any water does get into interior wood, it can’t dry out as well. He suggests bilge paint, which I’m contemplating. And I’ve got to go back and read the other related threads here to pick a T&H finish.
So that’s where it stands. We’re going to wait a bit for the garage to reach an acceptable ambient temperature. Next on the list is removing the saloon and v-berth hatches for rebuild and chasing a leak of the fuel tank.

cheers,
Jeff
 
Last edited:

Christian Williams

E381 - Los Angeles
Senior Moderator
Blogs Author
Amazing and beyond.

The extensive floor expansion-gap edge trim--I have that too. Are you going to replace as before? When replacing, I have considered using only one course of screws to penetrate both trim and floor-into-TAFG, rathter than screwing the trim and the floor plywood independently. The trim pieces alone are a big job to make, fit and finish.

I tried that on a few forward sections and it seems to work, and doesn't look bad even with the screws unplugged (bronze screws, still shiny in the photo) .

cabin sole B.JPG...BBBBB.JPG
Factory trim (plugged) and single-screw fastening, unplugged.

I feel strongly that all the plywood be saturated with penetrating epoxy, esp. the end grain. Underside is constantly wet from condensation if not actual bilge water. Not sure the top needs it since it will receive many coats of finish (CPES can radically darken the laminate).

Thanks for a grand report on this daunting job, and may all your lines match up!
 
Last edited:

Prairie Schooner

Jeff & Donna, E35-3 purchased 7/21
. . .
The extensive floor expansion-gap edge trim--I have that too. Are you going to replace as before? . . .

I feel strongly that all the plywood be saturated with penetrating epoxy, esp. the end grain. Underside is constantly wet from condensation if not actual bilge water. . . .
Christian,
I do plan on replacing all the trim strips. I was able to save all the original pieces and my hope is to just refinish them. If there are damaged holes I'll try to glue in a plug and redrill. A couple of the strips back by the Q-berth/Nav station are soaked in diesel so I 'spect I'll need to make new ones there. I'll probably put some SS screws under the trim, though likely not as many as the original installation. In normal life the fit is so tight it probably doesn't need much. But in the case of a rollover, I don't want those panels to go flying. I really like the look of the trim strips with the bungs so I haven't decided what to do with that. If things go according to pattern, I won't get that far this season anyway. I have too many mission critical things to do before splash.

I was planning on CPES until Dean got me thinking. Unless it's completely saturated, like a piece of G-10, there will be dry wood inside. Anyplace there's an incursion, drill holes, thin spots, water can still get in. And if the bulk of the panel is sealed, it can't breath and rot can occur. As I think about it, I may seal the end grain with epoxy and put bilge paint on the rest. Still thinking. Our bilge certainly seems to have some water all the time. If I did seal the panels all in epoxy, I'd feel duty bound to seal and redrill every hole I put in. I need to do some more research on what the bilge paints actually are. I can be persuaded on this, so appreciate all viewpoints offered.

Thanks for the kind words and good wishes.
J
 
Last edited:

JSM

Sustaining Member
I was going to saturate the plywood sub-sole with penetrating epoxy. Dean isn’t a fan of that because if any water does get into interior wood, it can’t dry out as well. He suggests bilge paint, which I’m contemplating. And I’ve got to go back and read the other related threads here to pick a T&H finish.
When I replaced the sole in our 34-2 five years ago I used Smiths Penetrating Epoxy on the bottom sides and end cuts of all the panels and have had zero water ingress so far. From my experience once water gets into plywood it seems to be there for life no matter what the wood was treated with.


Loren Beach

O34 - Portland, OR
Senior Moderator
Blogs Author
Newer site members may find this well-documented thread of interest. So a 'bump' seems to be in order.
 

Prairie Schooner

Jeff & Donna, E35-3 purchased 7/21
This sole project is turning into The Song That Never Ends.
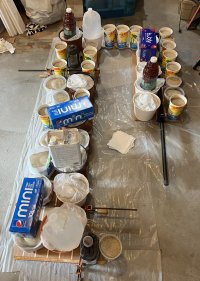
If I had it to do over again, I would definitely buy 3/4" T&H plywood rather than try to laminate like I'm doing. That process is really something that should be done vacuum bagging and and with way more weight. As it was, I used 250# of playground sand and anything in the garage I thought might have some weight.

process glue up 01 sm.jpeg
It took some finagling to get the right mix of filler and epoxy. It was too thick for some of the first panels and the top sheet didn't settle all the way down. All the panels are glued now and we're cleaning up the old .5" x .75" access panel trim and attaching it.

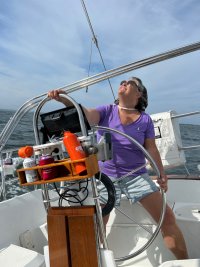
So, we haven't done any cruising yet, but we have been doing a fair amount of day sailing. We've had friends and family out and given a half dozen people their first time driving a sailboat. It was really important for us to have a boat where we could share our love of boating. Last year we were just putting the boat in the water at this time, so I'm counting this as a win. We're enjoying some vicarious cruising through your posts here.

Kismet 2023_7-15 a.jpg . . . Kismet 2023_6-18 j.jpg

Cheers,
Jeff and Donna
 

bsangs

E35-3 - New Jersey
This sole project is turning into The Song That Never Ends.
If I had it to do over again, I would definitely buy 3/4" T&H plywood rather than try to laminate like I'm doing. That process is really something that should be done vacuum bagging and and with way more weight. As it was, I used 250# of playground sand and anything in the garage I thought might have some weight.

View attachment 47842
It took some finagling to get the right mix of filler and epoxy. It was too thick for some of the first panels and the top sheet didn't settle all the way down. All the panels are glued now and we're cleaning up the old .5" x .75" access panel trim and attaching it.

So, we haven't done any cruising yet, but we have been doing a fair amount of day sailing. We've had friends and family out and given a half dozen people their first time driving a sailboat. It was really important for us to have a boat where we could share our love of boating. Last year we were just putting the boat in the water at this time, so I'm counting this as a win. We're enjoying some vicarious cruising through your posts here.

View attachment 47844 . . . View attachment 47845

Cheers,
Jeff and Donna
Look at you two actually sailing! Looks great Jeff. Enjoy the rest of the season.
 

Prairie Schooner

Jeff & Donna, E35-3 purchased 7/21
sole a sweeps 8 E35-3.jpg
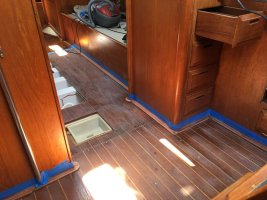
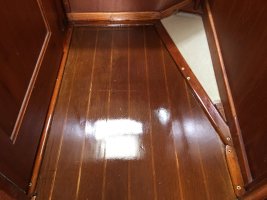
All the parts for the sole were completed this past fall and will be installed later this spring. I’m just catching up with documentation.

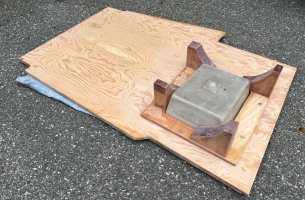
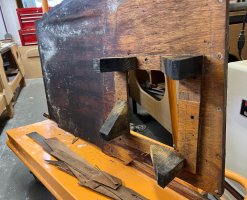
This is the structure that goes under the sweeps panel just at the base of the ladder. It was patterned after the old unit. I used marine grade plywood and some leftover mahogany. A router was used to make the relief which accommodates the rim of the plastic tray.

All exposed edges were soaked with penetrating epoxy. Then it was coated with Total Boat 2 Part Epoxy Primer. The final finish is BilgeKote. The bottom of the sole panel is not yet finished in this photo.

fin sweep 242 E35-3.jpg fin sweep 5115 E35-3.jpg
 

Prairie Schooner

Jeff & Donna, E35-3 purchased 7/21
Ericson went to some trouble to support that sweep box, which I've always thought was a clever detail. I didn't put mine back in because these days I use a battery hand vac.

For thread integrity, here is my E381 sole replacement project.
That you left it out of your project slipped by me, thinking it never had one. I only gave passing thought to not including it. I had some vague notion that I might need it for access at some point, though really, there isn't much that can be reached in there.
I've really appreciated your account of your sole project. What I learned will be helpful as I finish the install. Even more valuable are your remarks on what a big project it was. I've been feeling kinda inadequate about how long it's taken me to complete. Thanks!
 
Top