You are using an out of date browser. It may not display this or other websites correctly.
You should upgrade or use an alternative browser.
You should upgrade or use an alternative browser.
Glassed in Chain plates
- Thread starter sproption
- Start date

gareth harris
Sustaining Member
Chainplates rarely fail, so I would not say having them glassed in is a big problem, although I think it is a bad arrangement. There is only one glassed in chainplate on the E35, I removed mine; at the point I did the work the boat had been sitting inside for several months, but the chainplate was still sitting in water inside the glass.
The E29 is a good boat.
Gareth
Freyja E35 241 1972
The E29 is a good boat.
Gareth
Freyja E35 241 1972
The only way to inspect them is to cut them out of the glass.
The plates themselves have two right angles where they extend out of the glass, or at least they did on my boat. I suspect this is a potential weakness compared to plates that are straight, although I have not heard of them failing there. Maybe someone else has?
One thing is for sure, they will not fail by pulling out of the glass. It took several hours of work to get mine out of the glass with a grinder.
Thanks!
Thanks for your input and the encouragement regarding the 29.
I am feeling better about this as I go along, researching and getting the opinions of others.
I am still a little leary of the 29 because of the fiberglass liner that makes it nearly impossible to get at hardware and assess leaks.
Thanks again,
Sproption
http://www.ericsonyachts.org/infoexchange/showthread.php?t=1201&referrerid=28
Here is an earlier related thread. Found with a search of this site on "chain plate."
http://www.ericsonyachts.org/infoexchange/showthread.php?t=91&referrerid=28
And another...
Regards,
Loren
Here is an earlier related thread. Found with a search of this site on "chain plate."
http://www.ericsonyachts.org/infoexchange/showthread.php?t=91&referrerid=28
And another...
Regards,
Loren
Last edited:
boethius27
Member II
I've got the e35 with the one glassed in chainplate (backstay). I was just in there inspecting it yesterday and as far as I can tell from tapping around it sounds pretty good and dry. I don't see it as an issue yet.
And really, if you have to grind it out and then thru-bolt it anew... it isn't a HUGE deal, just an annoyance, but it will be all the stronger and better for the work you do put into it.
And really, if you have to grind it out and then thru-bolt it anew... it isn't a HUGE deal, just an annoyance, but it will be all the stronger and better for the work you do put into it.
"PDX...
Do you own a 29?
If so, what have you done about the issues with the fiberglass liners?
Also, is it a good idea to drill a small hole or two into the glassed in chainplates to allow water to escape?"
No, I own an Ericson 30-1, a boat that is somewhat contemporaneous with the 29 but a little older. It may be that the chainplate design is a little different on my boat because the incident described in the thread linked by Loren, in which the chainplate was pulled through the deck, could not have happened on my boat. My boat has a teak toe rail, roughly 2 inches wide. The chainplate is glassed into the hull outside of the toe rail, necessitating the double right angle bend to clear the toerail. There was no water or corrosion in mine when I ground the glass away so no need to drill a drain hole. In any case I wouldn't recommend it on yours because there is no guarantee that there will be a free water path between the intake leak and the hole you drill. Moreover, the glassed in plates are not single tangs like normal plates. Each tang has two outrigger tangs connected to it so it ends up looking like kind of a trident.
The fiberglass liner on my boat was a single piece. I cut it out with a grinder and dremel. Mine was not glued to the cabin trunk so it came out easily once chopped up. It was the poorest design feature of the boat IMO, adding no structural strength and a lot of weight and ugliness. If you want to keep yours (and its possible yours is actually attached to the cabin top, giving it structural support) you can do what some people have done--cut holes where you need to inspect deck fittings such as handrails and stanchions and then gelcoat the holes.
CaptDan
Member III
Sometimes they DO go bad
Chainplates rarely fail, so I would not say having them glassed in is a big problem, although I think it is a bad arrangement.
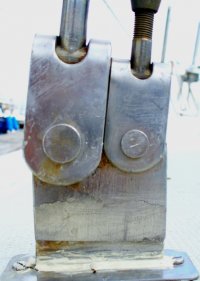
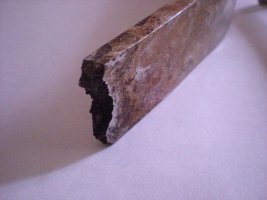
Me too. On a related note, I'm in the process of removing the upper shroud chainplates on my boat. Both plates have stress fissures; the port plate in particular. (Pix attached.)
Unfortunately, it's the port plate that's the most difficult to remove because, as you might know, the cabinetry in the head has to be dismantled to get to the through bolt nuts.
My plan is to have new plates made, then cut the tops off the old ones, file and shape them, then use those portions as backing plates which are ubiquitously absent in the original design.
Sorry for the thread hijack, but I think it's relevant. 30+ year old stainless CAN get a little long in the tooth.
Capt Dan G>E35II "Kunu"
Chainplates rarely fail, so I would not say having them glassed in is a big problem, although I think it is a bad arrangement.
Me too. On a related note, I'm in the process of removing the upper shroud chainplates on my boat. Both plates have stress fissures; the port plate in particular. (Pix attached.)
Unfortunately, it's the port plate that's the most difficult to remove because, as you might know, the cabinetry in the head has to be dismantled to get to the through bolt nuts.
My plan is to have new plates made, then cut the tops off the old ones, file and shape them, then use those portions as backing plates which are ubiquitously absent in the original design.
Sorry for the thread hijack, but I think it's relevant. 30+ year old stainless CAN get a little long in the tooth.
Capt Dan G>E35II "Kunu"
Attachments
-
 Chainplates 001.jpg189.3 KB · Views: 500
Last edited:
Hi all-
Just happen to be doing a project here myself on my E29. A couple of years ago, I replaced my chainplates. I placed the new chainplates exterior, and used the old chainplate assembly that was glassed in as a backing plate. The problem was that the old attachment points protruding through the deck remained, and I wanted them gone, plus, drilling through the old chainplates was a PITA, and the new chainplate alignment was not ideal. I wanted the old chainplates gone!
So, while I had planned a doing a major bottom refit on the boat, I also used the opportunity to cut out the old chainplates. Yep, cut 'em out with a circular saw from the outside, leaving a gaping hole about 52-inches long and about 2" wide on both sides! But not without first doing my research, having a plan, and talking with many people experienced with fiberglass reconstruction.
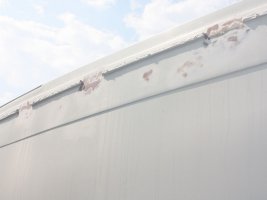
The repair job was actually fairly simple, but took some time. After thoroughly cleaning the inside and outside of the openings first with a degreasing detergent and then with acetone (that took half a day) I bevelled the outside of the opening down to the bottom of the cove stripe and up to the hull-deck flange, as well as on either end of the opening. Then I bevelled the inside of the opening as much as I could manage by working the grinder wheel through the opening from the outside of the boat. This was actually quite effective, especially working after that with roto-zip and dremel attachments. After cleaning up again, I used alternating layers of roving and 10oz cloth to rebuild the opening, both inside and out. Once the outside was built back to approximate fairness with the rest of the cove stripe, I made up any unevenness with fairing compound (see photo). I built back the inside using the same method, but gorund down all the uneven ridges from the original layup so the new layup could go on flat. I also cut away the glass that joined the hull to raceway so I could bond the first several layers to the inside of the hull, then rejoined the hull to raceway with subsequent layers. For additional strength, I pre-made some 4.5-inch wide fiberglass strips about 1/4" thick, that were slightly longer than the opening, and glassed them over the new layup, so there would be solid overlap to the existing hull from the inside for additional reinforcement.
I also ground-out the chainplate openings on deck, glassed and faired those in. Now I'm ready to prime and paint.
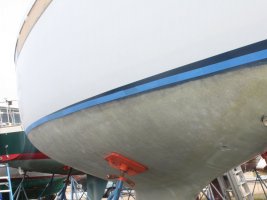
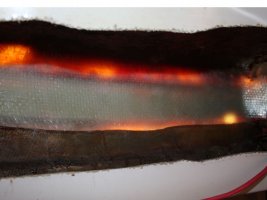
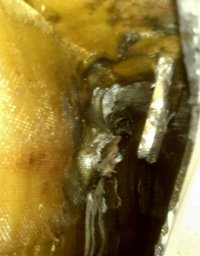
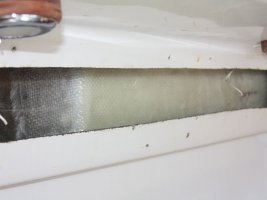
The photos below show 1) the faired opening from the outside (in the upper left corner of the photo - not a great shot as I was photographing something else) and 2) the 1st few layers built up from the inside. I'll post more detailed photos of the end result with the glassed in fiberglass reinforcing strips, along with the finished outside next time I'm down. Overall, I am VERY pleased with the work. It is clean, smooth and fair, and strong. The local experts agree.
As a sidenote, the old chainplates were quite corroded at every weld point. Water had definitely worked it's way in, to what degree I don't know. But after these repairs, I'll feel great about taking this boat out there, and it looks great without the old clutter.
Just happen to be doing a project here myself on my E29. A couple of years ago, I replaced my chainplates. I placed the new chainplates exterior, and used the old chainplate assembly that was glassed in as a backing plate. The problem was that the old attachment points protruding through the deck remained, and I wanted them gone, plus, drilling through the old chainplates was a PITA, and the new chainplate alignment was not ideal. I wanted the old chainplates gone!
So, while I had planned a doing a major bottom refit on the boat, I also used the opportunity to cut out the old chainplates. Yep, cut 'em out with a circular saw from the outside, leaving a gaping hole about 52-inches long and about 2" wide on both sides! But not without first doing my research, having a plan, and talking with many people experienced with fiberglass reconstruction.
The repair job was actually fairly simple, but took some time. After thoroughly cleaning the inside and outside of the openings first with a degreasing detergent and then with acetone (that took half a day) I bevelled the outside of the opening down to the bottom of the cove stripe and up to the hull-deck flange, as well as on either end of the opening. Then I bevelled the inside of the opening as much as I could manage by working the grinder wheel through the opening from the outside of the boat. This was actually quite effective, especially working after that with roto-zip and dremel attachments. After cleaning up again, I used alternating layers of roving and 10oz cloth to rebuild the opening, both inside and out. Once the outside was built back to approximate fairness with the rest of the cove stripe, I made up any unevenness with fairing compound (see photo). I built back the inside using the same method, but gorund down all the uneven ridges from the original layup so the new layup could go on flat. I also cut away the glass that joined the hull to raceway so I could bond the first several layers to the inside of the hull, then rejoined the hull to raceway with subsequent layers. For additional strength, I pre-made some 4.5-inch wide fiberglass strips about 1/4" thick, that were slightly longer than the opening, and glassed them over the new layup, so there would be solid overlap to the existing hull from the inside for additional reinforcement.
I also ground-out the chainplate openings on deck, glassed and faired those in. Now I'm ready to prime and paint.
The photos below show 1) the faired opening from the outside (in the upper left corner of the photo - not a great shot as I was photographing something else) and 2) the 1st few layers built up from the inside. I'll post more detailed photos of the end result with the glassed in fiberglass reinforcing strips, along with the finished outside next time I'm down. Overall, I am VERY pleased with the work. It is clean, smooth and fair, and strong. The local experts agree.
As a sidenote, the old chainplates were quite corroded at every weld point. Water had definitely worked it's way in, to what degree I don't know. But after these repairs, I'll feel great about taking this boat out there, and it looks great without the old clutter.
Attachments
-
 ChainplateRepair1.jpg76.1 KB · Views: 116
 -
 ChainplateRepair2.jpg74.1 KB · Views: 125
CWM
Chuck
>> A couple of years ago, I replaced my chainplates. I placed the new chainplates exterior, and used the old chainplate assembly that was glassed in as a backing plate.
<meta http-equiv="Content-Type" content="text/html; charset=utf-8"><meta name="ProgId" content="Word.Document"><meta name="Generator" content="Microsoft Word 11"><meta name="Originator" content="Microsoft Word 11"><link rel="File-List" href="file:///C:%5CUsers%5CCWMiller%5CAppData%5CLocal%5CTemp%5Cmsohtml1%5C01%5Cclip_filelist.xml"><!--[if gte mso 9]><xml> <w:WordDocument> <w:View>Normal</w:View> <w:Zoom>0</w:Zoom> <w unctuationKerning/> <w:ValidateAgainstSchemas/> <w:SaveIfXMLInvalid>false</w:SaveIfXMLInvalid> <w:IgnoreMixedContent>false</w:IgnoreMixedContent> <w:AlwaysShowPlaceholderText>false</w:AlwaysShowPlaceholderText> <w:Compatibility> <w:BreakWrappedTables/> <w:SnapToGridInCell/> <w:WrapTextWithPunct/> <w:UseAsianBreakRules/> <w
 ontGrowAutofit/> </w:Compatibility> <w:BrowserLevel>MicrosoftInternetExplorer4</w:BrowserLevel> </w:WordDocument> </xml><![endif]--><!--[if gte mso 9]><xml> <w:LatentStyles DefLockedState="false" LatentStyleCount="156"> </w:LatentStyles> </xml><![endif]--><style> <!-- /* Style Definitions */ p.MsoNormal, li.MsoNormal, div.MsoNormal {mso-style-parent:""; margin:0in; margin-bottom:.0001pt; mso-pagination:widow-orphan; font-size:11.0pt; mso-bidi-font-size:10.0pt; font-family:Arial; mso-fareast-font-family:"Times New Roman"; mso-bidi-font-family:"Times New Roman";} @page Section1 {size:8.5in 11.0in; margin:1.0in 1.25in 1.0in 1.25in; mso-header-margin:.5in; mso-footer-margin:.5in; mso-paper-source:0;} div.Section1 {page:Section1;} --> </style><!--[if gte mso 10]> <style> /* Style Definitions */ table.MsoNormalTable {mso-style-name:"Table Normal"; mso-tstyle-rowband-size:0; mso-tstyle-colband-size:0; mso-style-noshow:yes; mso-style-parent:""; mso-padding-alt:0in 5.4pt 0in 5.4pt; mso-para-margin:0in; mso-para-margin-bottom:.0001pt; mso-pagination:widow-orphan; font-size:10.0pt; font-family:"Times New Roman"; mso-ansi-language:#0400; mso-fareast-language:#0400; mso-bidi-language:#0400;} </style> <![endif]-->jkenan:
1. Can you post a photo of the old chain plates that the factory installed?
Also, the dimensions of the old chainplates?
2. When you installed the exterior chainplates that you recently removed, did you extend the spreaders?
TIA
<meta http-equiv="Content-Type" content="text/html; charset=utf-8"><meta name="ProgId" content="Word.Document"><meta name="Generator" content="Microsoft Word 11"><meta name="Originator" content="Microsoft Word 11"><link rel="File-List" href="file:///C:%5CUsers%5CCWMiller%5CAppData%5CLocal%5CTemp%5Cmsohtml1%5C01%5Cclip_filelist.xml"><!--[if gte mso 9]><xml> <w:WordDocument> <w:View>Normal</w:View> <w:Zoom>0</w:Zoom> <w
unctuationKerning/> <w:ValidateAgainstSchemas/> <w:SaveIfXMLInvalid>false</w:SaveIfXMLInvalid> <w:IgnoreMixedContent>false</w:IgnoreMixedContent> <w:AlwaysShowPlaceholderText>false</w:AlwaysShowPlaceholderText> <w:Compatibility> <w:BreakWrappedTables/> <w:SnapToGridInCell/> <w:WrapTextWithPunct/> <w:UseAsianBreakRules/> <wontGrowAutofit/> </w:Compatibility> <w:BrowserLevel>MicrosoftInternetExplorer4</w:BrowserLevel> </w:WordDocument> </xml><![endif]--><!--[if gte mso 9]><xml> <w:LatentStyles DefLockedState="false" LatentStyleCount="156"> </w:LatentStyles> </xml><![endif]--><style> <!-- /* Style Definitions */ p.MsoNormal, li.MsoNormal, div.MsoNormal {mso-style-parent:""; margin:0in; margin-bottom:.0001pt; mso-pagination:widow-orphan; font-size:11.0pt; mso-bidi-font-size:10.0pt; font-family:Arial; mso-fareast-font-family:"Times New Roman"; mso-bidi-font-family:"Times New Roman";} @page Section1 {size:8.5in 11.0in; margin:1.0in 1.25in 1.0in 1.25in; mso-header-margin:.5in; mso-footer-margin:.5in; mso-paper-source:0;} div.Section1 {page:Section1;} --> </style><!--[if gte mso 10]> <style> /* Style Definitions */ table.MsoNormalTable {mso-style-name:"Table Normal"; mso-tstyle-rowband-size:0; mso-tstyle-colband-size:0; mso-style-noshow:yes; mso-style-parent:""; mso-padding-alt:0in 5.4pt 0in 5.4pt; mso-para-margin:0in; mso-para-margin-bottom:.0001pt; mso-pagination:widow-orphan; font-size:10.0pt; font-family:"Times New Roman"; mso-ansi-language:#0400; mso-fareast-language:#0400; mso-bidi-language:#0400;} </style> <![endif]-->jkenan:1. Can you post a photo of the old chain plates that the factory installed?
Also, the dimensions of the old chainplates?
2. When you installed the exterior chainplates that you recently removed, did you extend the spreaders?
TIA
I'll post photos of the old chainplates, along with other aspects of the project next time I'm down working on her - probably about 2 weeks.
I did not extend the spreaders - the rigging experts at Sailcraft Service (in Oriental, NC) did not feel moving the attachment points outboard - about a 1.5-inch difference from where they originally were inboard - warranted doing this. The angles are practically the same, and the cost of doing so would have been a lot. The only issue I have noticed is the lifelines - the shrouds clear them, but not by much, so when people pull on the lifelines, they rub against the shrouds and the lifeline lining wears a little. I've considered taking a pipe bender, and ever-so-slightly bending the stanchions outboard to provide more clearance. That's it though. The new chainplate config was worked beautifully. I've sailed her hard, been out in 30 knots, and had 1 accidental jibe with no adverse result from this config.
I did not extend the spreaders - the rigging experts at Sailcraft Service (in Oriental, NC) did not feel moving the attachment points outboard - about a 1.5-inch difference from where they originally were inboard - warranted doing this. The angles are practically the same, and the cost of doing so would have been a lot. The only issue I have noticed is the lifelines - the shrouds clear them, but not by much, so when people pull on the lifelines
, they rub against the shrouds and the lifeline lining wears a little. I've considered taking a pipe bender, and ever-so-slightly bending the stanchions outboard to provide more clearance. That's it though. The new chainplate config was worked beautifully. I've sailed her hard, been out in 30 knots, and had 1 accidental jibe with no adverse result from this config.Chain plate failure on E27
The chain plate for the main broke as the result of a pulloff tha required the baot going hard over to the rail. (We grounded on a shoal due to low water on the lake and malfuntioning depthfinder.) This is a 1971 E 27 that has not seen regular upkeep. The boat has been in fresh water for at least 15 years. I have not inspected the others but plan to go with the outside mounted version mentioned above. My design plans for a more triangular tab coming up to the shoroud to increase the base area along the junction with the horizontal piece.
The chain plate for the main broke as the result of a pulloff tha required the baot going hard over to the rail. (We grounded on a shoal due to low water on the lake and malfuntioning depthfinder.) This is a 1971 E 27 that has not seen regular upkeep. The boat has been in fresh water for at least 15 years. I have not inspected the others but plan to go with the outside mounted version mentioned above. My design plans for a more triangular tab coming up to the shoroud to increase the base area along the junction with the horizontal piece.
Attachments
-
 DSCN1399.jpg111.1 KB · Views: 115
 -
 DSCN1407.jpg70.2 KB · Views: 100
 -
 IMG00098.jpg54.1 KB · Views: 104
 -
 DSCN1398.jpg84.3 KB · Views: 101
Ugh, looks like mine.
Hmm, that first photo looks very familiar. My 1972 E27 had been pretty badly neglected too, although I think its been a freshwater boat for most of its life. Guess I have a chainplate replacement job in my future. I already have to replace the aft chainplates and stem fitting, so I may as well do it all at once.
I like jkenan's chainplate design, and have the spec's from an earlier post (which I'll modify based on my boats particular dimensions). John, did you put any kind of an angle in to match the shroud angle? If so, what was it approximately? I assume you used 316 SS, do you remember what thickness?
Also, I may try to just grind off the portion of the chainplates protruding up from the deck (although a couple of them are difficult to access on my e27) and leave the horizontal bar in place as a backing bar for the external chainplates.
Doug
I am using 316SS at 1/4-inch thickness for the plates, but am modifying my 1st design since the old plates are no longer part of the scheme. Originally, I used the old horizontal bar as a backing plate, but they were a royal pain to drill through, and the drill bit migrated enough so the new plates were not aligned as I planned (see photo). The old plates protruding through the deck posed some issues, and just cutting off the protrusions while leaving the horiz. bar was easier said than done, so I decided to remove them entirely and start over.
With the old plates gone, I'm not as limited as before with the placement/size of the new plates - using the old bar as a backing plate required higher attachment of the new plates along the cove stripe (about 1/2 way up the stripe's vertical distance to the rubrail), and required sufficient width in the new plates to span the weld joint of the old plates (about 3.5 inches). Functionally, it was fine, but now that the old plates are gone, I'm redesigning the new plates for a taller, slimmer appearance (anyone want to buy the old ones?). I've attached drawings of the new design (left), beside the old one (right), as well as a photo of the 1st design plates installed. I'm also having a new forestay and split backstay chainplates made, matching the originals. The 1st set of plates delivered flat, but I'm thinking of having the new ones bent (I'll determine angles next time I'm down at the boat). If you bend them yourself, bronze inserts in a vice will keep the SS from marring.
For anyone looking to have plates made, I highly recommend John Justin at Custom Marine. He has been fabricating all of Pacific Seacraft's chainplates for years, and continues to do so under their new ownership. His prices seem very reasonable (but that was a few years ago, and I havn't received his quote for the new plates yet). I asked him if I could share his contact info here, and he said yes. His phone number is (714) 642-8941.
Attachments
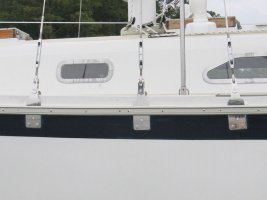
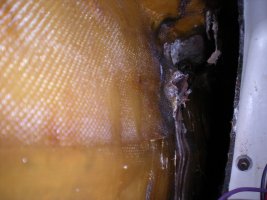
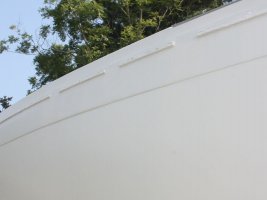
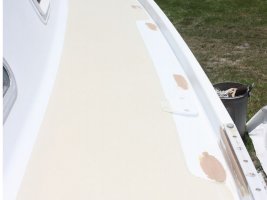
Finished the last of the repair layup this past weekend. The holes I cut in the sides of the boat to remove existing chainplates are completely faired on the outside (and most of the topsides are primed for painting with the exception of the starboard side around chainplates shown in the photo below). The inside of the hole was beveled as well, and is built up with about 10 successive layers of roving and cloth. A 1/4" fiberglass backing strip wider than the hole itself was glassed in over that (shown in the photos) as additional reinforcement.
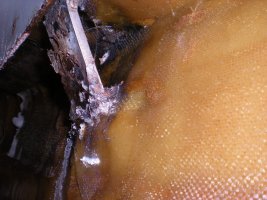
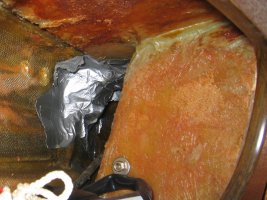
My old chainplates got cut up and used as backing plates by a buddy of mine in the yard on his Tartan 27, so unfortunately, I don't have photos of them extracted from the boat. I did post a photo of PO's work - he had duct taped paper towels around the chainplates belowdecks, and poured epoxy around through the hole where they came up through the deck (to seal them he told me) - but did NOT remove the paper towels!!! They were a hardened soggy mess for who knows how long when I bought the boat, and once I chiseled all of that off each plate, they looked about as bad as the ones in goboatin's earlier post.
New chainplates are being made as we speak, including forestay and split backstay plates.
Several other refit projects occuring - thruhull relocation, painting topsides & deck & binnacle, rewiring, new exhaust riser (to name a few) - but that's another post!
Attachments
-
 ExteriorRepair.jpg55 KB · Views: 112
 -
 ExteriorRepair2.jpg74.2 KB · Views: 113
 -
 InteriorRepair.jpg62.4 KB · Views: 117
 -
 OrigCP.jpg147 KB · Views: 113
Also meant to post photos of the deck repair, where original chainplates came up. I also widened all stanchion base fastener holes and filled with epoxy to protect Balsa, and repaired an 8-inch long crack in the toe-rail next the aft starboard shroud. Deck is now ready for primer.
Attachments
-
 DeckRepair.jpg66.1 KB · Views: 516
Nice work
You mentioned earlier that you are using 316 SS one quarter inch thick. How wide and how long? Are they as long as the originals?
There was a guy in our area who had done an outboard chainplate project on a Cascade 29. They were huge--probably way overbuilt for the size of the boat and its rig loads. But I really enjoyed looking at them anyway.
I attached a PDF of the new CP design to one of my posts above within this thread - the PDF is named 'Chainplate Shroud3.pdf'.
Basically, it is 10" tall piece that is 1.75" wide at the top, and 2.5" wide at the base. The wider base allows a broader attachment pattern since these boats don't lend themselves to fastening longer straps to the topsides (interior liner and such present difficulties), and therefore the CP's must be on the 'short' side. The original design was 3.5" wide at the base and 9" tall. That width was required since the fasteners needed to span the weld joints of the old chainplate (used as a backing plate). I arrived at 9" height by placing fastener hole centers in the middle of the original CP horizontal bar and went up to allow 1/2" from the base of the clevis pin hole to the toe rail. I thought that would be plenty, but in fact it was not - the base of the new turnbuckle toggles (which I did not have when I was projecting measurements and allowances) was barely in contact with the toerail, which I did not like. By going to 10" with the new design, I'm extending that point 1/2" upward (my rigging will accomodate this), and extending the CP base 1/2" downward. This basically puts my new fasteners as low as is reasonable in the raceways without creating other issues (ie, projects). And with the old plates gone, I don't need to span the weld joint. I also think the narrow profile will look better as well.
Basically, it is 10" tall piece that is 1.75" wide at the top, and 2.5" wide at the base. The wider base allows a broader attachment pattern since these boats don't lend themselves to fastening longer straps to the topsides (interior liner and such present difficulties), and therefore the CP's must be on the 'short' side. The original design was 3.5" wide at the base and 9" tall. That width was required since the fasteners needed to span the weld joints of the old chainplate (used as a backing plate). I arrived at 9" height by placing fastener hole centers in the middle of the original CP horizontal bar and went up to allow 1/2" from the base of the clevis pin hole to the toe rail. I thought that would be plenty, but in fact it was not - the base of the new turnbuckle toggles (which I did not have when I was projecting measurements and allowances) was barely in contact with the toerail, which I did not like. By going to 10" with the new design, I'm extending that point 1/2" upward (my rigging will accomodate this), and extending the CP base 1/2" downward. This basically puts my new fasteners as low as is reasonable in the raceways without creating other issues (ie, projects
). And with the old plates gone, I don't need to span the weld joint. I also think the narrow profile will look better as well.