• Untitled Document

    Join us on April 26th, 7pm EST

    for the CBEC Virtual Meeting

    All EYO members and followers are welcome to join the fun and get to know the guest speaker!

    See the link below for login credentials and join us!

    April Meeting Info

    (dismiss this notice by hitting 'X', upper right)

New bulkhead

jengels

Member II
Joint

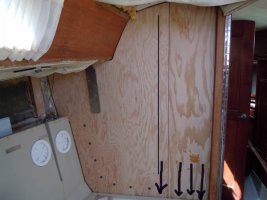
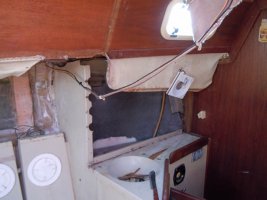
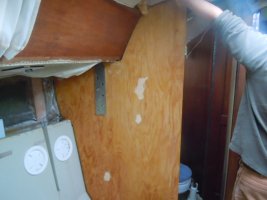
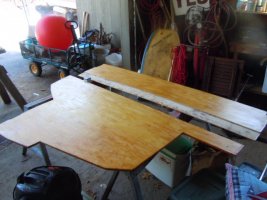
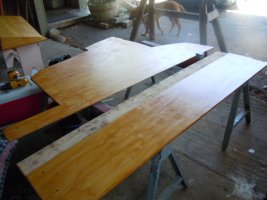
Roscoe, I'll be using a lap joint, one half inch on either side. I'll glue it and screw it every three inches or so. Then I will epoxy over the joint with cloth. This bulkhead is also bolted to the inner liner below the chainplate. There are also four bolts at the bottom of the bulkhead near the shower pan. The joint is positioned so that one of those four bolts will go through the larger(outboard) piece of the bulkhead. I will have more detailed pictures of the bolts when I go back to put in the real pieces.

John
 

jengels

Member II
Project Stalled

To all who were following my progress with this project, I apologize for my lack of postings, but the weather here this winter has been brutal. My boat is in the back of the boatyard and the last time I went to check on it I had to wade through knee deep snow. I have the plywood for the new bulkhead in the garage ready to be cut. We're expecting some temps in the sixties for the next few days so possibly some snow melt. So for now I'll be in the basement working on the trains.

Thanks, John
 

jengels

Member II
Project resumed

Since the weather has improved a bit here and the snow is gone I have gone back to the boatyard to pick up where I left off last fall...sort of. After doing more research into scarf joints I realized my half inch joint was insufficient. I looked into the West Systems scarfing jig but that only works on plywood up to three-eighths, I'm using half-inch. So I have decided to use a four inch lap joint that will be epoxied and screwed. This bulkhead is heavily bolted all along the bottom. It was barely tabbed to the hull at all. I intend to improve on that. Over the last couple of days I have cut two pieces that fit very well. When I go back to the boat I will take more pictures and post. Once again if anybody has any questions about what I found back there or any suggestions please let me know.

John
 

jengels

Member II
Project Resumed... again.

I have the pieces cut for the new bulkhead. The first picture is the two pieces in place before the final assembly. The black dots roughly show where the bolts are located. The arrows point to the bolts that are located at the bottom of the panel on the head side. The thin line is the thickness of the joint, 4 inches. Picture two is the space formerly occupied by the head cabinet which was a mess. Pictures three and four are of the new cabinet awaiting either paint or veneer.
 

Attachments

  • Bulkhead.jpg
    Bulkhead.jpg
    63.4 KB · Views: 68
  • head .JPG
    head .JPG
    72.6 KB · Views: 68
  • cabinet 1.JPG
    cabinet 1.JPG
    101.5 KB · Views: 87
  • cabinet 2.JPG
    cabinet 2.JPG
    94.8 KB · Views: 67

PDX

Member III
Wow. I like the idea of the four inch lap and it looks like the joint is in a good location. I have some questions:

It appears that the bulkhead fits flush up against the settee in the cabin. I understand the 30+ is a panned boat and am not familiar with access in and around the settee. Will you have access to tab both sides of the bulkhead to the hull?

Are you going to tab the raw plywood and then veneer over the top of the tabbing?

Will you veneer underneath where the chainplates fit? And a related question, are you going to use actual veneer or are you going to use a thin sheet of veneered plywood?

Do you know what kind of glass you will use and how many layers?
 

jengels

Member II
PDX, thanks for the vote of confidence. I positioned the joint so it catches bolts all the way across the bottom. As far as the tabbing goes, there's not much. There was only one layer of cloth, about 10" long, on the aft side of the bulkhead just above the settee. I will be using two layers, overlapping, when I put the new bulkhead in. There was also some tabbing on both sides of the bulkhead along the top. Again, just one layer. It almost seemed like a token gesture. I'll use the West System resin and woven cloth to tab it in. I plan to tab in the new bulkhead and then veneer it. As far as veneering under the chainplate, I don't know yet. The veneer has to be pretty thin. There is only about a half inch between the chainplate and that plastic backing on the head side. I have also thought about just painting the bulkhead with a nice finish as I saw someone else do in a beautiful restoration on this site.

John
 

Loren Beach

O34 - Portland, OR
Senior Moderator
Blogs Author
Kudos for Biax

Biaxial cloth is 100% stronger across the joint than the traditional weave. I used it for anything structural in our boat. Wets out nicely for epoxy use. After cutting out the biax length needed, I wet it out in a tray, and then gently roll up the piece and lay it on the joint. (wet out the area with some neat epoxy first, BTW.
If needed, I first put a fillet on the 90 degree part with thickened epoxy to soften the angle and then lay the wetted-out biax on and smooth down with a "soft" blade like a spatula. Sometimes I have wet it out on a piece of wax paper and then applied it to the mating surface, and then peeled off the paper.

Here is one link with a quick search : http://www.jamestowndistributors.com/userportal/show_product.do?pid=1442&BASE

Regards,
Loren
 

Attachments

  • 00005837.jpg
    00005837.jpg
    36.9 KB · Views: 246
Last edited:

PDX

Member III
Painted bulkhead

I'm partial to painted bulkheads for brightening up an interior. Here is an older thread that contains a series of interior rehab photos, scroll down to post 6 for before and after pictures:

http://www.ericsonyachts.org/infoexchange/showthread.php?t=4500&highlight=nova


One thing about painting plywood, though, is I suspect the wild, rough plywood grain will telegraph through the paint. You may need to fair it to get a smooth painted surface.

Also, on a related topic, make sure the new bulkhead is separated slightly from the hull when you tab it in. If it is touching the hull directly it can create a hard point. People often stuff a foam edging in around the bulkhead edge to keep it separated from the hull when tabbing.
 

jengels

Member II
Paint It Is

PDX, I'm sold. That was one of the pictures that I had seen of a painted bulkhead. I have two coats of resin on the edges of the plywood and I just put the first coat of marine spar varnish on the faces. Hopefully two or three coats will provide a nice smooth finish for the paint. As far as the hard spots go, I know about putting a cushion of some kind between the edge of the bulkhead and the hull. On the Bristol, which had contact all the way from the deck to the bilge, I put a thin strip of foam. On the 30+ there is only about 10" of contact with the hull and it's up around the boot stripe area. Thanks for the nudge in the paint direction, I think that looks nicer too.

John
 

jengels

Member II
Thanks for the encouragement Charlie. I'll be there tomorrow to put the whole shebang back together. I'll take some pictures to post and let everyone know how it went.

John
 

jengels

Member II
Almost

Well, half of the shebang is in. While we were drilling the holes for the chainplate, the outboard piece shifted about an eighth of an inch. Therefore the joint overlapped by the same. So I brought the inboard section home to trim a bit off the end that goes into the compression post channel and re-epoxy the exposed edge. Picture one is of the outboard piece in place. Pictures two and three are of the pieces awaiting the trip to the boatyard. Anyway, I can start putting the trim work in the salon back together. Also, for anybody in the Port Jefferson, NY area, I found out about a great place for stainless hardware. It's called D. Lillys on Linden Place, PJ.

John
 

Attachments

  • DSCN0484.JPG
    DSCN0484.JPG
    83 KB · Views: 63
  • Bulkhead Pcs.JPG
    Bulkhead Pcs.JPG
    81.4 KB · Views: 64
  • Bulkhead Pcs 2.JPG
    Bulkhead Pcs 2.JPG
    83.3 KB · Views: 63

jengels

Member II
Mark, I'm going to paint the bulkhead for two reasons. As thin as it is, there is not a bit of room under the chainplate for any veneer, it's really tight. Also I would like to keep an eye on the joint for at least one season to make sure everything is OK. I can always add the veneer at a latter date. I'd have to fit it around the chain plate.

John
 

jengels

Member II
First test

We took the boat out on Saturday for it's first sail, nothing too aggressive, and everything held up fine. Again, thanks to everyone who offered advice during this project, there are many to follow.

John
 

jengels

Member II
One More Thing

Be careful about leaving your computer unattended after logging in as I did so that my idiot friend could post that nonsense. I actually despise the Yankees. By the way, I'll be posting a video in a few days showing the restored interior of the good ship PINEAPPLE.

John
 
Last edited:

LeifThor

Member III
John, I’m curious how your bulkhead has held up over the last 9 years? Anything that has held up well or poorly?

I’m going to need to do some bulkhead repair/ replacement on my E 35-2 and currently in the research stage. Reading about repairs is good. Learning how they’ve held up over many sails is better.

Thanks!
 
Top