
Visual Appeal
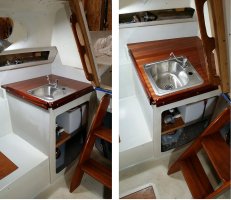
The last part of the sink base rebuild was the counter top. We wanted it to match the rest of the boat, so we opted to imitate the ribbon stripe mahagony bulkheads and cabinet fronts with the counter top, but with thicker lamination's. We have used this technique quite a bit on other projects and really like it as it it easy to do, forgiving, and the final sanding makes up for a lot of crude epoxy work and makes it look like real craftsmanship of carefully fitted pieces. Our shortcut.
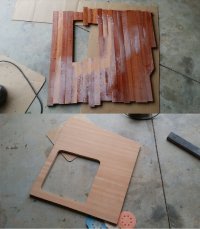
First, we made a template of the counter top in cardboard, then using the template cut out a plywood top from nice flat 3/8" birch plywood. After some minor sanding and fitting of the plywood top, we took that off and cut out the hole for the new sink, then set it aside.
Next, we took some leftover sections of mahogany from other projects and cut them to 1/4" strips on the bandsaw, with the grain so it was quartersawn, or as close as we could get it. Then we epoxied the strips down to the birch plywood base. It looked ugly as heck when we were done, see pictures below.
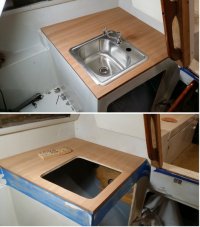
After it hardened, we sanded it down and smoothed the edges. The final step was to put it into place, and then sand the edges so they matched the fiberglass. Note that the fiberglass base is not square, flat, or true in any direction! So that took some work.
Pictures below show the sequence of creating the basic top.
Sink Selection
We looked at marine grade sinks in Defender and various sites, and while we have no doubt they are heavy duty wonders that will stand up to the harshest of marine life, we did not want to pay $200 for a simple stainless steel sink. So we found a nice bar sink on Amazon that matched our size for only $39. It was made of 304SS, was 22 guage so thinner than the marine ones but lighter too which was good, and was brushed rather than polished SS. I wouldn't want to carelessly drop a cast iron skillet into it, but for our application it was the right price, right size, right weight, and right material. Plus, the biggest uses the sink gets is washing hands, coffee cups, and a bowel or two.
We only ran into two problems. First, the old tailpipe from the original sink did not match the threads on the new bar sink tailpipe. The threads on the standard household drain tailpipe were 1-1/2" straight pipe thread. Fortunately, Forespar makes a Marelon Tailpipe / Hose Connector that is female 1-1/2" straight pipe thread that matches, and has a 1-1/2" hose barb on the other end. Screw it onto the sink drain and it is easy to connect a hose from the sink outlet to the sink through hull valve.
The second problem was that our marine faucet was smaller than the sink faucet hole, but that was fixed with an adapter bought at home depot made for a spray nozzle on a sink. We just slid it onto the faucet and screwed it down. The second hole will be filled with a soap dispenser for dish soap from Home Depot, Stainless Steel to match. We like the idea of it being mounted and not able to roll around.
All the parts and pieces for the sink itself came to less than $100 including the faucet.
Final Assembly
The last piece is to put it all together. We coated both sides of the countertop with two coats of thinned penetrating epoxy. Later we will put finish coats on it to protect from UV. We also made new side trim pieces since the originals were too short now. While we were at it we made matching ones for all of the other areas of the boat.
Later when the boat is farther along, we will use the open countertop space under the back cabin bulkhead that sticks out for some plates, coffee cups, and bowl storage. A nice little mahogany rack with them stored on it will look great, and be functional.
We think it looks terrific! And really is starting to show what this little yacht is going to look like when she is all done.