• Untitled Document

    The 2024-2025 Fund Raising Season has Opened!

    EricsonYachts.org has opened the season for raising funds to support the expenses of the site. If you would like to participate, please see the link below for additional information.

    Thanks so much for your continued support of EricsonYachts.org!

    2024-2025 Fund Raising Info

Ericson Windlass Installation [Master Thread]

footrope

Contributing Partner
Blogs Author
Over the past few years I have reviewed many anchor windlass and locker modification posts here on EY.org. I looked at a couple in person, too. Some really fine thought and workmanship has gone into the various configurations. I thank and appreciate all those who have gone before me and posted their process and results. I will share my experience here.

Briefly, the decisions that guide this installation
1. No odors or moisture shall get into the v-berth area. We've had wet feet in the middle of the night from the existing locker pan and will not accept any more of that.
2. The windlass shall not be a trip hazard on the foredeck and the anchor locker door will remain as unmolested as possible.
3. The pile of rode and chain must be accessible from the deck in case of pyramids or fouling and to facilitate drying out the locker contents.

Enough of that requirements-speak. So, there will be a new, lowered floor and the locker must be sealed so the moisture stays out of the interior of the boat.

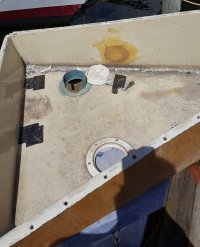
I made a cardboard pattern for the new floor, followed by a slightly more accurate 1/8" plywood pattern shown below. The new floor slants slightly downward towards the pointy part of the bow. A new drain hole will be drilled on the left side of the hull up there. The top of the new floor will be about 1/2" below the edge of the v-berth opening.
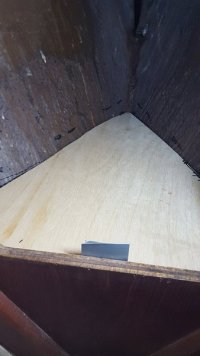
20170214_162101-small.jpg

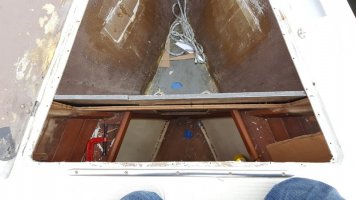
The existing wires and washdown pump hose were routed low in the hull and come out below the level of the new floor. Rather than re-route them, I made holes in the new floor and epoxied in 1-1/4" unions for PVC pipe to act as feed-throughs. I will add pipe above the floor to an appropriate height. The chain and turnbuckle attached the bitter end of the rode to a u-bolt. The aluminum turnbuckle broke with little effort while I was removing it. The u-bolt has also been hacksawed out.
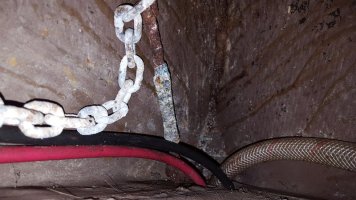
20161027_140822-small.jpg

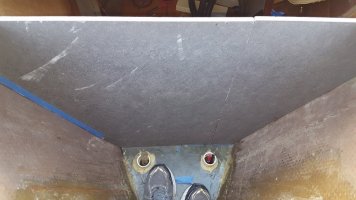
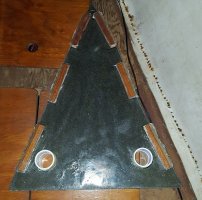
The new floor is made of 1/2" Coosa board, which is a flberglass reinforced polyurethane foam replacement for plywood. Coosa is impervious to water. I used the stronger Bluewater 26 product. I covered both sides with one layer of epoxy and cloth, to protect against dents. It is lighter than marine plywood and plenty strong. The underside of the floor has mahogany cleats (made from scraps) and fiberglass cloth "curb-feelers" to keep control of the thickened epoxy during the final installation. Using peanut butter consistency epoxy was important as it kept the mess to a minimum when I had to fit the floor through the existing opening. It barely fit. I spent about an hour doing dry-runs of getting the floor through the v-berth opening and the wires and hose into the unions. After the initial set-up overnight I added more thickened epoxy over the cleats and then tabbed the sides in with one layer of cloth and epoxy.
20170422_164842-crop.jpg

Here is a shot of the floor after one of the dry-runs. The edges of the floor were cut on an angle and then were custom tailored during the initial dry-fits, before the cleats were glued on. The cleats were made to roughly match the angle of the hull and then glued to the bottom of the floor. Coosa (I'm just a satisfied customer) cuts with regular wood-working tools and files and rasps work great. Not hard at all to work with it. There is some fiberglass chop embedded in the polyurethane, in addition to two layers of cloth about an eighth inch below each surface.
20170420_133645-small.jpg

In Part 2 I'll get into the demolition of the old anchor pan and next steps to seal up the locker.
20170430_121536-small.jpg
 

Christian Williams

E381 - Los Angeles
Senior Moderator
Blogs Author
Wonderful. Can't wait to see which windlass you chose and how you will fit it and handle the chain lead and drop.
 

Teranodon

Member III
Coosa

This Coosa material looks very interesting for all sorts of applications. I admit I never heard of it. I found a nice video on boatoutfitters.com. It invites comparison with Starboard. Apparently, it works well with many adhesives (which Starboard conspicuously does not). Furthermore, it comes in thick sizes. Starboard certainly looks nicer. The claim is that Coosa can be worked with standard woodworking tools, which surprises me given the fiberglass content. I did a quick price comparison for 1/2-inch: Coosa looks to be about 10% more expensive.

Having gone through a windlass installation, I'm looking forward to Part II.
 

footrope

Contributing Partner
Blogs Author
Why I chose Coosa

I found Coosa board by chance at a local chandlery, where a 2' x 4' sheet was propped against a counter waiting for the customer to pick it up. A short chat with the customer service person and a look at the price was enough to get me curious. It is light and impervious to water and cheaper than G-10 or any fiberglass sheet layup I have found. Those are the main reasons I chose it for the bow mods and windlass installation. I sold 1/4 of the sheet to a boating pal and he used it for shelves and dividers in his remodeled ice box, clad in a layer of epoxy and cloth. As a structural member with backing plates or epoxy filled fastener holes it can be used like plywood based on my reading and experience building that little floor which is approximately 18" x 23" x 23". After the cleats were glued on and the feed-thrus glued in, I stood on it (175 lbs) before installation in the bow. A little confidence building exercise.

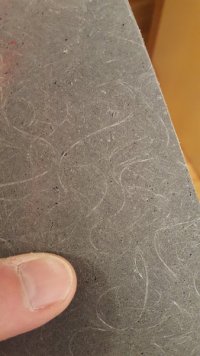
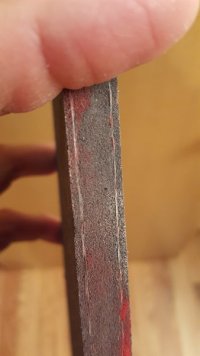
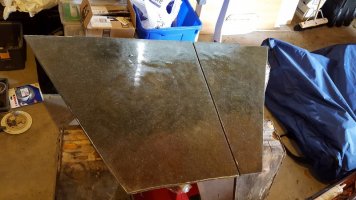
I bought my 4 x 8 sheet at an industrial/marine supply house that stocked the Bluewater 26 in thicknesses of 1/2" and 2" and could get other thicknesses after a 3 week wait. The sales pitch says the thicker stuff is used for the decks of fishing boats. That must be for deck cores because the raw surface needs impact protection. Here are some pictures of the raw board. The polyurethane is mixed with fiberglass strands and on the edge view you can easily see the two cloth layers. It makes gray dust, similar to wood sawdust, when you cut it.
20170503_231654-small.jpg20170503_231822-small.jpg
 
Last edited:

footrope

Contributing Partner
Blogs Author
E38 Windlass Installation Part 2 - Anchor Locker Demolition

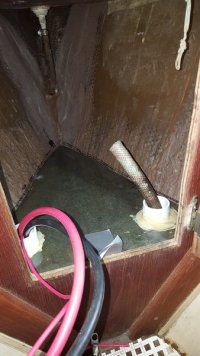
I have a nice relationship with the original anchor locker pan. It is deep enough to hold the rode and chain I use for typical anchoring which is about 150 ft and 35 feet of water. The rest of the rode can be fed down to the compartment forward of the v-berth. Many of the Ericson line has that door into this area at the front of the v-berth. The rode today is 60 feet of 5/16 HT chain and 200+ feet of 3-strand nylon. Without a windlass I can lift chain and a 33 lb Bruce by myself up to about a 35 foot depth. There used to be a windlass installed just aft of the anchor locker and it intruded much into the v-berth. It was encased in a nice box, but it was a head knocker when making the bed, etc. Also the line stripper was useless and I never did figure out how to use the windlass after several frustrating experiences. So, in 2014 I had it removed and the deck holes professionally patched. There was also a foot switch that was removed.

20170414_130418-small.jpg

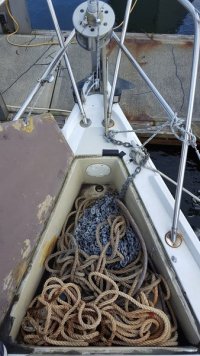
Another goal of this locker re-configuration is to accommodate at least 400' of rode in one compartment that is accessible from the deck. I have 300 feet of new 5/8" 8-plait that I bought second hand and the 60 feet of chain. Eventually I'll replace the chain with a 100 foot length. We are going to be exploring northwards of Desolation Sound in the coming years and I have heard that anchoring in 60 to 90 feet is sometimes required. Those depths are not feasible without a windlass. Using the 8-plait I could eventually go to 500 feet of total rode in this space, if needed. I'm eye-balling this based on how the 300 feet of 8-plait fits in a box, but soon I'll be able to test that estimate. This picture shows the lower compartment with all 200+ feet of nylon rode and the pan still in place.

20160409_163052-small.jpg

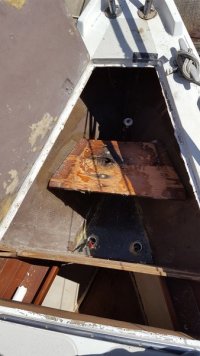
Demolition: I asked a boating friend to give me a hand with this part. The existing pan was resting on a 3/4" plywood cross piece that was firmly tabbed into the bow about 9 inches below deck level. The perimeter lip of the pan was randomly penetrated by sheet metal screws and the whole thing had been re-bedded with the plumber's friend, silicone. A wire wheel exposed the screw heads and they were pretty easy to zip out with a drill. The pan is made of fiberglass and has some chopped strand in the gelcoat-like upper coating. So, as we tried to free the lip from the silicone, it chipped. Unavoidable and I do want to save the aft 8 inches of the pan for re-installation. I'll have some patching to do at both aft corners. The shortened pan will be epoxied and probably tabbed into place to prevent leaks.

The pan was glued onto the crosspiece with polyester resin, fortunately. One small length of tabbing at the aft edge and none in front. Although there were some old holes through both the pan and the plywood that were repaired with epoxy, we were able to get them apart from below with a large chisel and and a hammer. The round access port in the front vertical surface had to be removed to allow the pan to be lifted out. A close fit. It was not that easy to get the pan loose between the silicone and the glue, but it came out without any damage except to the lip, as mentioned before. The picture below shows the pan and it's features. The bronze feed-thru marks the edge of the v-berth bulkhead below.
20170430_123053-crop.jpg

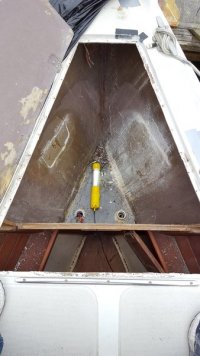
This picture shows the nice access I'll have to the hardware for the pulpit bases, deck cleats and the anchor roller and bow chainplate. Not to mention the nav light wiring.
20170502_123520-small.jpg

Finally, the crosspiece has been sawed out. My next post will discuss the windlass I selected.
20170502_155637-small.jpg
 
Last edited:

footrope

Contributing Partner
Blogs Author
E38 Windlass Installation Part 3 - Windlass Decision

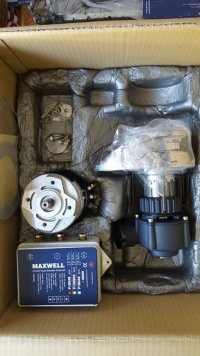
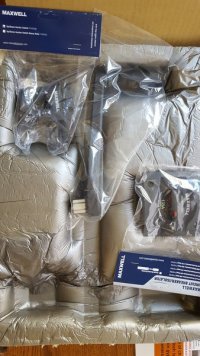
I chose the Maxwell RC8-8 12 volt DC windlass which is recommended for boats of 38 feet. RC refers to rope-chain which is my preferred rode. It has the 5/16" chain and 5/8" rope gypsy, which fits the chain I already have. It is the vertical low-profile type, i.e. no capstan. I compared it to two Lewmars and a Lofrans, all rated for similar sized boats. I inspected all of the candidate windlasses at a chandlery or boat show. I made a very small spreadsheet that helped compare the features and specs. Here are the criteria: Max. Pull lb, Working load lb, Weight lb, Material, Motor Watts, Retrieval speed, Amps. Yes, Price was in there also as a tie-breaker.

The Working Load of 440 lb was middle of the road for the four contenders, but sufficient to allow me to go to 200 feet of chain some day, if desired. The windlass Weight was the lowest, quoted at 36.3 lb, and the body and gypsy Material were both stainless steel. These are desirable features for the bow of a sailboat of this size. The Retrieval speed is supposed to be 92 feet per minute. That figure is 23 fpm higher than the highest of the others and it doesn't seem to be an outlandish claim based on some user opinions. So, when the local Price (no shipping) came in next to cheapest, I made my decision and here it is:

20170319_163413-small.jpg

Also included is an up-down toggle switch, a winch handle, and a panel mounted 135 amp breaker/isolator and some hardware. I'll discuss the wiring next. It was a good thing to get the windlass in hand and look at the wiring requirements before committing some installation decisions to the saw and epoxy.

20170319_163257-small.jpg
 
Last edited:

footrope

Contributing Partner
Blogs Author
E38 Windlass Installation Part 4 - Windlass Wiring

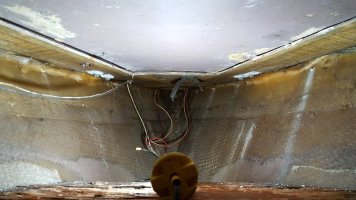
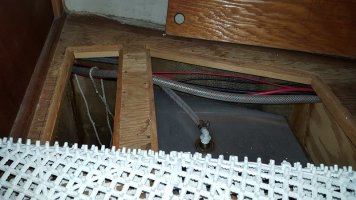
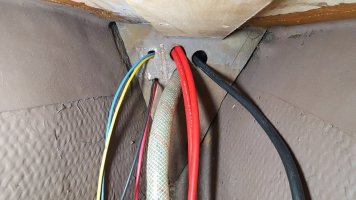
The boat came with a windlass and the #4 gauge wires that ran from the DC panel area to the bow along the port side. They ran behind the dinette seat backs in the storage area, under the sink in the head, and then were strung along under the floor of the v-berth. From there they dived low and came up below the new floor. See Part 1 that started this thread. There is a Windlass switch/breaker on the DC panel, and below the DC panel behind a blank panel there was a 100 amp Blue Seas breaker/isolator on the positive wire. The old wiring did not include a smaller wire, such as a #12 or #14 gauge, to energize the solenoid to control the motor. How the old windlass was wired was a mystery until I traced the old circuits. Eye-opening but not necessarily dangerous.

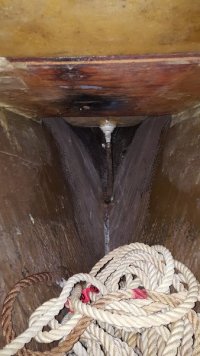
Windlass wires in the v-berth area. Wires exiting the v-berth. Note the washdown pump hose.
20170326_143846-small.jpg20170502_124026-small.jpg

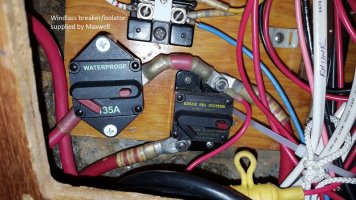
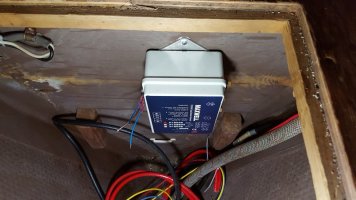
I replaced the 100 amp breaker with the Maxwell supplied 135 amp breaker. It mounted in essentially the same spot as the old one, but it was a panel mount rather than a surface mount. So I mounted it on 3/4" nylon spacers. I did not have to modify the existing #4 gauge jumper to make this change. I decided to give up the panel mount convenience for this breaker. It will hide behind a blank cover. Maybe I'll label the cover.

Windlass breaker/isolator 135 amp
20170422_133101-small.jpg

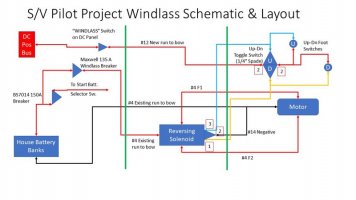
The Maxwell wiring diagram and specs recommend #2 gauge wiring for a run of this length. I elected to stick with the existing #4 gauge. If testing indicates a need for larger wire it is relatively easy to run new wire. Maxwell also depicts a smaller gauge positive wire to energize the Up/Down solenoid and control switches. This makes sense, so I ran that new positive wire, a red #12, all the way to the bow alongside the #4 wires where it will connect to the Up/Down switches. I wired it to the switch on the DC panel but it does not go through the larger breaker/isolator that provides power for the motor (this is a minor deviation from the Maxwell diagram).

Windlass Wiring Diagram.jpg

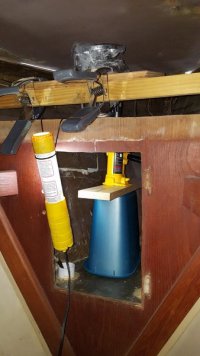
The Maxwell Dual Direction Solenoid mounts below the floor of the v-berth in a nice big space that will stay dry. The positive #4 wire terminates there. From there two red #4 wires will run to the motor. The #4 negative wire connects directly to the motor. Two #14 Up/Down control wires also run to the bow from that solenoid, and a #14 gauge black wire runs from the negative terminal of the motor back to the solenoid to complete the windlass control circuitry. That's seven wires that run up into the bow.

Solenoid in most forward v-berth storage area
20170502_124002-small.jpg

The wires and Dual Direction Solenoid have been tested successfully. The solenoid requires about 2 amps to operate.

I have not decided on where to mount the Up/Down toggle switch, remote controls or foot switches. Still considering the ergonomics.

This catches up the thread for progress made to date. The next post will discuss the plan for mounting the windlass and connecting it to the bow structure.
 
Last edited:

footrope

Contributing Partner
Blogs Author
E38 Windlass Installation Part 5 - Bow structure and windlass installation plan

The locker pan will be cut about 7” from the aft wall, to be fit back into its old position resting on the existing v-berth bulkhead. It will be epoxied and tabbed in permanently.

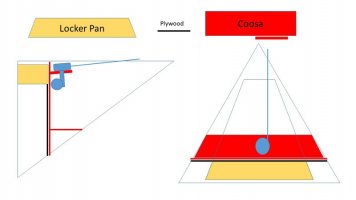
There will be a ½” Coosa bulkhead, covered in cloth and epoxy, in front of and parallel to the existing plywood bulkhead. It will rest on the new floor and extend up to the lip under the locker door. The Coosa will extend to the hull and be tabbed to the hull, the underside of the deck and the new floor. Additional tabbing to the inside of the anchor pan will be added. This bulkhead seals off the locker from the v-berth. The existing v-berth door will then be decorative and will be secured closed.

The attached diagram, which is not to scale, shows the plan for the structure to mount and physically secure the windlass. The Coosa board windlass shelf is two pieces of ½ board glassed together. There will be a layer of glass and epoxy between them and then the assembled 1” board will be covered by a layer of cloth and epoxy. The shelf will extend to the hull and be tabbed to the hull all the way around. The shelf will be angled slightly to align the gypsy properly to the rode coming over the lip of the locker opening. The diagram exaggerates this angle. The shelf will be butted against the Coosa bulkhead and glassed to it also.
Note: See post #11 for a change to the shelf structure.

Coosa Size Req.jpg

The chain drop will be about 15 to 18 inches from the bottom of the shelf. I can only estimate it until I get a couple more measurements from the deck to the floor.

Operating the windlass will require the locker door to be open. I am not sure if the forward edge of the door will be notched in some way to admit the rode. There will have to be a small roller for the forward edge of the locker opening, to turn the rode and protect the edge of the opening.

If necessary I can add stainless bolts through the Coosa bulkhead to the plywood bulkhead. Other methods are available to strengthen the shelf against the pull are also available. I’ll have to see what happens during testing.
 
Last edited:

Teranodon

Member III
[.....] The shelf will extend to the hull and be tabbed to the hull all the way around. The shelf will be angled slightly to align the gypsy properly to the rode coming over the lip of the locker opening. [.......] I am not sure if the forward edge of the door will be notched in some way to admit the rode. There will have to be a small roller for the forward edge of the locker opening, to turn the rode and protect the edge of the opening.

Very interesting design. Some observations:

1. You have decided to transfer the forces from the windlass back to the reinforced bulkhead and sideways to the hull. Are you sure that these structures and your joints will be strong enough? Why not connect your shelf up to the deck as well, with a strong custom bracket of some kind?

2. I'm not sure how you can avoid cutting up the hatch to let the chain through. The angle is shallow, so it will need to be a sizable opening. How will you keep fresh and salt water out? Will there be some kind of cover?

3. Have you considered adding a chain stopper?

4. 200 feet of 5/16 chain will weigh over 200 lbs. With the windlass, how will that change the trim of the boat? You can ask a hefty person to stand in the approximate location to get an idea.

5. You might want to extend the shelf forward a bit and the windlass with it, so that you aren't dropping the chain so close to the bulkhead, where it might have a tendency to pile up.

6. Will you be able to turn the gypsy with the winch handle if you have a malfunction?

7. Since your windlass will not be visible with the hatch closed, did you consider putting in a horizontal model, which might have some advantages?

8. Where will you attach the bitter end of the rode?
 

footrope

Contributing Partner
Blogs Author
Very interesting design. Some observations:

1. You have decided to transfer the forces from the windlass back to the reinforced bulkhead and sideways to the hull. Are you sure that these structures and your joints will be strong enough? Why not connect your shelf up to the deck as well, with a strong custom bracket of some kind?

I am not sure the structure and joints will be strong enough under maximum loads, but I am pretty sure the working loads can be absorbed. Unfortunately I am not capable of calculating this accurately enough to prove it. I have designed the shelf to move the weight of the windlass aft as far as possible and to allow me to be guided by testing for further strengthening via bracketry, gussets, or other means. The light weight and other properties of the Coosa board vs plywood or a denser composite board have been on my mind. Most of the windlass shelf/bracket and fastening choices I've seen are either sensibly or extremely overbuilt which is a good thing for strength and durability. Another feature of other installations is how far forward some of them place the windlass. The further forward the windlass is placed, the easier it is to take advantage of the triangular bow/deck structure and the smaller and lighter the bracket can be and still do the job. But, that also means the bow might be down more than desired. I intend to use my forward 60 gallon water tank, so bow trim is important. Compromises.

2. I'm not sure how you can avoid cutting up the hatch to let the chain through. The angle is shallow, so it will need to be a sizable opening. How will you keep fresh and salt water out? Will there be some kind of cover?

Today, I'm thinking that the hatch will remain unchanged. I tie off to the starboard mooring cleat and the rode exits via the existing gap next to the cleat. I already plan to lower and raise the anchor with the locker door open anyway. This is no change from the non-windlass method I have used up till now.

3. Have you considered adding a chain stopper?

Yes, especially if I go to more than 100 ft. of chain. I seldom use less than 100 feet of rode anyway with the minimum I can recall being 90 feet. There is plenty of room to install a chain stopper forward of the hatch.

4. 200 feet of 5/16 chain will weigh over 200 lbs. With the windlass, how will that change the trim of the boat? You can ask a hefty person to stand in the approximate location to get an idea.

An additional 150+ pounds in the bow is a concern. We'll see how it works and rides with the existing 60 feet of chain, plus a full bow tank.

5. You might want to extend the shelf forward a bit and the windlass with it, so that you aren't dropping the chain so close to the bulkhead, where it might have a tendency to pile up.

The shelf size and location of the windlass is planned to leave 2-1/2 inches behind the windlass to permit easy movement of the rode to/from the gypsy. The forward drop location of the vertical windlass means that the center of the chain drop hole is 9-1/2 inches forward of the new locker bulkhead. That should be plenty. I'll be able to see the rode and chain pile up and will be able to topple the pile from deck level if necessary. Drop height above the locker floor is about twice the recommended minimum, but we know that the stuff piles up on itself unless the floor angle is pronounced.

6. Will you be able to turn the gypsy with the winch handle if you have a malfunction?

I had not thought about this. I would be able to use the winch handle for at least 180 degrees with the current design. That is certainly plenty for clutch adjustment. But it might be quite limiting for raising the anchor manually since the windlass doesn't have a stop like a winch. More measuring is needed. Thanks for this question.

7. Since your windlass will not be visible with the hatch closed, did you consider putting in a horizontal model, which might have some advantages?

I considered this and decided against it. I am a little concerned about the chain slipping and, now that you mentioned it, how far the rode will drop from the bulkhead behind the winch. With some horizontal designs with the body of the winch aft of the gypsy, they prevent that if you're not getting fancy with where the motor is located.

8. Where will you attach the bitter end of the rode?

I am thinking about that but haven't decided. As with any anchor, the unexpected, unrestrained free fall of the rode is a concern and not just for the cost of replacement. I have concerns about this for a self-launching roller, especially if single-handing (this isn't necessarily a major factor on a well-maintained windlass). Also, you don't want to damage structure with a bitter end attachment. With a windlass, the strength of the shelf comes into play. I have thought about it more since reading this last night. It may be feasible to install a u-bolt under the forward lip of the locker opening that matches the hole pattern of the added roller, or at least uses the roller mount as a backing plate. I could then route the rode through a couple nylon ties secured to the underside of the deck next to the locker opening, to route the rode aft. The ties could be torn out without damage to the structure. I could also use an attachment to a pulpit base. I want this point above the waterline and not at an odd angle to the windlass shelf. Suggestions are welcome.

Thanks for the list of questions. Your knowledge of the requirements and installation concerns is great. I responded in-line in the bold font. I spent the afternoon at the boat yesterday cutting and fitting the new aft locker bulkhead. Maybe I'll make a short post about that exercise. And it was exercise due to the number of times I jumped in and out of the locker.
 

footrope

Contributing Partner
Blogs Author
Change to shelf plan

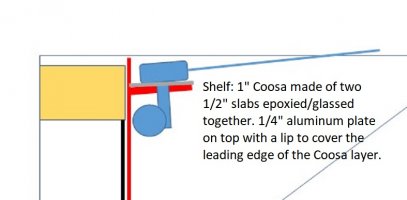
After some discussion and reading I have decided to add an aluminum plate for the top surface of the windlass shelf. This plate will add stiffness against the weight of the windlass, and, with an appropriate front lip, will protect the Coosa edge and surface from the chain. It will also protect the rode as it crosses the shelf. Most importantly it will allow me to tie into the aft pulpit bases and bring the deck into play to resist the max pull of 1320 lb. The 440 lb. "working load" is a conservative figure that is 1/3 of the max pull quoted by Maxwell. The working load is not quoted in lbs or kg in the Maxwell specs for some reason. But, calculating the working load of 1/3 the max pull is mentioned in their catalog, which has a section that guides you through the winch selection process. I initially got the working load figure from a spec list on the retailer's website. Convenient and accurate.

So, back to tying the shelf to the deck. I read a short book about outfitting a yacht for extended offshore cruising and in the electric windlass section the author had a sentence about bringing the hull-deck joint into play (approximate wording) that clicked for me. I already was thinking about the ability of the Coosa to resist the pull in shear and how to use epoxy plugs to resist denting it at the fasteners. It would be glassed to the hull and to the new bulkhead behind it. The book described the environment and how much a windlass gets used and abused. That got me thinking about the chain passing the shelf and especially protecting the front edge of the shelf if the chain should flop under reduced tension. A top plate of aluminum will serve both purposes.

The shelf is going to be about 10-3/4 inches wide (fore and aft) and that brings it right under the aft pulpit bases. With a bend or a bracket the shelf can pick up the bolts. There are 3 bolts on each side and I may increase the diameter from 1/4 to 5/16".

Coosa Size Req-crop-text.jpg
 

Teranodon

Member III
After some discussion and reading I have decided to add an aluminum plate for the top surface of the windlass shelf

Please don't think I'm carping or interfering, but why not just use a welded aluminum frame instead of the Al/Coosa sandwich? You could easily attach it to the hull/deck as I suggested earlier. Another advantage:you can reach through the frame to sort things underneath. A flat quarter inch of aluminum will still buckle if it's seriously yanked on. If you want to stay with the Coosa, why not put aluminum on top and bottom to stiffen it, sort of like a cored deck? You would want to bolt it through in several places and slather epoxy as well.

Have you looked at https://docs.google.com/presentatio...=false&delayms=60000&slide=id.gc508d459a_2_75 ?

Again - this is just a suggestion.
 
Last edited:

footrope

Contributing Partner
Blogs Author
Please don't think I'm carping or interfering, but why not just use a welded aluminum frame instead of the Al/Coosa sandwich? You could easily attach it to the hull/deck as I suggested earlier. Another advantage:you can reach through the frame to sort things underneath. A flat quarter inch of aluminum will still buckle if it's seriously yanked on. If you want to stay with the Coosa, why not put aluminum on top and bottom to stiffen it, sort of like a cored deck? You would want to bolt it through in several places and slather epoxy as well.

Have you looked at https://docs.google.com/presentatio...=false&delayms=60000&slide=id.gc508d459a_2_75 ?

Again - this is just a suggestion.

Your suggestions are not bothering me. I read your paper a number of times and it has been helpful in planning the assembly steps, especially.

I spent parts of the past two afternoons figuring out a few things, in between rain showers. First was where the turning roller should go, both laterally and fore-aft. It is made from a chain stopper. I had a friend help me drill out the bushing of a replacement roller to fit the removable pin of the stopper. Initially the plan is to use 60 - 100 ft of chain and since I never let out less than about 100 ft of rode to anchor, it needs to be a roller for now. I will convert it back to a stopper if and when I go to 150' or 200' of chain.

While staring at the possible angles of the rode coming off the turning roller, I figured out how I was going to set the height and angle of the windlass shelf. Using cardboard and a 2x4 scrap I have been able to get a sense for the height, but the angle will be shallower or deeper depending on where the shelf actually lands. I have plus/minus 6 degrees to work with and that is more than adequate. But extending the lines to the hull to get the width and tie-in location is a tougher problem. So, I'll make a short shelf and install the top end of the windlass. I'll support it at the aft side temporarily and then support the front end with a variable height device (maybe a bottle jack) and zero in on the angle with the roller and the stopper configurations. I can extend the lines to the hull with straight edges. This geometry problem has been bothering me for some time.

I was also thinking about where to cut the shelf and how to splice it together. Clearly, I was going to have the same issue getting long shelf parts into the area as Teranodon had with the welded shelf. I had already made the decision to cut the vertical aft bulkhead from top to bottom (future post) about an inch left of the v-berth door opening. That worked out great. What I found while fooling with the cardboard "shelf" was that I could fit the Coosa shelf through an existing gap in the plywood bulkhead at the underside of the deck in the v-berth. I'll have to make the gap a little bigger to fit the assembled 1" thick shelf through, but this area is hidden completely and not connected structurally to the deck. This discovery has an effect on assembly order, but not one that makes the job more difficult. The aluminum shelf will not reach the hull, so it'll go in last.

I need to get the reverse side of the vertical bulkhead covered with cloth and epoxy, and make that short shelf.
 

footrope

Contributing Partner
Blogs Author
Aft bulkhead, Turning roller, Winch placement

The first two pictures are the aft bulkhead: First one is in position, still in raw form, and then all glassed up and ready to check the fit again.
20170507_183750-small.jpg20170516_163029-small.jpg

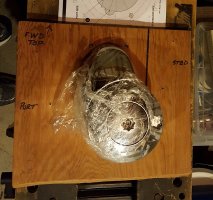
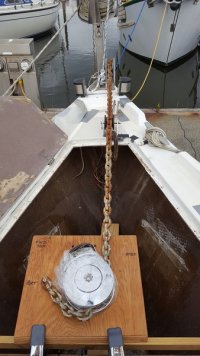
The winch top with gypsy installed on a piece of plywood. It will be used to determine and mark the final shelf location that accommodates the limits of the angle of the rode as it comes into the gypsy.
20170516_174434-crop.jpg

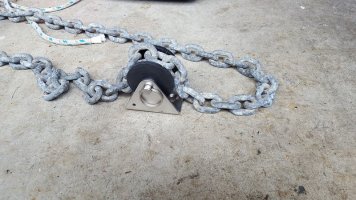
The chain stopper modified into a turning roller. Not sure if this is the final configuration but it is perfect for the purpose of determining winch shelf location. The chain is 5/16" HT.
20170514_124632-small.jpg
 

footrope

Contributing Partner
Blogs Author
This is the fit of the completed bulkhead, aft view.
I wish the plywood bulkhead was a little straighter.
20170517_160229-small.jpg

The alignment of the anchor roller, turning roller and windlass.
Pretty close to where it needs to be. Chain missing the pulpit base by a hair.
20170517_174247-small.jpg

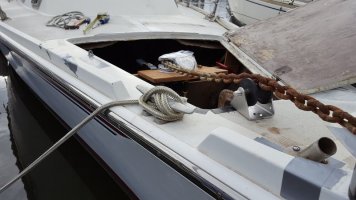
Deck level view with chain strung.
The windlass will sit higher than I envisioned.
20170517_174716-small.jpg

The underbelly of the alignment apparatus.
20170517_175828-small.jpg

It clears.
20170517_175941-small.jpg
 

footrope

Contributing Partner
Blogs Author
After getting the shelf angle and the fore-aft and left-right location of the windlass with the above method, I transferred the forward and aft edges of the top surface of the plywood shelf to the hull on each side. I used a piece of 1" aluminum angle for a straight edge. The plywood shelf was "level" with respect to the lip of each side the locker opening, which was the most reasonable reference I could think of.

Chain roller vs. Chain stopper: I checked the angle of the windlass vs chain with and without the turning roller. I settled on an angle that slightly favored the roller configuration. If I remove the roller, the difference in chain height at the turn point is 2-1/2 inches. The Maxwell installation guide shows a 6 degree allowance or 3 degrees up or down from straight on the centerline of the gypsy. How much angle change does that 2-1/2 inches make? I don't know exactly, but I approximated it by doing simple algebra. The distance from the roller to the center of the gypsy is 27 inches. That makes a 54 inch diameter circle, and pi x 54 gets a 169.6 inch circumference. Where "x" is the approximate change in degrees:
x/360 = 2.5/169.6 which yields about 5.3 degrees. And both configurations "look good" for the chain angle.

I then drew the total 1-1/4" profile of the future finished shelf on the hull to use as a fit guide. I temporarily re-installed the aft bulkhead to find the aft position where the shelf would rest against it. The shelf will be 10-1/2 inches fore-aft. I then measured and cut the first shelf blank with a generous excess width (1/4") and spent some time beveling the edge and getting the width right and the angle close. I then cut the second blank slightly larger than the bottom surface dimensions of the first blank. I did one final fit check with the 1" thickness and it looked good for clearance from the locker door. I also proved that the finished 1" Coosa shelf will fit through the gap in the old bulkhead. Thus I can avoid cutting and splicing the shelf pieces.

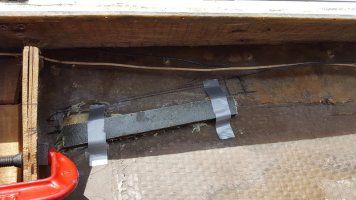
After that I epoxied Coosa cleats to the hull for the shelf to rest on and took the shelf pieces home to glue them together and cover with fiberglass cloth.

Cleat in place, port side. I need to glue that upper part of the old plywood bulkhead together and cover it with glass. It's hidden but it shows signs of the leaks over the years. You can see the Sharpie marks for the shelf profile. The RC8-8 low-profile windlass is only 3-1/4 inches tall at the center of the gypsy. The distance below the deck looks pretty small, but it is more than adequate.
20170519_143927-small.jpg

Starboard side with bulkhead cut down to just over an inch below the underside of the deck. Note the wacky cloth covering the underside of the plywood "core" of the deck alongside the locker opening.
20170519_143912-small.jpg
 
Last edited:

Loren Beach

O34 - Portland, OR
Senior Moderator
Blogs Author
That 'wacky' cloth pattern looks like unidirectional roving with the cross threads holding the long strand sections together before it was glassed in. All the strength is in one direction, yielding tremendous strength in that direction.
(If there's a more correct name for that material, I may have forgotten it).
Our boat has it along the long raised hull stringers. Ericson (and Bruce King) did not skimp on scantlings. :)

As our boats age through the decades, basic "foundation" strength is a Very Good Thing.
 

footrope

Contributing Partner
Blogs Author
That 'wacky' cloth pattern looks like unidirectional roving with the cross threads holding the long strand sections together before it was glassed in. All the strength is in one direction, yielding tremendous strength in that direction.
(If there's a more correct name for that material, I may have forgotten it).
Our boat has it along the long raised hull stringers. Ericson (and Bruce King) did not skimp on scantlings. :)

As our boats age through the decades, basic "foundation" strength is a Very Good Thing.

Unidirectional roving sounds like a good name. I've never seen that material before. I have seen Spectra cloth, however, which is considerably less expensive than fiberglass cloth. Has anyone ever investigated Spectra cloth as an alternative to fiberglass cloth?

The hull stringers you mentioned, are they below the waterline? Are they associated with the keel support structure?

Thanks for the info, Loren.
 

footrope

Contributing Partner
Blogs Author
Hot Weekend

Great weather for working with epoxy. After Friday's (05/19) activity at the boat I got too hot and felt lethargic after all the heat. There was no wind in the marina at all.

Saturday, which is normally a good day to go to the marina because there would be parking available near the dock entrance, was spent in the cool of my garage. In the morning I glued the two windlass shelf blanks together with a piece of cloth in between. I used plenty of epoxy to avoid voids when I put them together. When I did put the sandwich together I was not expecting the two to be so easy to reposition. I had to carefully move them to a more level bench and then hover for awhile to make sure they didn't shift. Adding weight did not help. That amplified the non-level situation and I settled for using my hands to put the squeeze on them and when epoxy was squishing out, I just re-aligned them and waited for the stuff to set. I thought of several ways I could have prepared for that but it was too late once the epoxy was spread. Late Saturday afternoon I put cloth on the top side of the shelf.

Then I cleaned up the back end (~7 inches) of the old locker pan that I had cut off. Water, solvent and sandpaper. I also cleaned the last of the silicone off the lip. Then I started making some repairs. There were 5 holes and two corners that needed cloth so I got a start on that.

On Sunday I covered the bottom side of the windlass shelf with cloth and epoxy. Tomorrow it will be ready to clean up and go do final fit checks. At the boat it was nice. Upper 70s but with a nice north wind and high clouds. No problem staying cool. I cleaned the lip of the locker opening, which was loaded with silicone, with a wood chisel and a wire wheel. I also checked the cleats for the shelf and they were fine. The bulkhead slipped in behind them.

The lip of the locker without the pan in there is lower and that makes the locker door close below the deck profile. I will need some flat or round gasket material to act as a spacer and a seal around the lip. I'll have to look around for something about 1/4 inch thick for most of it, and around the rear, where the piece of pan goes back in, I will need something about 1/8 inch thick or perhaps a bit less.

I also cleaned up the excess sealer around the outside ring and the acorn fasteners for the two forward ports on the right side. Leftover from the 2015 work.
 
Last edited:

Loren Beach

O34 - Portland, OR
Senior Moderator
Blogs Author
Strong, both ways!

Unidirectional roving sounds like a good name. I've never seen that material before. I have seen Spectra cloth, however, which is considerably less expensive than fiberglass cloth. Has anyone ever investigated Spectra cloth as an alternative to fiberglass cloth?

The hull stringers you mentioned, are they below the waterline? Are they associated with the keel support structure?

Thanks for the info, Loren.

When the interior was built out on our boat, there were some major sections molded out (forepeak, settee area, aft berth, head module... that have long fore-n-aft areas that are heavily tabbed to the hull side. This provides strength along the long axis of the hull. On our port side, aft of the head compartment there was a lengthly storage shelf tabbed in (again, top and bottom) to the hull side to provide rigidity all the way aft. On the starboard side which is an open area for the aft cabin berth, they put in a foam blank about 9 feet long, from the back side of the after hanging locker all the way to the end of that berth with it's own tabbed-in bulkhead. That foam is about an inch high (i.e. stands proud from the inside of the hull molding) and about three inches across the base -- kind of a half-oval in shape. Then they ran heavy strand roving from end to end, and the "unidirectional" strength is fore and aft. At least that is the surface of the glass. All this was covered with glued on fabric, but we removed the lower section of the fabric after we brought out fixer-upper home in '94, due to mold that we could not clean out. This will also be the last major area of our boat to get the same new hull ceiling treatment as we recently finished in the forepeak.

I looked up some boatbuilding terms, and found this:
LONGITUDINALS
Those hull framing members that run the length of the boat (i.e. chine, keel, sheer, battens).

So, this "framing" has nothing to do with the lower hull and keel attachment. Like your Ericson's TAFG, we have an extensive internal "backbone" that lays against the bilge area and carries the keel bolts' weight and torque.

Regards,
Loren
 
Last edited:
Top