-
Untitled Document Join us on April 25th, 7pm EDT
for the CBEC Virtual Meeting
EY.o April Zoom Meeting
All EYO members and followers are welcome to join the fun and get to know the people you've met online!
See the link below for login credentials and join us!
(dismiss this notice by hitting 'X', upper right)
You are using an out of date browser. It may not display this or other websites correctly.
You should upgrade or use an alternative browser.
You should upgrade or use an alternative browser.
Replacing rubber seals on main (large) windows/ports [Master Thread]
- Thread starter kapnkd
- Start date
I have heard that mechanical removal by scrapper and wire brush is best, but have not done this myself. (Our fixed ports are external lenses.)
If it's actually silicone, my new favorite expensive caulk remover, "Anti-Bond 2015," won't work. But you never know. Acetone does help. As Loren says, mechanical removal is always required.
Blue Streak
E25
I wonder if there is a good Dremel brush for that.Took me hours and hours with various bronze brush wheels on a grinder and drill. Persistence and patience is key.
kapnkd
kapnkd
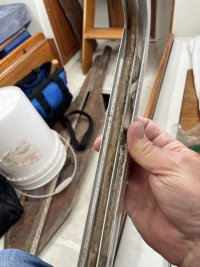
Sadly, there is no easy way out short of the needed elbow-grease and frustrations that we ever found when tackling our ports years ago.What about prep? Any other suggestions as to how to best clean the old silicone and adhesives off of aluminum frames?View attachment 43313
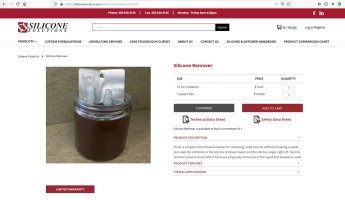
I DID see this product advertised on the web but have never used it. ...Maybe others can provide feedback on it for you???
https://siliconesolutions.com/silicone-remover/ss-srr.html
In order to fully remove the silicone you essentially have to remove the layer of aluminum that it’s bonded to. A tiny Dremel brush may be good for some tight spots but I think it’s too small for bulk removal. I found that a brass wire wheel from Harbor Freight on my little bench grinder worked well on the flat sections and various drill mounted paint removal wheels worked (sort of) in the curves. I also employed various sacrificial chisels, mini screwdrivers, picks and other implements for the small areas that inevitably remainedI wonder if there is a good Dremel brush for that
Put on some good music, use a headlamp and reading glasses (if needed), and gut through it!
The test for success is a mist of water sprayed on the frame. If it beads up you’re not there yet.
kapnkd
kapnkd
Dremel tools and accessories are great - BUT - recently using multiple heavy duty full size wire brushes for cleaning just the engine compartment/frame - during the engine rebuild - (of my also and now 50 year owned ‘67 Corvette), “SADLY - NOT HAPPENING”! Dremel brushes are good for small areas but in your small area lurks a determined silicone adhesion monster!!I wonder if there is a good Dremel brush for that.
The built up road grime, similar to Silicone, is out and out…STUBBORNLY TOUGH SCHTUFF to get off!!! (Just wish silicone stopped all the leaks equally as hard as it is to get rid of!)
…Nature, along with the laws of physics. I’ll hydraulics and simple physics of gravity make water THE most insistent and invasive invaders on our planet!
Certainly
Debond or Remov-It adhesive remover have worked well for me. here's a blog I wrote about the process. the pics have disappeared.
The photos are there, at the bottom (at least I can see them). They lost their place result of the migration to the new blog software. Send me a private message if you'd like me to move them back into the body copy, it's easy enough to do.
Mr. Scarlett
Member III
Could they be safely bead blasted? Is there a dip tank somewhere that would take care of silicone? A friend's dad would take our bike frames to his shop (commercial truck mechanic?) and bring them back as bare metal. We didn't do any prep at all. And we could change the colour of our bikes!
Bead blasted yes, dip tank no. The problem is that silicone gets into any & every pore at the microscopic level and virtually nothing sticks to it for long, setting up the potential for future leaks. That's why you need to remove the surface of the aluminum, fiberglass, or whatever else the silicone has adhered to.
But then the bare aluminum will corrode because the anodized surface layer has been removed or at least scratched thru in numerous areas. In the bad old days, we would apply alodine and zinc chromate, then hope for the best. Now we have barrier coats that are easy to use and actually last like this:
But then the bare aluminum will corrode because the anodized surface layer has been removed or at least scratched thru in numerous areas. In the bad old days, we would apply alodine and zinc chromate, then hope for the best. Now we have barrier coats that are easy to use and actually last like this:
Prairie Schooner
Jeff & Donna, E35-3 purchased 7/21
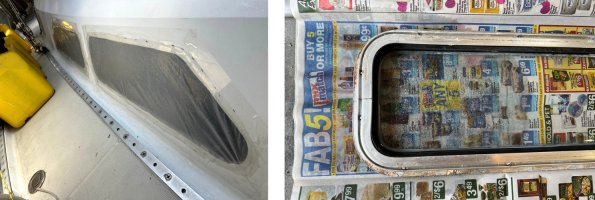
The portlights* and deadlights* were all leaking so I’ve pulled them out. I did the Bob @Tin Kicker test and the deadlights leak like a sieve.
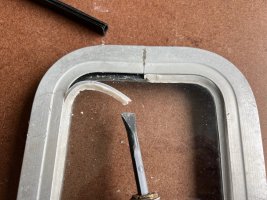
I disassembled one of the deadlights. The two black gaskets are still supple and seem to be in pretty good shape. After reading all the accounts I can find, I’m wondering: - - Do I really need to replace the gaskets on the deadlights? I'm thinking on the other three units I could just remove the outer silicone bead and put in a new one (Dow 795, probably), without taking them apart. Or maybe disassemble, clean the gaskets, and reuse them? It seems like the gaskets are more to keep things in place and keep the frame channels clean than to stop leaks. Those of you who have done this task, what would you advise?
Thanks, Jeff
* I have a friend steeped in traditional nautical jargon who corrected my use of window terms. In deference to him, I’m using ‘portlights' to refer to windows that open and ‘deadlights’ to refer to windows that don’t open.
Threads I’ve found helpful:
- https://ericsonyachts.org/ie/threads/replacing-fixed-windows-research-master-thread.9603/
- https://ericsonyachts.org/ie/thread...main-large-windows-ports-master-thread.13578/
- https://ericsonyachts.org/ie/threads/tips-for-removing-original-portlights.14575/
- https://ericsonyachts.org/ie/threads/non-opening-portlight-gasket.19794/
- https://ericsonyachts.org/ie/thread...of-four-fixed-ports-on-1975-ericson-25.16261/
- https://ericsonyachts.org/ie/threads/wanted-vinyl-glazing-for-fixed-ports-3-16-glass.19511/
- https://ericsonyachts.org/ie/ubs/confessions-on-rebedding-portlights.490/
- I’ve got over a dozen other links saved, on portlights and other aspects of this. - There was no logo left on our portlights so shoutout to @Christian Williams for your post identifying ours as Bomar and letting us know they are not rebuildable.
Wowsers, I remain perpetually glad that EY used external lenses for our four fixed ports! 
And, having chickened out of totally rebuilding our '88 Lewmar opening ports, I am also pleased to have replaced them with the newer "Atlantic" series from Lewmar.
Hats Off to all of you that persevere in rebuilding your ports!!
Trivia question: are "deadlights" the same product as "fixed ports"... ? It seems like they would be, but I am not sure.
There's nothing worse than going through all the trouble of removing and rebedding the portlights only to have them still leak, so you might as well fix and replace everything you can while they're out. The black rubber piece on the inside of the frame is just for ascetics and doesn't have anything to do with keeping water out. I used the kit from Catalina: https://www.catalinadirect.com/shop...gaskets/aluminum-window-reseal-kit-c-30-c-36/ for my 25+. I'm sure you can find all the bits and pieces independently for a little less, but Catalina direct makes it easy to source.
Prairie Schooner
Jeff & Donna, E35-3 purchased 7/21
That's my understanding, Loren. But I grew up in Iowa. Happy to be directed to even more accurate use of the terms.. . .
Trivia question: are "deadlights" the same product as "fixed ports"... ? It seems like they would be, but I am not sure.
I say "opening ports" "portlights" and "fixed ports. (Anything but "windows")
"Deadlights" seems a stretch to describe the ports on our boats. Or anyhow, in conversation I wouldn't know exactly what was meant.
"Deadlights" seems a stretch to describe the ports on our boats. Or anyhow, in conversation I wouldn't know exactly what was meant.
Noun[edit]
deadlight (plural deadlights)- (nautical) A strong (often wooden) shutter fitted over a porthole, that can be closed in bad weather to keep water out and discourage the glass windows from breaking.
- (nautical) A deck prism, a device to allow light into the cabin of boat through the deck.
- (figurative) An eyelid.
Prairie Schooner
Jeff & Donna, E35-3 purchased 7/21
Nick,There's nothing worse than going through all the trouble of removing and rebedding the portlights only to have them still leak, so you might as well fix and replace everything you can while they're out. The black rubber piece on the inside of the frame is just for ascetics and doesn't have anything to do with keeping water out. I used the kit from Catalina: https://www.catalinadirect.com/shop...gaskets/aluminum-window-reseal-kit-c-30-c-36/ for my 25+. I'm sure you can find all the bits and pieces independently for a little less, but Catalina direct makes it easy to source.
Absolutely. That would be a royal pain. But in looking at the construction, I'm not sure the current Catalina offering matches what we have on our boat. Below is a schematic (only roughly to scale) of how our lights are constructed. And, the Catalina gaskets.
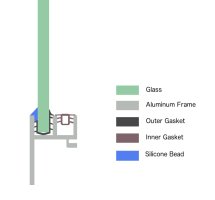
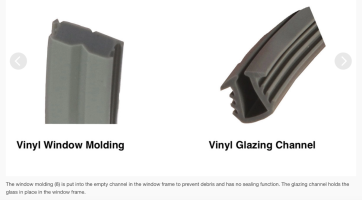
Do either of these look like what you had on your 25+ or got from Catalina? The fillet of the gasket only exists on the inside.
I spent too much time and money getting the wrong sized gaskets twice and eventually gave up and bedded them entirely in Dow 795. I used some little bits of the original gasket as spacers. Still going strong 6 years on. It will be a real nightmare if I ever have to redo them though!

