• Untitled Document

    The 2024-2025 Fund Raising Season has Opened!

    EricsonYachts.org has opened the season for raising funds to support the expenses of the site. If you would like to participate, please see the link below for additional information.

    Thanks so much for your continued support of EricsonYachts.org!

    2024-2025 Fund Raising Info

Engine Compartment Clean up

Nick J

Contributing Partner
Moderator
Blogs Author
This work has pushed into the holiday season which is making it much more difficult to find the time to get it all done. On top of my limited time, the yard has been hit with the flu, so they've been limited as well.

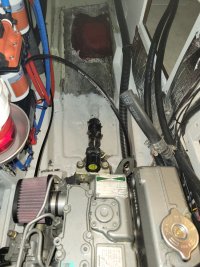
We got the last piece of insulation in:
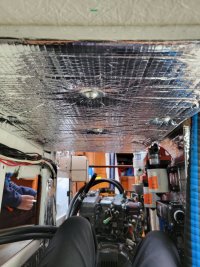
20221126_124442.jpg
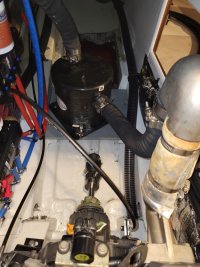
Finished the Oil filter install and filled the engine with oil:
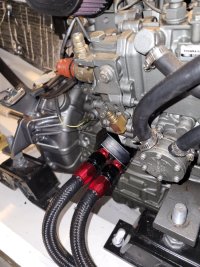
20221125_123020.jpg
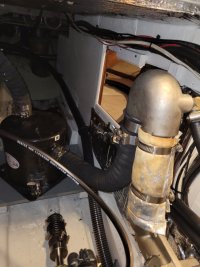
and completed the electrical connections:
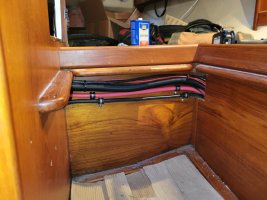

20221125_152329.jpg
The battery cables on top of the fuel tank always bothered me, so I relocated them to the other side of the bulkhead. I'm planning on making a box to hide the cables and support the infill. I'm probably going to have to remove the tank at some point so this will just be one less step I will have to tackle when that time comes.

We also installed new control cables, but were not able to finish the job due to the transmisison cable pivot bolt not being the correct part. Of course, being a Yanmar evertyhign is metric and the local shops only carry standard parts so I'm going to have to wait for the part to arrive.

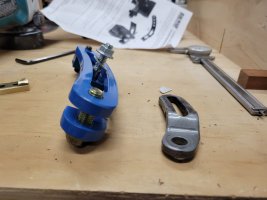
I've also been working on modifying a Balmer Belt Buddy to fit on the stock Hitachi alternator so I don't have to wedge a screwdriver in the alternator to adjust belt tension. One of the main sources of dirt and grime in the engine compartment was belt dust, so this should help keep everything tidy. (before I started cutting it up to fit)
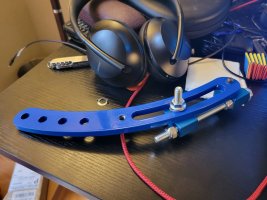
20221123_150758.jpg

The water heater won't go in until after the boat is back in the water so I'm going to install some shutoff valves in the lines so I can fill the engine with coolant.
 

dhill

Member III
That definitely looks like a good candidate for a cleanup. Looking closer at your pics shows there's been some good work to update the water system, various hoses, and moving some equipment to a more maintenance friendly locations.

The one piece of advice I'd offer to anyone going down this path is to carefully plan everything out to ensure you have most everything you need on hand and the environment is good to paint (temp and humidity). The strut replacement project has really masked a lot of my mistakes in planning this out. At first I was just going to paint and install insulation, but I added the hoses, then thru hulls, then..... If I just would have looked at everything before hand and went for it, I would have saved weeks of time. In my case, it didn't affect the timeline because the strut work is still going on (fingers crossed they will finish up the fiberglass and fairing work this week).

It is actually a very doable DIY project. Removing the engine was surprisingly easy and each individual step was straight forward. You just have to put a plan together and go through each step. I'm not done yet, but I would say it's been worth it and I'm actually looking forward to maintaining the engine after this work is done. Before, I would put off the routine maintenance until the last possible minute. There's been many trips over the last few years where I was at the boat late the night before struggling through an oil change, fuel filter replacement, or stuffing box adjustment. Hopefully this will make all those tasks much more tolerable.
Thanks @trickdhat , for your assessment. I installed the water strainer and moved the coolant overflow tank to ease access (I'm hoping that is what you are referring to as good work? :) ). I traced through the entire water system in the boat and labeled everything at the end of the summer/early fall, so I hope to clean the plumbing up quite a bit next spring. There are lots of piping going all over the place back there. Unfortunately, the yard won't let me work on the boat during the winter while it's on the hard.

The thing I'm most concerned about doing this as a DIY project is the linkage between the engine and transmission - mostly putting it back together once they are separated. I have the original Universal M25XP and Hurth transmission.

Thanks!
Dave
 

dhill

Member III
This work has pushed into the holiday season which is making it much more difficult to find the time to get it all done. On top of my limited time, the yard has been hit with the flu, so they've been limited as well.

We got the last piece of insulation in:

View attachment 45158
Finished the Oil filter install and filled the engine with oil:

View attachment 45159
and completed the electrical connections:


View attachment 45160
The battery cables on top of the fuel tank always bothered me, so I relocated them to the other side of the bulkhead. I'm planning on making a box to hide the cables and support the infill. I'm probably going to have to remove the tank at some point so this will just be one less step I will have to tackle when that time comes.

We also installed new control cables, but were not able to finish the job due to the transmisison cable pivot bolt not being the correct part. Of course, being a Yanmar evertyhign is metric and the local shops only carry standard parts so I'm going to have to wait for the part to arrive.

I've also been working on modifying a Balmer Belt Buddy to fit on the stock Hitachi alternator so I don't have to wedge a screwdriver in the alternator to adjust belt tension. One of the main sources of dirt and grime in the engine compartment was belt dust, so this should help keep everything tidy. (before I started cutting it up to fit)

View attachment 45161

The water heater won't go in until after the boat is back in the water so I'm going to install some shutoff valves in the lines so I can fill the engine with coolant.
The belt buddy looks great! I'll have to try that on mine. Most of the dirt and grime in my engine compartment is also belt dust, so I'm eager to purchase one and try it out!

Thanks!
Dave
 

Nick J

Contributing Partner
Moderator
Blogs Author
The belt buddy looks great! I'll have to try that on mine. Most of the dirt and grime in my engine compartment is also belt dust, so I'm eager to purchase one and try it out!

Thanks!
Dave
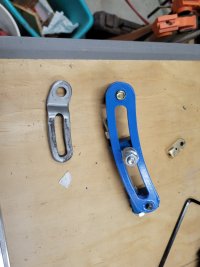
You'll probably have an easier time fitting it than I'm having. The original bracket on the yanmar is a joke and the Balmer part is huge. Hopefully the grinder did the trick. I should find out tomorrow.
20221128_205854.jpg
20221128_205850.jpg
 

JSM

Sustaining Member
The thing I'm most concerned about doing this as a DIY project is the linkage between the engine and transmission - mostly putting it back together once they are separated. I have the original Universal M25XP and Hurth transmission.
I Had my M25xp out last winter to replace the Hurth trans and had the same concerns. Once all of the bolts holding the bell housing to the engine are removed the bell housing and the trans will (fairly) easily separate. When reassembling everything the splined drive shaft coming out of the back of the engine slides into the trans and the bell housing gets re bolted.
Way easier than I thought it would be.
 

Nick J

Contributing Partner
Moderator
Blogs Author
well...the bracket ended up not fitting. The pivot bolt location on the Yanmar 3Ym series isn't close enough to the arc path of the alternator. The body of the alternator ends up hitting the bracket. I can have a small adapter made, but that's going to have to wait until after all the other stuff is back together. It's past time to get this think back in the water, so I mounted the alternator with the old bracket and reminded myself once again why an adjustable bracket would be nice to have.
 

Nick J

Contributing Partner
Moderator
Blogs Author
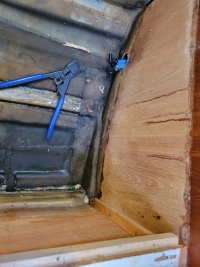
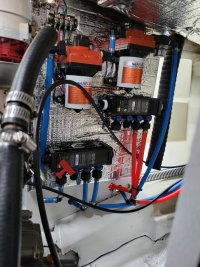
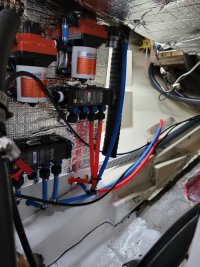
I was going back and forth on completing the plumbing before putting the boat back in the water. I'm tired and being on the hard with every weekend taken up by this project is taking its toll. On the other hand, putting the exhaust system back in only to take it out for access to the plumbing really isn't an appealing solution either.

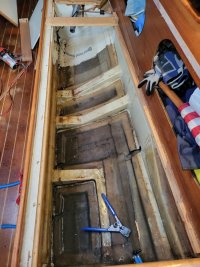
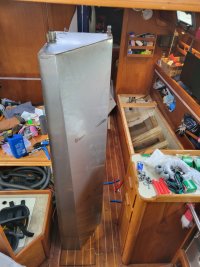
Pex is easy to connect, but it isn't fun to work with. Even with a few tricks to straighten it out, it still has a mind of its own and it seems to never want to do what you need. In a boat where nothing is easy or accessible, this becomes a big headache. On top of everything else, I needed to remove the water tank to access the path between the tanks and the distribution manifold. I don't think that's as bad as cutting an access hatch in the sole and removing the waste tank will be. On the positive side (??) I got a chance to see more of my boat today.
 

Attachments

  • 20221204_133036.jpg
    20221204_133036.jpg
    174.6 KB · Views: 46
  • 20221204_133048.jpg
    20221204_133048.jpg
    180.8 KB · Views: 46
  • 20221204_133055.jpg
    20221204_133055.jpg
    143.4 KB · Views: 47
  • 20221204_143608.jpg
    20221204_143608.jpg
    183 KB · Views: 45
  • 20221204_143611.jpg
    20221204_143611.jpg
    161.1 KB · Views: 44

Nick J

Contributing Partner
Moderator
Blogs Author
One step forward, two steps back today. The engine is in and aligned, the dripless is in, prop is on, and they installed the new transducer.
20221206_173023.jpg

The bad news is the transducer is about 10 degrees off center and they didn't install the g10 backing plate I made. The really bad news is a section of the hull paint pealed off when they removed the the plastic tent they had taped up to work on the strut.

20221206_173844.jpg

It was after hours when I stopped by the boat so I haven't talked with them yet. Has anyone had paint peel off like this before? To my knowledge it's awlgrip.
 

Nick J

Contributing Partner
Moderator
Blogs Author
We're getting closer. I installed the water lift muffler, exhaust riser, cotrol cables, and some cut off valves for the heater hose to the water heater. I should be able to start the engine tomorrow after filling the coolant. However, the paint issue is still unfinished. The yard said they made a mistake by using tape on Awlgrip. They are going to fix it by feathering the edges and applying color matched paint. It's kind of frustrating, but they have been honest and upfront about everything, so I'm optimistic it will get resolved. Hopefully it won't cause too much more time out of the water. 20221209_172709.jpg20221209_172704.jpg
 

Nick J

Contributing Partner
Moderator
Blogs Author
Last weekend was another tough one, but the engine fired up, the pedestal's back together, and the boat should now float (at least as soon as the yard finishes the dripless install). It wasn't without it's struggles though.

Im not quite ready to install the hot water heater so I installed the heater hose back to the area where the hot water heater will be and installed some valves. This should get us up and running for now and provide a way to isolate the hot water heater if there's any problems in the future.
20221211_153624.jpg

Next up was installing the hose from the expansion tank to the coolant fill cap. I've replaced almost every other hose, so I thought this one should be done as well. I picked up a short section of clear 3/8" clear vinyl after bringing the tank to the shop to ensure a good fit. It wasn't and ended up leaking coolant, strike one.

The coolant drip was small, so I decided to go ahead with the test fire and address the leak later. I ran a hose to a bucket and rerouted the raw water pick-up hose from the strainer to the same bucket. I found the water flow from the yard's spigot wasn't quite up to the task of running the engine, but it was good enough for about 5 minutes before the 5 gallon bucket was drained.

Thankfully, the engine started right away. There was a slight shutter as the last of the bubbles in the fuel line made their way through. Hearing the engine and seeing no water, fuel, or oil leaks after everything I've done to it felt awesome.

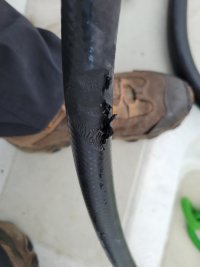
The feeling was short lived. The bucket was almost empty so I started to put the companion ladder back in to head up and shut it off when I slipped and put my hand on the new heater hose. The hose shifted down and got pinned between the alternator fan and the body of the alternator, cutting into it. I wasn't t able to reach the shutoff button on the back of the engine before the fan had cut all the way into the house and started spraying coolant everywhere. Strike two

20221211_124004.jpg

It wasn't the end of the world, but it certainly put a damper in my day. I needed to take a break from the engine, so I shifted my attention to the pedestal. As I was looking at the pedestal I heard the distinct sound of running water and realized I hadn't turned the hose off. The bucket was overflowing pouring water over the sole boards into the bilge. Strike three, but I wasn't done yet.

To put a cherry on the top of this fantastic day, I ended up punching myself in the face when my hand slipped off a wire I was pulling through the pedestal guard to the nav pod. With my cloths soaked in coolant and a fat lip, I figured the best course of action was to grab lunch and a beer before trying again. The afternoon went much better. I installed the old expansion tank hose which solved the coolant leak, replaced the damaged heater hose, and started the engine again. One positive out of this whole ordeal was finding a large piece of metal shavings in one of the heater hose valves. Had I not cut the heater hose, I never would have found it and it probably would have ended up stuck in the engine. Small win, but I'll take it.
20221211_152322.jpg
 

Nick J

Contributing Partner
Moderator
Blogs Author
Just received a text from the yard, They're all wrapped up and we're ready to go back in the water. He said they matched the paint and blended in the repair. Hopefully I'll get a chance to stop by today during the day so I can check it out. I'm still waiting for the final invoice, but I'm extremely relived to be wrapping this haul out up. We still have the water system and bilge pump hoses to finish up.

I temporarily plumbed the auto bilge pump to the 1.5" manual pump hose to address any incidental bilge water that makes its way in there before I get to the permanent solution. I need to cut an access hatch into the cabin sole to access the plumbing and I didn't want to do that before the engine work was done since that's the area you need to stand on while doing most of the work.
 
Top