Nova has been dockbound for years and has some serious wood rot on the cabin interior around the portlights. I am renovating her and would like to fix this by replacing it. I would like to preserve the pieces to use as a template but really don't have an idea as to how to remove them without destroying them. Any ideas? Has anyone ever attempted this?
-

Untitled Document The 2024-2025 Fund Raising Season has Opened!
EricsonYachts.org has opened the season for raising funds to support the expenses of the site. If you would like to participate, please see the link below for additional information.
Thanks so much for your continued support of EricsonYachts.org!
You are using an out of date browser. It may not display this or other websites correctly.
You should upgrade or use an alternative browser.
You should upgrade or use an alternative browser.
NateHanson
Sustaining Member
E30+ (based on his profile anyways)
Teak, rot, and sweat equity
Clicking on the person's screen name brings up their profile, and in this case the boat is listed as a 30+.
That would be early-mid 80's, AFAIK. Ya think?
An educated guess is that the cabin and deck mold, in one piece, was laid up in the upside down position. After the glass layers were laid over the nonskid and the future exterior gel coat, any coring for the deck and cabin top was laid in. At about that point the interior teak-faced plywood was laid against the cabin sides. A template would likely have been used to saw out the holes for the ports.
Fast forward thu our imaginary time machine to 2007... Now we have the internet, this Forum, and now the beautiful teak-faced ply has rot under any port where water was allowed to seep in for all these dacades.
One could fix this several ways, and I will suggest just one...
If most of the teak "liner" is structually OK, just route out the bad parts around each port opening after you have removed the ports. Then lay in pieces of new ply in thickened epoxy to match the surface level of the remaining veneer surface. Use big C-clamps, thru the port openings.
Then make a nice pattern for the whole inside and (with trepidation!) cut out a perfect cover piece of ($$$) Teak veneer. Carefully epoxy the new veneer over it all. Then reattach all the teak trim pieces (you did take these off and varnish them at home, right?). Reinstall the ports, renewing the gaskets if needed, and, as they say in the UK -- "Bob's your uncle."

I have seen this repair done on a mid 80's E-32 and the new varnished surface looks just lovely. On our own '88 model, we had no rot, but did have extensive water stains over the teak below every fixed port. In '95 we put in new fixed portlights -- no leaks for a decade, and layers of new varnish on the teak after it was stripped and bleached with Teaka A&B.
Looks great, if I do say so.
Best,
Loren in PDX
Clicking on the person's screen name brings up their profile, and in this case the boat is listed as a 30+.
That would be early-mid 80's, AFAIK. Ya think?
An educated guess is that the cabin and deck mold, in one piece, was laid up in the upside down position. After the glass layers were laid over the nonskid and the future exterior gel coat, any coring for the deck and cabin top was laid in. At about that point the interior teak-faced plywood was laid against the cabin sides. A template would likely have been used to saw out the holes for the ports.
Fast forward thu our imaginary time machine to 2007... Now we have the internet, this Forum, and now the beautiful teak-faced ply has rot under any port where water was allowed to seep in for all these dacades.
One could fix this several ways, and I will suggest just one...
If most of the teak "liner" is structually OK, just route out the bad parts around each port opening after you have removed the ports. Then lay in pieces of new ply in thickened epoxy to match the surface level of the remaining veneer surface. Use big C-clamps, thru the port openings.
Then make a nice pattern for the whole inside and (with trepidation!) cut out a perfect cover piece of ($$$) Teak veneer. Carefully epoxy the new veneer over it all. Then reattach all the teak trim pieces (you did take these off and varnish them at home, right?). Reinstall the ports, renewing the gaskets if needed, and, as they say in the UK -- "Bob's your uncle."
I have seen this repair done on a mid 80's E-32 and the new varnished surface looks just lovely. On our own '88 model, we had no rot, but did have extensive water stains over the teak below every fixed port. In '95 we put in new fixed portlights -- no leaks for a decade, and layers of new varnish on the teak after it was stripped and bleached with Teaka A&B.
Looks great, if I do say so.
Best,
Loren in PDX
Last edited:
If you think you are getting that teak off in one piece, think again. It's
coming off in pieces and will be useless for a template. Anyway, templating
is the least of your problems. Here's where I started. Notice the liberal use of stainless and the elegant
plastic speaker cabinet screwed to the bulkhead. Ya gotta love
buying second hand boats.
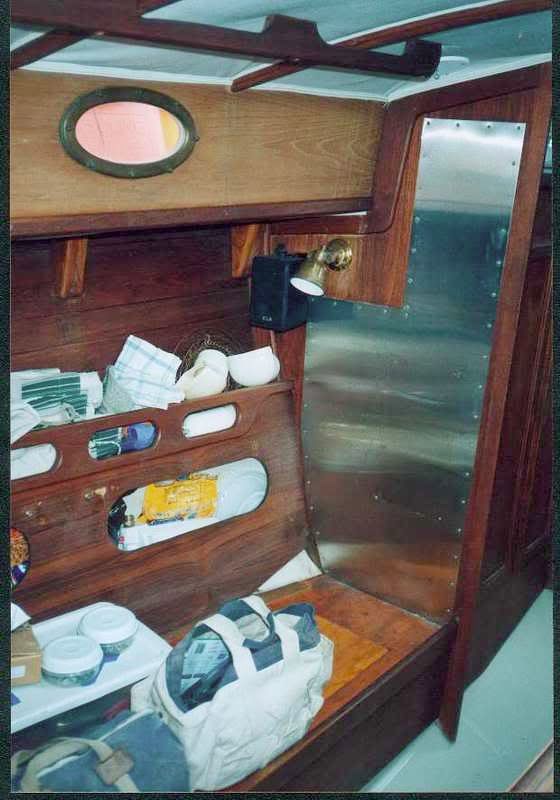
All that crap had to come off including the overhead, hand rails, ports,
etc. before addressing the house sides. All the wood was stripped
back to bare, bulkheads were prepped for paint.
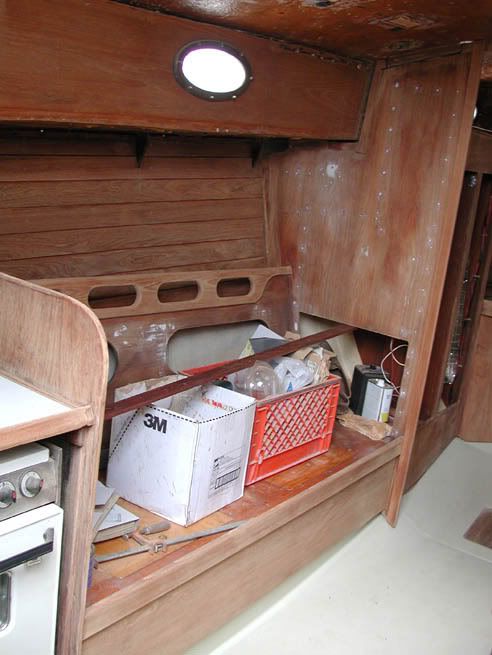
The veneer was stripped off the house sides, and the rough glass
was faired with epoxy. Notice too that I ground off the glassed in hanging brackets for the overhead hand rails-I had plans to do a custom moulding along the bottom of the house that would double as a hand rail.
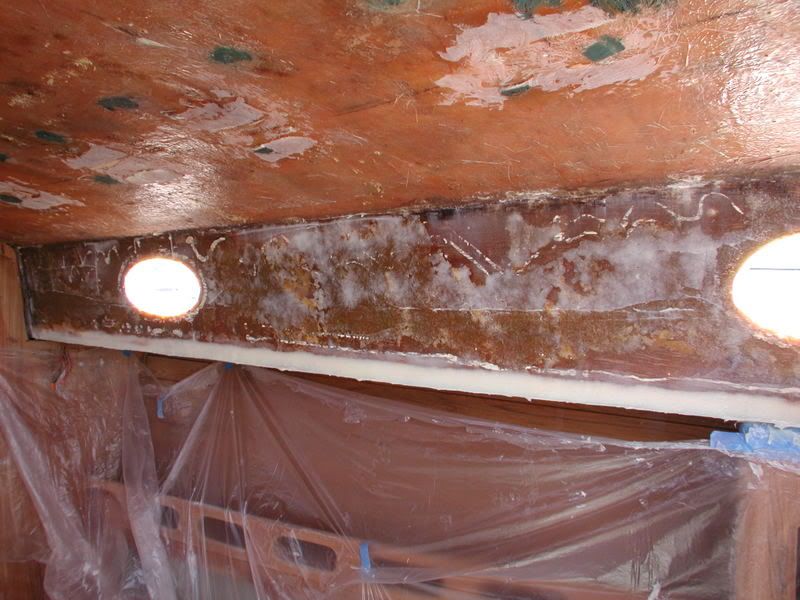
After resawing, bookmatching and glueing up the new panels, I vacuum
bagged them in place. This was the best way to achieve adequate clamping pressure over the entire panel, ensuring a good bond with the substrate.
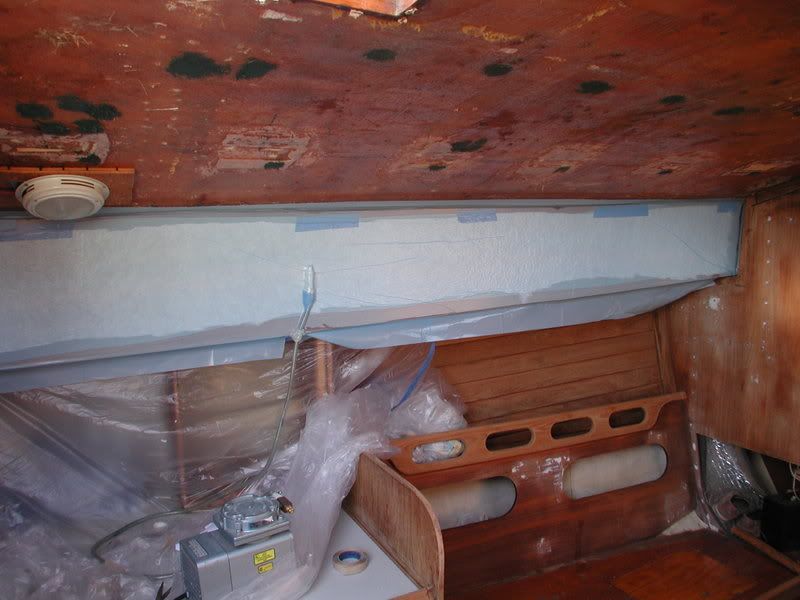
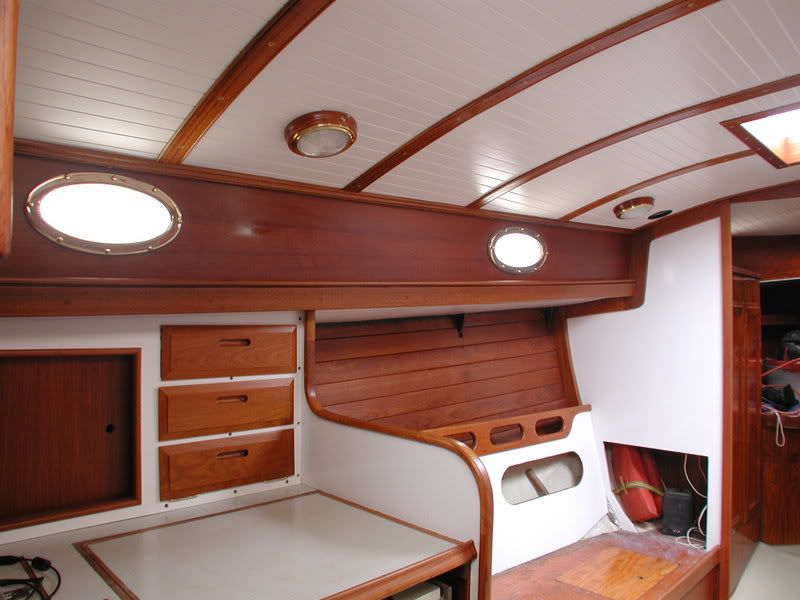
This is where we ended up after installing the new panels, mouldings,
overhead, etc. Not a bad looking interior, if I do say so myself.
coming off in pieces and will be useless for a template. Anyway, templating
is the least of your problems. Here's where I started. Notice the liberal use of stainless and the elegant
plastic speaker cabinet screwed to the bulkhead. Ya gotta love
buying second hand boats.

All that crap had to come off including the overhead, hand rails, ports,
etc. before addressing the house sides. All the wood was stripped
back to bare, bulkheads were prepped for paint.

The veneer was stripped off the house sides, and the rough glass
was faired with epoxy. Notice too that I ground off the glassed in hanging brackets for the overhead hand rails-I had plans to do a custom moulding along the bottom of the house that would double as a hand rail.

After resawing, bookmatching and glueing up the new panels, I vacuum
bagged them in place. This was the best way to achieve adequate clamping pressure over the entire panel, ensuring a good bond with the substrate.

This is where we ended up after installing the new panels, mouldings,
overhead, etc. Not a bad looking interior, if I do say so myself.

Last edited:
Martin that looks like alooooootttaa work!!! Gotta say I like Loren's idea a little better. It should get me back on the water sooner. I figured I couldn't get the veneer off the cabin side walls in one piece but my Dad always said to ask if you didn't know, now I do.
I like your headliner. That and a new floor are on my to do list but first things first. I am currently stripping the old stain off the midships bulkhead, settee area, galley, nav station, day berth and forward vee berth. These are in good condition just a little dry. I am going to restain and probably varnish(?) them to maintain a better, less mantenance, finish. Any suggestions?
I like your headliner. That and a new floor are on my to do list but first things first. I am currently stripping the old stain off the midships bulkhead, settee area, galley, nav station, day berth and forward vee berth. These are in good condition just a little dry. I am going to restain and probably varnish(?) them to maintain a better, less mantenance, finish. Any suggestions?
wheelerwbrian
Member III
Martin, what material is the headliner?
And it is beautiful work, btw.
And it is beautiful work, btw.
Sven
Seglare
I like how you managed to "repurpose" the plastic speaker as part of the new interior !
Kidding aside, it is amazing how the interior feel improved by adding some white surfaces to the almost-all-wood original. The contrasting white really brings out beauty the wood.
Very nice !
-Sven
Kidding aside, it is amazing how the interior feel improved by adding some white surfaces to the almost-all-wood original. The contrasting white really brings out beauty the wood.
Very nice !
-Sven
I like how you managed to "repurpose" the plastic speaker as part of the new interior !
Kidding aside, it is amazing how the interior feel improved by adding some white surfaces to the almost-all-wood original. The contrasting white really brings out beauty the wood.
Very nice !
-Sven
Sven,
That's pretty funny. I had forgotten that I had left that thing wired
up and sitting there so I could hear the radio while all that work was
going on! Modern technology is fine but I don't want to see it in
what is supposed to be a period interior. I ended up mortising a couple
of 6x9's into the shelf behind the settees where you can't see them.
The white painted bulkheads with varnished trim is a time honored
interior treatment that never gets old. Too much varnished wood
in a small interior can feel claustrophobic and oppressive. While
not quite finished, I think you'd agree that the transformation
from a cruise worn production boat interior to something approaching
semi custom is dramatic and shows what is possible if one is
willing to do the work.
Martin
Martin, what material is the headliner?
And it is beautiful work, btw.
Hi Brian,
The headliner is 1/4" plywood that I v-grooved with a router.
Martin
Hey Martin. Very nice. Can you please tell me what finish you used on the wood and how you applied it? I would love for mine to lokk half as nice when I am done.
Hi Tim,
It's just varnish and paint, applied with a brush.
Martin
finishing removing panels
Martin, I am chiseling/sanding the last of the side panels off the salon interior (was lucky/unlucky that one came off almost intact, but it left most of the last ply glued to the frp!). I have a question or two about your earlier reply.
 What is "bookmatching"? and second, what type of epoxy did you use to fair the salon sides?
 Thanks.
Martin, I am chiseling/sanding the last of the side panels off the salon interior (was lucky/unlucky
 What is "bookmatching"? and second, what type of epoxy did you use to fair the salon sides?
Martin, I am chiseling/sanding the last of the side panels off the salon interior (was lucky/unluckythat one came off almost intact, but it left most of the last ply glued to the frp!). I have a question or two about your earlier reply.
What is "bookmatching"? and second, what type of epoxy did you use to fair the salon sides?
Thanks.
Nova,
In a bookmatched panel, the boards are arranged to form a "mirror image"
on each side of the glueline. The epoxy I used to fair the house sides
was thickened West systems spread with a 12" rubber squeegee.
HTH,
Martin
Interior re-do
Martin:
Add my kudos to the others.
1. The plywood that you routed for the headliner: what thickness, and was it a veneer, or just B/C plywood?
2. The cross-pieces on the headliner that are varnished: what are they made of? How did you fabricate them?
3. The paneling that you "bookmatched": where is the glue line? I can't see it. Is it running horizontally or vertically? What stock did you fabricate the panels from?
Thanks
I thought this thread was kind of dead but I've had a couple of
requests to repost those pics. Who knew?
Anyway the ply used in the headliner was 1/4" fir.
The seam battens have a side bead detail and are made from teak.
The house sides were made from a couple of hand selected rift sawn
boards. The boards were first resawn, planed to thickness (3/16 or 1/4")
I don't remember exactly, the edges jointed and glued. The glue line
runs fore and aft and is nearly invisible. Then this "veneer" was vacuum
bagged to some 1/4" ply before being cut to fit and installed. After
vacuum bagging the panels in place, they were sanded to 220 and finished
with varnish before cutting the ports and installing the hardware. Both
the house sides in the main cabin were done this way as well as the piece
up forward that curves through 180 degrees on the 31C.
HTH,
Martin
PS I should add that the curved piece was done in stages, first the backer (1/8" luan)
was vacuumed bagged to the glass, and then the teak panel was cut to size, glued
up and bagged in place.
Last edited:

