Coolant Conundrum

bigd14

Contributing Partner
Blogs Author
The exit fitting on the riser is 1.99" OD. The input of the lift muffler has an OD of 1.71" and that's with some rubber hose on it to increase diameter. The output of the muffler is 1.65". The hose ID is 2.00".
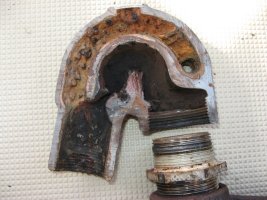
Such a frustrating cobbled together mix of hoses and fittings on these engines! It's a mess. I had the same problem. My lift muffler was delaminating so I had a new one made of stainless steel with the same input size as the exhaust riser output to simplify things. Of course I then complicated it again by adding a hump hose and a fiberglass elbow. I was going to try to match the entire exhaust system to the 2-inch exhaust riser exit fitting but I couldn't remove the exhaust thru hull without damaging the transom so I just kept it at 1.5 inches between there and the lift muffler.

If I were you I would probably replace all the hoses in the system to make sure they are not internally delaminating and are properly sized and clamped. Big painful job but worth it in the end.
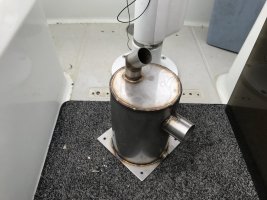
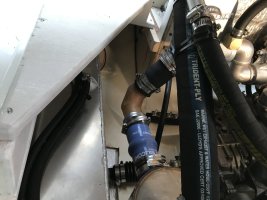
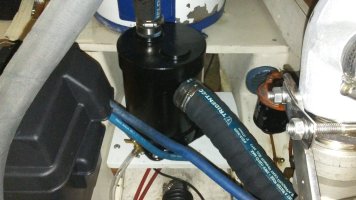
IMG_0023.jpeg IMG_0362.jpeg
 

Loren Beach

O34 - Portland, OR
Senior Moderator
Blogs Author
Perhaps worth a mention is that when we replaced the OEM Universal M25XP (23 hp) with the new Betamarine25 (25 hp), in 2018, the exhaust hose sizing was a bit bigger than the old hose and muffler bits. I was told that the newer engines have a larger ID exhaust hose to reduce back pressure and gain another fraction of a horsepower, but I am not an engineer.

I did replace the 1988 water lift muffler with a new one, same configuration and same company. New SS transom exhaust outlet, too. (sigh)
This did leave us with uniform hose and fitting sizing from manifold to transom, tho.

As for the original hose, it was starting to seep some rusty water from rusting of the steel spiral reinforcing, anyhow, and was surface cracking in sections. I figured that it "did not owe me anything" after all those years of service; it was going to get replaced with or without a new engine. Trivia: the factory Centek-Vernalift water lift muffler, like the replacement, was made of fiberglass, and cleaned up near-new. Good product, IMHO,
 

Pete the Cat

Sustaining Member
It does look like the second hose clamp on several hoses was tightened outside the stub. That would certainly ruin a hose. Both clamps are supposed to be on the stub.

View attachment 51436
You may find that the hose delaminated inside that hose--they are strong but do not like being compressed like that. I love my electric socket driver and 5/16th socket for working hoses. Saves time, skinned knuckles and improves my language.
 

Kenneth K

1985 32-3, Puget Sound
Blogs Author
Jeff, when I re-did my exhaust system, I ran into the same discovery--2" hose slipped over 1-5/8" hose to accommodate the smaller fitting at the lift muffler. The postings I read at the time, and the others I talked to that did this before me, all seemed to say that practice was pretty common and that there's really nothing wrong with slipping a hose over another hose. So, that's how I put mine back together in 2017 and I've never had a problem since (though I think I also slathered some RTV sealant between the hoses).
20170906_150130.jpg

Your third photo in post #38 makes it looks like that's a pretty tight bend on the 2" hose. I don't think you'd be able to fit a 2" x 1-5/8" hose adapter in that tight of a bend (unless you get a custom-made, angled adapter), so I wouldn't necessarily shy away from the hose-over-hose trick. Also, the "corrugated" tubing is standard for wet-exhaust hose--that's what mine is in the pic above.
 

Prairie Schooner

Jeff & Donna, E35-3 purchased 7/21
Jeff, when I re-did my exhaust system, I ran into the same discovery--2" hose slipped over 1-5/8" hose to accommodate the smaller fitting at the lift muffler. The postings I read at the time, and the others I talked to that did this before me, all seemed to say that practice was pretty common and that there's really nothing wrong with slipping a hose over another hose. So, that's how I put mine back together in 2017 and I've never had a problem since (though I think I also slathered some RTV sealant between the hoses).
View attachment 51476

Your third photo in post #38 makes it looks like that's a pretty tight bend on the 2" hose. I don't think you'd be able to fit a 2" x 1-5/8" hose adapter in that tight of a bend (unless you get a custom-made, angled adapter), so I wouldn't necessarily shy away from the hose-over-hose trick. Also, the "corrugated" tubing is standard for wet-exhaust hose--that's what mine is in the pic above.

Thanks Ken. Your posts about the rehab on your boat are among those I'm rereading carefully. I think you're right that an adapter that extends the nipple would create a curve that's too extreme. It's kind of at it's limit right now. I thought about using resin to glue a sleeve on the nipple, but regular polyester, or epoxy, would not take the heat. As I look at the photo you referenced, when remounting the muffler I might rotate it ~15º.

It looks like your muffler has a drain petcock. Yes? Did you put that in or did it come with the unit? Do you use it? When is it helpful?

How's your riser brace working out? Something like that is part of my plan, using the existing riser. Does the U-bolt chafe or stress the riser? Does the cantilever off the anchor point on the engine give enough support? I'm thinking of replacing the HX mount with a custom plate-metal part that also reaches up to support the riser.

Many questions have I.
yoda luke questions sm.jpg
 

Kenneth K

1985 32-3, Puget Sound
Blogs Author
As I look at the photo you referenced, when remounting the muffler I might rotate it ~15º.
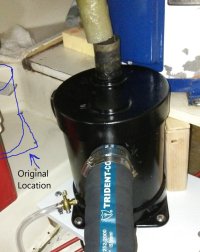
Yeah, if that gives you a better lead, it might be a good idea. It's also ok to raise it a few inches if that helps at all. Originally, my muffler was mounted towards the starboard side, not centerline.
20170616_160328.jpg
It looks like your muffler has a drain petcock. Yes? Did you put that in or did it come with the unit? Do you use it? When is it helpful?
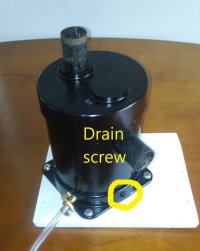
Yeah, I put that in. I think all Vernalift mufflers have a drain screw at the bottom. The drain screw released old, stagnant, soot-infused salt water onto whatever surface it drained onto, which ultimately ended up in the bilge. With the valve and hose, I can catch drain water in a cup at the bilge. Reasons for draining: 1) If you crank the motor many times without a successful start, water backs in the exhaust hose, which can ultimately hydro-lock the engine. 2) Before winterizing, I drain the muffler. Then, whatever antifreeze you run through the muffler is not diluted by the water in the muffler.

I left the drain screw in place and just tapped threads into a different place at the base of the muffler.
20170615_094643.jpg
How's your riser brace working out? Something like that is part of my plan, using the existing riser. Does the U-bolt chafe or stress the riser? Does the cantilever off the anchor point on the engine give enough support? I'm thinking of replacing the HX mount with a custom plate-metal part that also reaches up to support the riser.
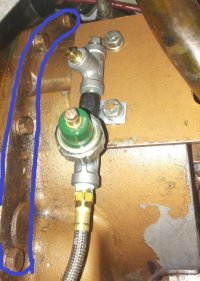
No problems with the support brace. I've tightened up the U-bolt only once since installing it. I haven't seen any chafing--it seems to be holding together as one solid part. I was able to mount mine to the hoist-point threads on the cylinder head because I had the exhaust manifold removed at the time. There's no way to get to that hoist-point-bolt with the manifold installed.

As for using the HX mount--it might be worth talking to a mechanic. The HX mounts to the top of the aluminum bell housing between the block and the transmission. Ask the mechanic if the aluminum walls of the bell housing can support that kind of force or not. You wouldn't want to crack the housing. If that's a problem, maybe the custom bracket could span the top 2, 3, or 4 bolts that hold the bell housing on.
20170506_212106.jpg
That way, the bracket would be supported by 2-4 bolts that actually screw into the engine block.
 

Prairie Schooner

Jeff & Donna, E35-3 purchased 7/21
Yeah, if that gives you a better lead, it might be a good idea. It's also ok to raise it a few inches if that helps at all. Originally, my muffler was mounted towards the starboard side, not centerline.
View attachment 51480

Yeah, I put that in. I think all Vernalift mufflers have a drain screw at the bottom. The drain screw released old, stagnant, soot-infused salt water onto whatever surface it drained onto, which ultimately ended up in the bilge. With the valve and hose, I can catch drain water in a cup at the bilge. Reasons for draining: 1) If you crank the motor many times without a successful start, water backs in the exhaust hose, which can ultimately hydro-lock the engine. 2) Before winterizing, I drain the muffler. Then, whatever antifreeze you run through the muffler is not diluted by the water in the muffler.

I left the drain screw in place and just tapped threads into a different place at the base of the muffler.
View attachment 51481

No problems with the support brace. I've tightened up the U-bolt only once since installing it. I haven't seen any chafing--it seems to be holding together as one solid part. I was able to mount mine to the hoist-point threads on the cylinder head because I had the exhaust manifold removed at the time. There's no way to get to that hoist-point-bolt with the manifold installed.

As for using the HX mount--it might be worth talking to a mechanic. The HX mounts to the top of the aluminum bell housing between the block and the transmission. Ask the mechanic if the aluminum walls of the bell housing can support that kind of force or not. You wouldn't want to crack the housing. If that's a problem, maybe the custom bracket could span the top 2, 3, or 4 bolts that hold the bell housing on.
View attachment 51482
That way, the bracket would be supported by 2-4 bolts that actually screw into the engine block.

Thanks Ken.

Muffler drain: Interesting idea. I'm comfortable with the amount of winterizing anti-freeze that gets in the system, and I use the -100º assuming it will be diluted. But it might be worth putting the petcock in. It's never going to be easier.

HX mount: Aluminum?!!?!!? I had no idea. Strength aside, what does that mean for galvanic corrosion? The (multi-metal) HX is currently mounted to it by way of what I assume is a mild steel bracket.* Could that be part of why exchanger anodes corrode so fast? And then there's the strength issues you mention. Good suggestion about using the bolts holding the housing to the block. Hmmm. But I'm glad I found out now. There's definitely some bell housing research in my future.

* edit. It is isolated from the bracket by a sheet of rubber. Still . . .
 
Last edited:

Kenneth K

1985 32-3, Puget Sound
Blogs Author
HX mount: Aluminum?!!?!!? I had no idea.
It might be worth looking into. Actually, I don't KNOW that it's aluminum because I've never removed it, but I know the gear case cover on the front of the engine is aluminum. That's the part that cracked due to the old style alternator bracket, and why that old bracket needed to be replaced.

I guess you could test it, see if it's magnetic.
 
Last edited:

Kenneth K

1985 32-3, Puget Sound
Blogs Author
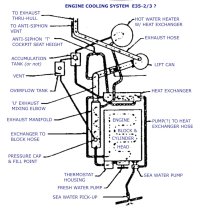
FYI, I came across the "plumbing" diagram in my Ericson manual. It's only slightly more readable than yours:

#4 - ?U? Exhaust Mixing Elbow
#6 - Thermostat Housing
#7 - Sea Water Pick Up
#10 Hot Water Heater with Heat Exchanger
 

Prairie Schooner

Jeff & Donna, E35-3 purchased 7/21
It might be worth looking into. Actually, I don't KNOW that it's aluminum because I've never removed it, but I know the gear case cover on the front of the engine is aluminum. That's the part that cracked due to the old style alternator bracket, and why that old bracket needed to be replaced.

I guess you could test it, see if it's magnetic.
I tested it and the magnet didn't stick. Hmmm. Recalibrating . . .
 

Prairie Schooner

Jeff & Donna, E35-3 purchased 7/21
This satisfied some of my curiosity. A Yanmar riser by "Hayden" on the Island Packet Yacht Owners Association site. More pictures at the link.

x ipyoa yanmar Hayden.jpg


And, updated cooling diagram for E35.
cooling map 2 E35-2-3 v4.jpeg
 

Prairie Schooner

Jeff & Donna, E35-3 purchased 7/21
Unless there's something critical I'm missing, I'm pretty sure the heat exchanger is the problem child in this little drama.

Sorry. My narration is pretty bad. I also ran a test with a garden hose connected to the raw water input, plugging the anti-siphon/riser outlet. Water came out of the coolant nipples.

We'll purchase a new one. At this point I'm thinking we'll size up from the current 2" to a 3" diameter unit. Can a diesel run too cool? Before this saga it would hold a steady 160º-170º.

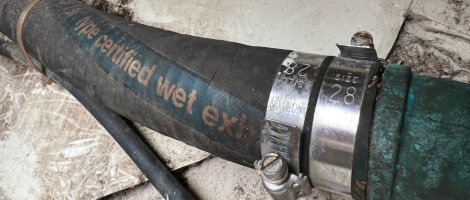
I'm still going to test the water heater, thermostat, and anything else you folks recommend. While I have things apart, I will replace all hoses. The exhaust hose at the transom thru-hull is especially crusty.

exhaust at thru-hull.jpg
 

Pete the Cat

Sustaining Member
Unless there's something critical I'm missing, I'm pretty sure the heat exchanger is the problem child in this little drama.

Sorry. My narration is pretty bad. I also ran a test with a garden hose connected to the raw water input, plugging the anti-siphon/riser outlet. Water came out of the coolant nipples.

We'll purchase a new one. At this point I'm thinking we'll size up from the current 2" to a 3" diameter unit. Can a diesel run too cool? Before this saga it would hold a steady 160º-170º.

I'm still going to test the water heater, thermostat, and anything else you folks recommend. While I have things apart, I will replace all hoses. The exhaust hose at the transom thru-hull is especially crusty.

View attachment 51516
Yes, a diesel can run "too cool" but not from the flow on the raw water side. It would only be the fault of your thermostat on the fresh water side that could make it run too cool. I would definitely go to a 3" Hx. It will handle the cooling process better and you might have fewer problems with clogs in the heat riser etc. 160 to 180 is generally acceptable. You do want the engine to heat up as diesels only burn fuel cleanly with designated high cylinder temps. Taking a long time to get there (or not getting there at all) are diesel killers. I try to run my diesel for minimum of 20" no matter what the need is and run it hard enough to develop operating temp heat.
 

David Grimm

E38-200
Prairie Schooner, From my seat here in NY I wouldn't jump to the HX right away! You stated that the levels change in your coolant. I think this may be your domestic water heater seeping into your coolant.

To test; shut the water pressure pump off and open the sink hot and cold. When all stops dripping put a coolant pressure tester on the manifold in place of the radiator cap. Pump up slowly. Do not exceed 14 psi. Anything coming out of the faucet?

Dave

Ps. You should replace the rubber exhaust hose. It overheated and most likely melted. The drip is not a good sign. Carbon Monoxide could also be seeping out.

I cannot stress enough. Step 1, start engine. Step 2, check for water flow at exhaust.

These motors take quite a bit of time to heat up the large volume of coolant. However from 180 to 200+ happens pretty quick when there is a raw water obstruction. Installing a 160 thermostat buys you a little more time to catch it rising.

I installed a 185/190 coolant temp switch in the side of the block. In theroy it should ground the oil pressure buzzer in the cockpit if it gets that hot. I desinged this to wake me up if the motor started to overheat while crossing to Bermuda.
 
Last edited:

Prairie Schooner

Jeff & Donna, E35-3 purchased 7/21
Prairie Schooner, From my seat here in NY I wouldn't jump to the HX right away! You stated that the levels change in your coolant. I think this may be your domestic water heater seeping into your coolant.

To test; shut the water pressure pump off and open the sink hot and cold. When all stops dripping put a coolant pressure tester on the manifold in place of the radiator cap. Pump up slowly. Do not exceed 14 psi. Anything coming out of the faucet?

Dave

Ps. You should replace the rubber exhaust hose. It overheated and most likely melted. The drip is not a good sign. Carbon Monoxide could also be seeping out.

I cannot stress enough. Step 1, start engine. Step 2, check for water flow at exhaust.

These motors take quite a bit of time to heat up the large volume of coolant. However from 180 to 200+ happens pretty quick when there is a raw water obstruction. Installing a 160 thermostat buys you a little more time to catch it rising.

I installed a 185/190 coolant temp switch in the side of the block. In theroy it should ground the oil pressure buzzer in the cockpit if it gets that hot. I desinged this to wake me up if the motor started to overheat while crossing to Bermuda.

Thanks Dave.

Water heater - It's something I definitely want to explore for leaks. We're on the hard, the domestic water has anti-freeze in it, I've already removed the exchanger and drained most/all of the coolant, the engine has been fogged and shut down. Is there a way I could hook one of those pressure testers up to just the water heater? I understand many auto parts stores will let you borrow one if you leave a healthy deposit. I've thought of using a bicycle pump but those get up to 100 psi rather fast and I don't know how reliable the gauge is at low pressure.

Hoses - All hoses in the cooling and exhaust circuits will be replaced as part of this project.

Start up, check exhaust for water. - Yes. We just get distracted and can't rely on habit. We're trying to think of some sort of device/arrangement to have a physical reminder. Some people who shut the seacock every time put the ignition key on the seacock handle. Maybe a 'Remove Before Flight' flag hanging on the throttle.

Alarms - If we have a temperature warning buzzer it doesn't work. Ditto with oil pressure. Part of this rehab will be making sure those are in place and reliably working.

Jeff
 
Top