Kind of summarizes most of youtube, doesn't it?That guy in that video gets and E for effort & enthusiasm, but flunks in understanding (at least on camera) what is really needed to address the root cause of his problem.
Guest viewing is limited
- You have a limited number of page views remaining
- 27 guest views remaining
- Register now to remove this limitation
You are using an out of date browser. It may not display this or other websites correctly.
You should upgrade or use an alternative browser.
You should upgrade or use an alternative browser.
Deck Repair, Injectadeck and Options [Master Thread]
- Thread starter wynkoop
- Start date
Ah, gentlemen of quick persuasion: YouTube has taught me everything I know, from the fingerings of Django Reinhardt to the arguments of Noam Chomsky, the repair of my gas clothes dryer, leaking dishwasher surfactant chamber and diesel engine injectors, as well as revealing European procedures for the thermite welding of railroad tracks and just exactly how a Russian lawyer bushcrafts his cabin in the woods.
I am much the better for it, and considerably more informed about the Battle of Midway than ever before.
I am much the better for it, and considerably more informed about the Battle of Midway than ever before.
Irresistible. A little off topic from Injectadeck, but still--irresistible!
Yes, there was significant deck camber. I preserved the center line of fiberglass between the non-skid areas along the entire length of the deck to maintain a reference point.When you do an area that size do you have to worry about losing camber across the deck?

gargrag
Member II
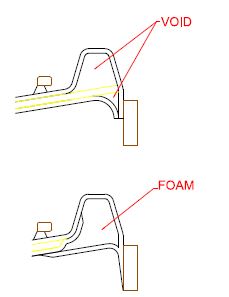
I'm planing to cut the fiberglass from inside, remove all the rotten core, glue the fiberglass layer again, and then fill the void with injectadeck. The other option I'm considering is instead of injectadeck, using this https://compositeenvisions.com/product/proset-expanding-epoxy-foam-resin-1942/ epoxy foam.
I'm still thinking about it, but will update in case it helps anyone else

I'm still thinking about it, but will update in case it helps anyone else
You may find that some of the fiberglass won't come off cleanly. Or if it does it means you haven't removed enough area to get back to solid core. I did a similar job from underneath on the side decks but used 1/2 inch balsa core material from Jamestown Distributors along with 1/2 G10 plates under deck fittings. As boat projects go it was technically easy, but quite messy. Line everything with plastic.glue the fiberglass layer again,
Springy Side Decks- Reinforce?
I'm in the process of correcting core damage to the side decks, from below. The starboard side is complete, but the port side remains. I'm loathe to remove the galley so I am limiting my repairs to the easily accessible areas, although I suspect the water damage does include the inaccessible...
Mr. Scarlett
Member III
Yes, PPE and protecting the interior are very important. Having done this I don't envy you one bit.
I also used balsa since it seemed to have held up for at least 40 years. Mapping out each area with a 1/8" drill bit and a Sharpie. As mentioned above, it's doable but messy. I wouldn't get too hung up on saving the old skin, this could be a great time to learn about vacuum bagging. If you can do it upside down, you can do it anywhere!
I have no experience with injectadeck other than videos lamenting its use when it comes time to do the job over with a solid core. As far as expanding foam goes, again no experience but it seems to me that one could end up with a bigger project than what they started with if they weren't careful. If I had to do it again I'd use balsa, (there's a chance the right person could talk me into foam), and perhaps plywood or G10 in a few strategic places.
Mind you these are just opinions, I'm sure there's any number of cases where the alternatives have worked out just fine. Good luck!
gargrag
Member II
Yes, PPE and protecting the interior are very important. Having done this I don't envy you one bit.
I also used balsa since it seemed to have held up for at least 40 years. Mapping out each area with a 1/8" drill bit and a Sharpie. As mentioned above, it's doable but messy. I wouldn't get too hung up on saving the old skin, this could be a great time to learn about vacuum bagging. If you can do it upside down, you can do it anywhere!
I have no experience with injectadeck other than videos lamenting its use when it comes time to do the job over with a solid core. As far as expanding foam goes, again no experience but it seems to me that one could end up with a bigger project than what they started with if they weren't careful. If I had to do it again I'd use balsa, (there's a chance the right person could talk me into foam), and perhaps plywood or G10 in a few strategic places.
Mind you these are just opinions, I'm sure there's any number of cases where the alternatives have worked out just fine. Good luck!
any material on how to approach core replacement woth vacuum bagging from the inside?
I used vacuum bagging on my port side repair, but decided not to use it on the starboard side. Vacuum bagging requires a perfect seal for it to work and you can only achieve that by sealing against the top skin (assuming you are going from below). If you try to seal against the bottom skin, the air will travel through the good core and escape through the staple holes. On the port side, I installed the bulk of the new core with vacuum, then filled in the space between the new core and old core using extendable drywall sanding poles to push up. At the end of the day, our boats aren't super light racers, so a little extra resin between the outer skin and new core isn't going to hurt anything. Here's a some more detail on my experience:
 ericsonyachts.org
E25+ - New Core...the wrong way I'm told
The first step with replacing the core was identifying justhow much core was rotten. As you canexpect, the affected area was greater than I initially expected. The void along the edge and between the topskin and balsa created by not spreading...
gargrag
Member II
yo convinced me to go with the proper repair.I used vacuum bagging on my port side repair, but decided not to use it on the starboard side. Vacuum bagging requires a perfect seal for it to work and you can only achieve that by sealing against the top skin (assuming you are going from below). If you try to seal against the bottom skin, the air will travel through the good core and escape through the staple holes. On the port side, I installed the bulk of the new core with vacuum, then filled in the space between the new core and old core using extendable drywall sanding poles to push up. At the end of the day, our boats aren't super light racers, so a little extra resin between the outer skin and new core isn't going to hurt anything. Here's a some more detail on my experience:
E25+ - New Core...the wrong way I'm told
The first step with replacing the core was identifying justhow much core was rotten. As you canexpect, the affected area was greater than I initially expected. The void along the edge and between the topskin and balsa created by not spreading...
I think. I'll plan for the end of the season, @trickdhat did you do this repair with the boat on the water and the mast stepped?
Yes, I cut into the laminate while it was on the hard, but the rest of the job was in the water. The Mast was up the whole time.yo convinced me to go with the proper repair.
I think. I'll plan for the end of the season, @trickdhat did you do this repair with the boat on the water and the mast stepped?
gargrag
Member II
@trickdhat gave me the last push to go ahead and do a proper repair on my rotten core, Has anyone recently bought balsa core? any recommendation ?
I purchase most of my supplies from these guys:
 fiberglasssupply.com
They are local to me, but it's actual cheaper to ship than it is to drive and they're only 45 minutes Away. They also offer classes, so they're really helpful.
Fiberglass Supply
Supplier of carbon fiber fabrics, fiberglass, epoxy resins, core materials, polyester resins, surfboard blanks and other supplies for working with composites.
fiberglasssupply.com
They are local to me, but it's actual cheaper to ship than it is to drive and they're only 45 minutes Away. They also offer classes, so they're really helpful.
I purchased most of my recore materials from Jamestown Distributors.
All I can say is, arghhhhh...two years of work.
 goodoldboat.com
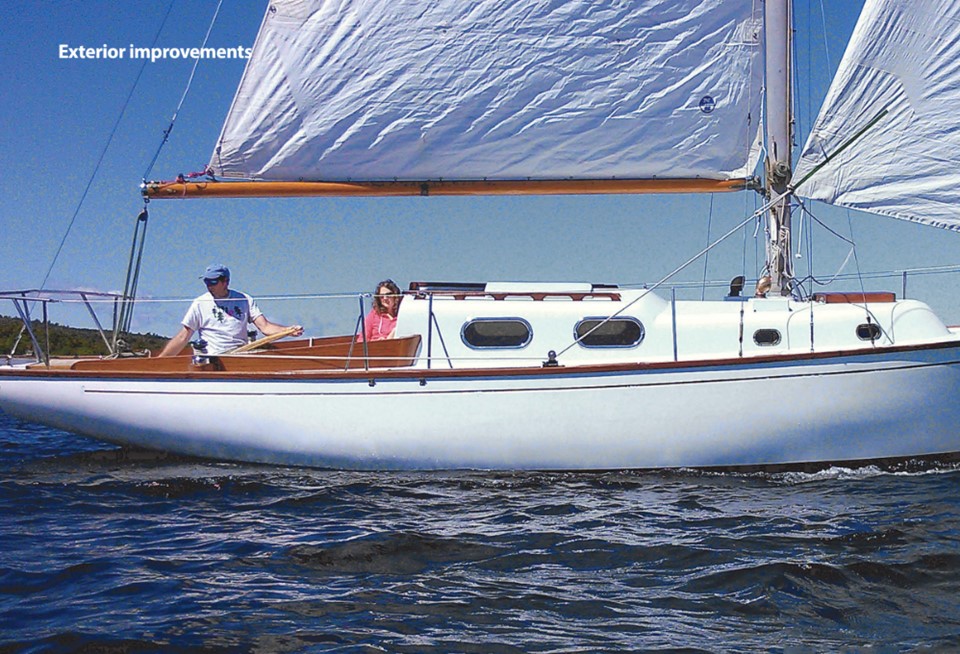
Rebuilding a deck, Part 2
Renewal restores the psyche Issue 100: Jan/Feb 2015 This is the second of two parts. In the first part, in the November 2014 issue, Matt described the process of removing the deck skin and soggy core of his Alberg 35, Magic. In this issue, he describes how he installed the new core and laminated the
goodoldboat.com
Drewm3i
Marine Surveyor
I would be very tempted to repair rotten/delaminated deck core with Gorilla Glue.
The only possible pitfalls would be refinishing the non-skid, but epoxy to fill the holes and Kiwi Grip to repaint the deck could be good options. On my boat, the deck is not really load bearing or structural as the chainplates pass through into the grid, and all substantial hardware is either bolted through the toe-rail or fastened into tapped aluminum blocks. I believe many Ericsons are similar--albeit with the exception of cleats and stantions (but those are through-bolted anyway!).
I recently repaired a rotten deck hatch with it (as a test) and the results speak for themselves:
IMO, it is very good at reattaching/regluing skins when expansion (from freezing) has caused them to delmainate. The core here was plywood vs. balsa--the latter of which is better, but not as easily repaired in this way.
The real test will be next winter but I am hopeful that it will stand the test of time as I have sealed all of the penetrations which caused the water ingress in the first place!
For something like a coach roof, anchor locker hatch, cockpit sole, etc., I have become a believer! Keep in mind, the "glue" is essentially a foam that--with what's left of the wood--creates a composite structure/core material; it is also catalyzed by water--so moisture is no issue unlike epoxy, which only creates brittle "pillars" of strength vs. these types of polyurethane foam products which remain tenacious yet flexible when wet.
I have also used high-density injectable foam in the past and have had decent results repairing a rotten deck/engine hatch on a power boat (though it indeed "bowed" the deck). And of course I have also rebuilt a transom, stringers, and some bulkheads in the past--and after that whole ordeal, decided I would never do so again! A deck re-core project would be even worse, especially considering the finish work necessary to achieve a good result--and at that point, I would rather just get another boat!
See here regarding deck core repairs:
IMO, for localized deck repairs, this method is worth trying. For load-bearing areas, a re-core is probably necessary.
Last edited:
p.gazibara
Member III
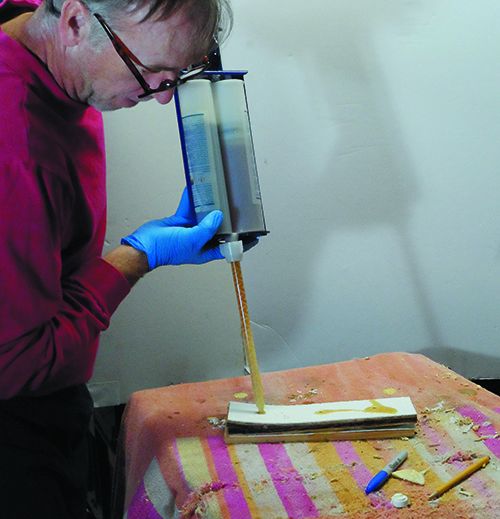
I have seen this done several times from the DIY world with varying success. Watching him spray the water onto the part prior to glueing made me scream inside. Yes it's catalyzed by water, but there would be plenty trapped in the part for that purpose. I highly doubt the glue consumes all the water in the curing process and any that's trapped will cause the problem to reoccur.
No boatbuilder I have ever met would call this acceptable. Lots of data has been collected about epoxy resins and their fatigue cycling (west system). No data that I am aware of exists about fatigue cycling this method (secondary bonding via gorilla glue). No other core material can handle fatigue cycles like wood when kept dry, even the fancy foams, they just don't rot so they can last longer without maintenance.
For a hatch cover or non loaded part like this video shows, it will probably last a lifetime assuming no more water gets in. (You would still want a coat of epoxy to prevent future water intrusion) For a deck or other structural component I wouldn't trust it.
Id love to see some data on it though, happy to be proven wrong.
I have fixed a few soft deck patches on Cinderella, its very easy to do properly with a multitool, fiberglass and epoxy. Cut out rot, template new core, add thickened epoxy, set in place with gravity clamp. Have a few beers until the glue kicks, then sand and glass over the top with peelply. You have to paint it regardless of the procedure. It can even be done all in one go once you get the hang of epoxy
It doesn't take more than a couple days to cut glue and coat, unless you are looking for a mirror finish.
-p
Drewm3i
Marine Surveyor
I have seen this done several times from the DIY world with varying success. Watching him spray the water onto the part prior to glueing made me scream inside. Yes it's catalyzed by water, but there would be plenty trapped in the part for that purpose. I highly doubt the glue consumes all the water in the curing process and any that's trapped will cause the problem to reoccur.
No boatbuilder I have ever met would call this acceptable. Lots of data has been collected about epoxy resins and their fatigue cycling (west system). No data that I am aware of exists about fatigue cycling this method (secondary bonding via gorilla glue). No other core material can handle fatigue cycles like wood when kept dry, even the fancy foams, they just don't rot so they can last longer without maintenance.
For a hatch cover or non loaded part like this video shows, it will probably last a lifetime assuming no more water gets in. (You would still want a coat of epoxy to prevent future water intrusion) For a deck or other structural component I wouldn't trust it.
Id love to see some data on it though, happy to be proven wrong.
I have fixed a few soft deck patches on Cinderella, its very easy to do properly with a multitool, fiberglass and epoxy. Cut out rot, template new core, add thickened epoxy, set in place with gravity clamp. Have a few beers until the glue kicks, then sand and glass over the top with peelply. You have to paint it regardless of the procedure. It can even be done all in one go once you get the hang of epoxy
It doesn't take more than a couple days to cut glue and coat, unless you are looking for a mirror finish.
-p
Can Glue Injection Fix Rotten Core? - Practical Sailor
We injected epoxy, Gorilla Glue and Inject‑a‑Deck into rotten core to see which products can safely stiffen a soft deck.
 www.practical-sailor.com
destructive testing:
[
Last edited:
A labor of love, for sure. Well done to that guy!