• Untitled Document

    Join us on March 29rd, 7pm EST

    for the CBEC Virtual Meeting

    All EYO members and followers are welcome to join the fun and get to know the guest speaker!

    See the link below for login credentials and join us!

    March Meeting Info

    (dismiss this notice by hitting 'X', upper right)

injectadeck - Thoughts and Experiences

wynkoop

Member III
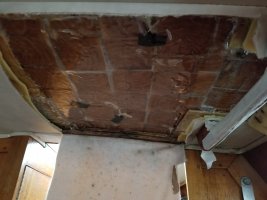
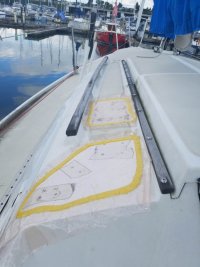
So far I have done the port side coach roof on Silver Maiden. I have also done the starboard side coach roof to within a few inches of the grab rails. Project for this spring is to remove the starboard grab rails and inject through their holes like I did on the port side. I got caught with cold weather last fall.

I have used a little over 1/2 of the large boat kit. I still need to finish the starboard coachroof then move on to the port and starboard decks next to the cabin and the foredeck. The last will be the cabin sole which is getting springy in places.

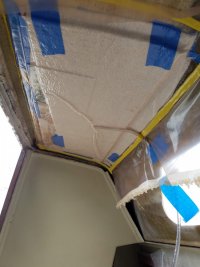
Where I have done it it is rock solid like the day it was done even though I have not yet plugged the injection holes with epoxy. I figured I would do them all at the same time, especially since I got into cold weather last fall.

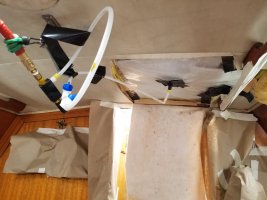
I would recommend this over cutting the deck off and mucking out the balsa for replacement. Be careful not to over inject or under inject. Over injection will waste product with big muffin tops out your holes and under injection will leave voids that will require another hole to be drilled.

If you get it on your decks expect a yellow stain if you do not get it removed fast with either acetone or mineral spirits, I do not recall which. This is why having a helper is good.

For my part I could care less about stains. Silver Maiden is not pretty and needs a paint job having had her gelcoat sand blasted by hurricane Sandy some years ago. Once the deck repairs are done I do plan to paint her and will be asking advice here.

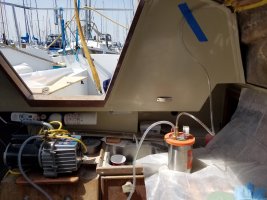
When I spoke to the injectadeck guy for my boat and the amount of area I had to cover he suggested the big boat kit and said if then I needed just 1 or two more tubes to finish he would sell me individual tubes until I was finished. I expect I will be getting more from him when I am done.

Sadly I have had no time to complete the project as I am at the moment working 6 days a week as Captain of a private ferry in NY harbor. That is also why I have not been active on the forum.
 

KS Dave

Dastardly Villain
Blogs Author
Sadly I have had no time to complete the project as I am at the moment working 6 days a week as Captain of a private ferry in NY harbor. That is also why I have not been active on the forum.
Thanks for taking a minute to reply! I'm in comms with them, too. It's nice to hear from folks who have done this. Coming up one tube short was a concern I had, too. Glad to hear they're willing to work with you on that.

Once you find time to finish up injecting, please post results here. If I decide to go this route, I'll do a blog post on mine.

I think I might need to pull my grab rail on that side for easier access to the repair. I think there's a thread around here about caveats with that - something about the screws/bolts being hard to get at or stuck. Now to find it...
 

wynkoop

Member III
The E-27 has matching grab rails top and bottom and they are easy to pull with two people. On the port side I put packing tape over the bottom holes and injected in the top holes. I plan to do the same on the starboard side when I can. READ ALL THE DIRECTIONS and make sure you have a wire coat hanger for poking and rotorootering around the edges of the holes.

When you pull your grab rails it is a good time to refinish them. Port side I sanded and then sealed with total boat penetrating epoxy, then covered that with UV stable polyurathane about 7 months later it still looks ok, but I see where it needed more attention, so when the starboard side is done I will plan for more time doing the job and learn from the mistakes of the port side. Port side is holding up better than just poly or varnish.
 

1911tex

Sustaining Member
Thanks for the follow-up - glad to hear yours is still going strong. From what I can ascertain, you used 2/3 of 1 tube for an ~1.25 sq ft. section. I have an approximately 6-8 sq. ft. section where the top layer of glass has cracks. I think @wynkoop repaired much larger sections.
KS Dave I had close to a 3 sq.ft. section for 2/3 of one tube...I would estimate 1 tube for 3 sq.ft. or no more than 3-4 tubes for your job. I sqeezed in too much in the drilled holes causing the "mushrooms" that bloomed out of the neighboring drilled holes were very large and wasteful, but forced out a huge amount of dark bad balsa before the white foam followed. I had glass cracks also, that is why I overpainted with anti-slip deck paint....cracks disappeared.
 

KS Dave

Dastardly Villain
Blogs Author
The E-27 has matching grab rails top and bottom and they are easy to pull with two people.
I don't think the E26-2 exterior grab rails are like this as the top grab rails are an oval pole; the raised sections are fiberglass. I think mine have the "captive nut" buried down in there. That, or the screws are buried in 5200. Trying to confirm.

E26-ExteriorGrabRails.jpg
 

KS Dave

Dastardly Villain
Blogs Author
KS Dave I had close to a 3 sq.ft. section for 2/3 of one tube...I would estimate 1 tube for 3 sq.ft. or no more than 3-4 tubes for your job. I sqeezed in too much in the drilled holes causing the "mushrooms" that bloomed out of the neighboring drilled holes were very large and wasteful, but forced out a huge amount of dark bad balsa before the white foam followed. I had glass cracks also, that is why I overpainted with anti-slip deck paint....cracks disappeared.
Okay, I stink at math. Yeesh. :confused:

Appreciate your experience, here. I'd think the belching of wood mush is a good sign because it's being displaced. I'm not sure if my cracks are surface or if they go into the core. He indicated to just be prepared for where it might leak out and use that as a guide for where I might need to seal up after the foam has set.
 

David Grimm

E38-200
As I read through this post I sit hear scratching my head wondering who's bright idea it was to use wood core in a fiberglass boat? I guess it fiscally made sense at the time and it did last 35+ years for most of us here. I see discussions of right way vs. wrong way to repair. I think the wrong way was wood core. In my opinion that inject foam will outlast spent uranium rods. I suppose the correct method would be to reconstruct an entire top of the boat out of solid fiberglass. Maybe something to look for in your brand new yacht? Apparently this product works pretty well. I like this guy's video I found on YouTube.
 

tenders

Innocent Bystander
Gosh, I consider balsa core construction to have been quite successful. Mine lasted 40 years before starting to need major repairs, and those repairs have so far been feasible. At least, deck core. (I don’t think hull coring was a great idea. Don’t have it in my boat however.)

Do keep in mind that the standard before the development of fiberglass/wooden core construction was…all wood!

I don’t think economical structural foam technology/chemistry existed then anyway (1960s/70s).

And the boats were not expected necessarily to be in service as long as they have been.
 

Loren Beach

O34 - Portland, OR
Senior Moderator
Blogs Author
That guy in that video gets and E for effort & enthusiasm, but flunks in understanding (at least on camera) what is really needed to address the root cause of his problem. He needs to remove and properly re-bed the fittings whose fastenings allowed (and will continue to allow) moisture to get into -and thru- his deck.
Or, since re-bedding is more time consuming and involved, he is prepping the boat to sell. :(

As for coring in decks, this all relates to establishing an "I Beam" effect to make the surface stiff. i.e. the two skins have to separated but joined. This separation can be done by solid glass (extremely heavy), plywood (less heavy), or a product that joins both sides and is intrinsically lightweight. Balsa core with vertical grain is the 'gold' standard, still. Foam has been used but still can suffer moisture intrusion and can let go OR can be severely weakened by heat from the sun beating down on the deck. Note that some fine offshore boats have been built with plywood - often in squares - as coring.
Our boats have plywood under surfaces with heavily-loaded deck gear like winches and steering components on the cockpit floor/sole. Since moisture can migrate horizontally freely thru the layers of plywood, cockpit soles are especially prone to damage if the sealant is not renewed regularly. And done with care.

And *there's* the problem with ALL coring. Very few owners ever re-bed all of the deck fittings on a 20 year basis (lesser boats) or a 30 year basis (Ericson's and other high end builds). So all of the older boats finally have weak trampoline-decks and finally get chopped up and thrown away.

The injected version of a two part foam will only alleviate the symptom in the short run, but it will be a few years before it can be judged as a possible real "cure" and if owners treat it like the guy in the video and allow the water to keep entering freely thru every ignored fastening, they will have continuing damage inside and under their decks.
(Sigh....)
 

David Grimm

E38-200
Loren, All you mentioned above should be considered as soon as he frees his bare feet from the structure foam deck. SMH.
 

tenders

Innocent Bystander
The injected version of a two part foam will only alleviate the symptom in the short run, but it will be a few years before it can be judged as a possible real "cure" and if owners treat it like the guy in the video and allow the water to keep entering freely thru every ignored fastening, they will have continuing damage inside and under their decks.
(Sigh....)
Having done several balsa core repairs myself, Loren, I share your skepticism on the longevity of the injected process for two reasons: first, as you point out, the source of the incoming water must be alleviated. But second, mush displacement/replacement is only part of the solution. There's still acres of wet, rotting, balsa, PREmush in there. I just don't see how replacing today's mush solves tomorrow's mush problem.

In the more invasive cut-out-and-replace process, that all comes out, leaving dry space to be filled with replacement core abutting solid, dry balsa.
 

nquigley

Sustaining Member
Having done several balsa core repairs myself, Loren, I share your skepticism on the longevity of the injected process for two reasons: first, as you point out, the source of the incoming water must be alleviated. But second, mush displacement/replacement is only part of the solution. There's still acres of wet, rotting, balsa, PREmush in there. I just don't see how replacing today's mush solves tomorrow's mush problem.

In the more invasive cut-out-and-replace process, that all comes out, leaving dry space to be filled with replacement core abutting solid, dry balsa.
A good demonstration of this issue (discovering the mush spreads wider than initially thought), and solution (cut it all out and reinstall new wood) was in a recent episode of You Tube 'Good, Bad and Ugly' sailing:
 

Offshore1

New Member
BTW I got the strips of plywood idea from an article I read on line about a deck fix done by someone else. Does anyone have any thoughts on putting plywood into the deck to replace the balsa?
I saw Bruce King at our Maine Ericson Rendezvous party a couple years ago, and I was having the same questions about a soft deck repair around the starboard stanchions. He thought about it for a bit, and told me to go out and find a nice cedar 4x4 post with tight grain. Cut 1/2 inch slices and seal each one of them with multiple coats of epoxy. Cedar is almost as light as balsa and it's way cheaper than balsa core. He told me to go in through the headliner (we have a 1977 E 39B with the crappy foam backed vinyl). Going at it from below made a lot more sense than opening up any potential leaks from doing the repair from above. Bruce told me to get a vacuum bag kit, which I found through Jamestown. I used a multi tool with a flat carbide blade to cut in from the bottom and removed all the glass layer and the mushy core until the core on the edges of the void were solid. I fit and numbered and glued up each square to the deck above with thickened West System epoxy and cut some glass matt into strands and mixed those in for added strength. I then laid in a layer of epoxy soaked glass matt with the release layer, the breather layer and the bag, and sealed all the edges and tracked down leaks. Epoxying overhead is quite a challenge! Vacuum bagging was a bit of learning experience, but I got enough of a vacuum going to pull the glass matt tight. The resulting repair is still very strong 3 years later. There were some very minor voids between some of my squares that I was going to squirt in new material, but the deck is quite solid now, so I have not bothered.

I have done two more smaller repairs the same way and can recommend this technique if you are fairly competent with glass work. The investment in the Vacuum bag kit has paid off for sure. We now have no more leaks anywhere on the boat (that I know of). Replacing the headliner in 3 cabins and 2 heads is the next big challenge.

Follow our Maine adventures on Instagram: sailingchandelle
 

Attachments

  • Overhead.jpg
    Overhead.jpg
    145.8 KB · Views: 20
  • Mess.jpg
    Mess.jpg
    126.2 KB · Views: 20
  • Vacuum bagging.jpg
    Vacuum bagging.jpg
    169 KB · Views: 20

tenders

Innocent Bystander
Treated lumber as core material? No thank you. His reference to polyester resin as "fiberglass," the way he cut that treated lumber, and the decision to leave gaps between the boards for "additional strength where the fiberglass fills in" makes me think he doesn't have any sense of structural design and hasn't read the West System repair manual. I also think he's going the cheap route by using Bondo instead of epoxy.
 

bigd14

Contributing Partner
Blogs Author
When I recored an Ericson 27 the entire bow deck with the exception of a small 2x2 foot area was saturated. The only area that was noticeably soft was the very bow section about two feet back from the stem, which looks dark in the photo below. The balsa was basically mush in this location. You can see the only remaining solid core is along the aft end of seam along the centerline of the boat to the left in the photo. In the end I took out the entire core and top skin under the non skid areas of the bow. Water had travelled all the way back to the cabin and the core had mostly separated from the top skin. Its always worse than it seems.

1622827790168.png
 

tenders

Innocent Bystander
When you do an area that size do you have to worry about losing camber across the deck?
Yes, if the deck is cambered. I don't think the E27's foredeck is cambered - my 32's is not. But when I replaced the core below the deck-stepped mast, there was definitely camber to be preserved. That was the reason I stacked several layers of thin curved plywood as the core there, and the reason the Good, Bad, and Ugly guy used fore-and-aft lengths of wood in his.
 

Nick J

Sustaining Member
Moderator
Blogs Author
I have done two more smaller repairs the same way and can recommend this technique if you are fairly competent with glass work. The investment in the Vacuum bag kit has paid off for sure. We now have no more leaks anywhere on the boat (that I know of). Replacing the headliner in 3 cabins and 2 heads is the next big challenge.

What vacuum pump setup did you use? I was only able to use vacuum where I could completely seal the new core to the top laminate. If I tried to replace a section in the middle and seal to the bottom laminate all the little staple holes and other random holes allowed too much air in. I would have had to leave the pump on and I still would not have had that much vacuum pressure.

I have an older JB industries DV-142N 5cfm, used peal ply, bleeder fabric and vacuum bag material from Fiberglass supply.
 

Attachments

  • 20170521_125404.jpg
    20170521_125404.jpg
    209.2 KB · Views: 13
  • 20170609_123610.jpg
    20170609_123610.jpg
    103.6 KB · Views: 13
  • 20170609_123734.jpg
    20170609_123734.jpg
    122.9 KB · Views: 12
  • 20170609_173035.jpg
    20170609_173035.jpg
    107.7 KB · Views: 10

KS Dave

Dastardly Villain
Blogs Author
The injected version of a two part foam will only alleviate the symptom in the short run, but it will be a few years before it can be judged as a possible real "cure" and if owners treat it like the guy in the video and allow the water to keep entering freely thru every ignored fastening, they will have continuing damage inside and under their decks.
Appreciate these thoughts, Loren.

So, what if I plan to do both? Can I reasonably expect to seal up the mush with the foam to keep it from spreading and address all the leaks from deck hardware? We're not talking about an $80,000 boat or even a $40,000 boat. If my boat is a total loss, it's $10K. I couldn't sell it for half that in the condition it's in and my budget for this year is about 20% of that for the projects I have in mind. Is this fix "good enough" for putzing around on a lake and keeping the damage from getting worse?

Regarding my specific location, where there's a deck block, if the foam hardens as it is supposed to, would that provide adequate support for those blocks? The support is derived from the 'sandwich' effect, right? So if the filling is strong, whether it be expanding foam, foam board, or balsa, or cedar (which is a GREAT idea!), will that provide support for those blocks?
 
Last edited:

Loren Beach

O34 - Portland, OR
Senior Moderator
Blogs Author
Since properly remounting hardware is almost all labor, yours, you might try using the new foam injection for the open areas. Also, remove adjacent hardware and do the over drill-epoxy fill-redril routine. I did something like a couple hundred holes that way, and never ran out the West Systems epoxy in my gallon can. I still have a partial can of their filler, as well.
Actually, my most tedious and difficult job was re-stapling the inside head liner. :(
 
Top