• Untitled Document

    Join us on March 29rd, 7pm EST

    for the CBEC Virtual Meeting

    All EYO members and followers are welcome to join the fun and get to know the guest speaker!

    See the link below for login credentials and join us!

    March Meeting Info

    (dismiss this notice by hitting 'X', upper right)

E35-3 Prop Shaft Strut - a look inside - and a zinc question

Prairie Schooner

Jeff & Donna, E35-3 purchased 7/21
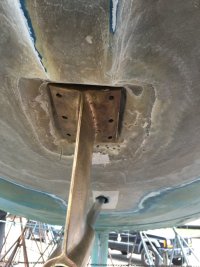
This looks a little pink at the top. I might have someone with metal expertise take a look at it before reinstalling it. This might argue for a disc zinc on the strut. Is this bonded to something? Bonding is controversial, I am just asking for my education, not advocating.
Hi Ray,
Thanks for the input. Yes, there is a little corrosion up there.
This video shows the reason we are rebedding the strut. It was one of the things the surveyor called out when we bought the boat last fall. Inside the boat, the top of the strut was (is still) completely covered with glass and not bonded.

Salt water was getting up in there, to raw bronze, and this surface was near the SS bolts. I'm thinking these conditions allowed the corrosion. When I reinstall the strut the upper portion will be sealed in with epoxy. The exposed area of the strut will be covered with PropSpeed. I'm also leaning toward using bronze nuts. With these measures I'd kinda ruled out an anode or bonding on the strut this go-round, but am still open to those. I learn a little more with each comment here.

I'm going to talk to a local marine fabricator about putting in the new cutless bearing. I'll ask them about the corrosion, too.
J
 

Prairie Schooner

Jeff & Donna, E35-3 purchased 7/21
Forensics
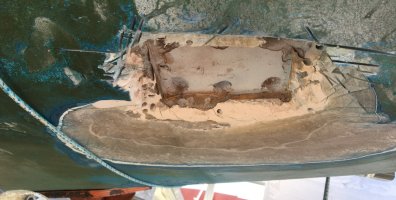
As I’ve dug further into the strut mount, literally, I think the evidence suggests this is how the strut was installed.
- SS bolts through horizontal plate of strut used to adjust shaft alignment, by resting on inside surface of hull
- Bedding compound (caulk? resin w filler? ???) put in, final alignment, and allowed to cure
- Fiberglass filled and faired into strut from below and covered over the bolt heads and plate on top.
K strut forensics 02 comp.jpg

On this site, in 2007, Roger Hinds described a very similar construction, though his only had four threaded studs.
’87 E34 strut, post #5 https://ericsonyachts.org/ie/thread...urce-replacement-ericson-36c.4096/#post-25978

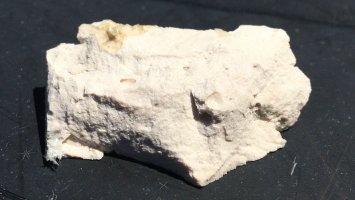
@Parrothead - As I got deeper into the shmutz, I think you’re right and it does seem like it was a resin/filler compound.* I can’t detect any fiber in the residue, so am assuming it was finely ground filler. Based on the way it chipped apart, I think it had a high filler:resin ratio.
K strut schmutz 7800.jpg
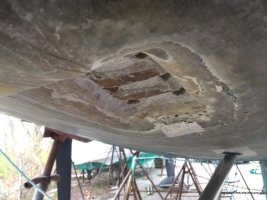
Neil, your article on Moyer Marine was very helpful, but I couldn’t find anything to suggest that these bolts did any more than give something for the shmutz to bond to and maybe adjust with. There was no fiberglass between the bolt heads and the top of the strut plate. On top of the plate it is covered in shmutz then by a layer of fiberglass.
Kismet strut 7220 b.jpg

The reason I’m obsessing about this is that I’m trying to devise an easy, but sufficiently strong, way to reinstall. I really don't want to tear out the insides.

* Related discussion: https://ericsonyachts.org/ie/threads/propeller-shaft-questions.19747/
 

Prairie Schooner

Jeff & Donna, E35-3 purchased 7/21
This looks a little pink at the top. I might have someone with metal expertise take a look at it before reinstalling it. This might argue for a disc zinc on the strut. Is this bonded to something? Bonding is controversial, I am just asking for my education, not advocating.
Hi Ray,
We took the strut to a prominent marine fabricator in Newport, RI to have the new cutless bearing installed. They inspected the strut and said it was only surface corrosion, that it was still sound. Thanks for the heads up.
 

bigd14

Contributing Partner
Blogs Author
I’m trying to devise an easy, but sufficiently strong, way to reinstall.
I found fiberglass cloth kind of wound around the bolt heads on the inside of the boat when I cut out the strut.

I think you'll have a number of significant challenges working from below:

The first challenge is gravity, and preventing voids from forming. This might be overcome by using properly thickened epoxy and containment methods to keep it from flowing out (e.g. pieces of heavy plastic garbage bags taped in place over the curing epoxy).

The second challenge is getting the top of the strut adequately bedded/bonded into the cavity it was removed from. You might consider hogging out the schmutz from that cavity back to fiberglass and then use a mash of small strips of fiberglass along with thickened epoxy (add milled fiberglass powder to make it significantly stronger) to mount the strut into the cavity. Once that cures more fiberglass and thickened epoxy could be wrapped around the upper part of the strut and bonded to the hull. There is the risk of overheating the large epoxy mix required that will need to be managed.

Another challenge is holding the strut in alignment while the epoxy cures. The prop shaft droops and cannot be relied upon to support the strut in the correct alignment. You will have to create an alignment/support jig to properly position the strut and shaft. This jig should be attached to the boat so there won't be any movement between the boat and the support (e.g. wind or someone stepping on and off the boat). The jig must also be able to be installed easily and quickly once the epoxy mash is stuffed into the cavity. You'll also need to devise a way to prevent any epoxy drips and runs from getting into the cutless bearing while still keeping the entire assembly in millimeter alignment!

I am sure this can be done from below, but it would be a much easier job if you could work from above. I say easier in the context of the strut work only; of course tearing everything out of the back of the boat then replacing it is a massive and time consuming project.

I will be very interested to see how this project comes together, keep us posted.
 

Prairie Schooner

Jeff & Donna, E35-3 purchased 7/21
I found fiberglass cloth kind of wound around the bolt heads on the inside of the boat when I cut out the strut.

I think you'll have a number of significant challenges working from below:

The first challenge is gravity, and preventing voids from forming. This might be overcome by using properly thickened epoxy and containment methods to keep it from flowing out (e.g. pieces of heavy plastic garbage bags taped in place over the curing epoxy).

The second challenge is getting the top of the strut adequately bedded/bonded into the cavity it was removed from. You might consider hogging out the schmutz from that cavity back to fiberglass and then use a mash of small strips of fiberglass along with thickened epoxy (add milled fiberglass powder to make it significantly stronger) to mount the strut into the cavity. Once that cures more fiberglass and thickened epoxy could be wrapped around the upper part of the strut and bonded to the hull. There is the risk of overheating the large epoxy mix required that will need to be managed.

Another challenge is holding the strut in alignment while the epoxy cures. The prop shaft droops and cannot be relied upon to support the strut in the correct alignment. You will have to create an alignment/support jig to properly position the strut and shaft. This jig should be attached to the boat so there won't be any movement between the boat and the support (e.g. wind or someone stepping on and off the boat). The jig must also be able to be installed easily and quickly once the epoxy mash is stuffed into the cavity. You'll also need to devise a way to prevent any epoxy drips and runs from getting into the cutless bearing while still keeping the entire assembly in millimeter alignment!

I am sure this can be done from below, but it would be a much easier job if you could work from above. I say easier in the context of the strut work only; of course tearing everything out of the back of the boat then replacing it is a massive and time consuming project.

I will be very interested to see how this project comes together, keep us posted.
I studied your blog posts before I tackled this and they helped a lot. These structures are somewhat different from your boat, but other similarities. They had to have had some standard practices. I've been letting it stew, but your suggestion of grinding out the upper shmutz strikes me as my best next step.
 

Prairie Schooner

Jeff & Donna, E35-3 purchased 7/21
Field Notes From Today’s Archeological Excavation
Today I ground out more of the shmutz and scarfed out the cavity more. All I found continued to support my speculation about construction detailed in post #42.

Kismet strut 7833.jpg Kismet strut 7852.jpg

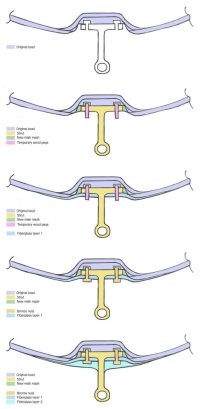
Neil’s ( @Parrothead ) description of standard practice for strut installation makes a lot of sense, especially on a new installation. I’ve tried to suss out what the vital features of that format are. It seems to me the main ones are the ability to micro-adjust strut position to lock it into place while mish-mash cures and then securing the strut mechanically by tightening the bolts to glass fiber structure. I’ve tried to figure out how I can recreate those features while doing the rebed entirely from the bottom. The graphic below is my current thinking. Note, strut holes are threaded. Any thoughts from the Ericson Brain Trust are greatly appreciated.

As @bigd14 says, keeping the strut exactly in place while the mish-mash (resin and glass fiber) cures is critical. I’m thinking a spare pop-it with a modified head might do it, but haven’t fleshed it out.

K Strut fix v1 t comp.jpg
 

bigd14

Contributing Partner
Blogs Author
Is there a way you could tap holes into the hull/schmutz to accept the bolts to hold the strut in place while the epoxy cures? You would have to get the alignment right first of course. I am still thinking you might need to devise a temporary external alignment jig of some kind.

By the way, is the shaft disconnected from the motor? I seem to recall reading somewhere that the "proper" method was to center the prop shaft in the shaft log, attach the strut in the same alignment, then adjust the motor mounts to fit the engine to the centered prop shaft. I used two pieces of some material I found on McMaster Carr with the proper ID and OD to match the shaft and shaft log to get things centered up.
 

Parrothead

Member III
For this repair everything aligns to the shaft log using the shaft as an alignment tool. Make six small wedges, maybe ½" wide, and center the shaft in the log, three wedges in the forward end and three on the aft. Slide the strut with its new bearing into place on the shaft before starting the glass work. With Ericson's smallish ¾" diameter shaft, be sure to support the aft end of the shaft to counter the weight of the strut.

As for the question of a strut zinc, I put one on mine. There's no downside. If there's a concern the strut is so marginally designed that a ¼" hole weakens it significantly you have bigger problems.
 

Jerry VB

E32-3 / M-25XP
Disclaimer: my ideas always work better in my head than In Real Life...
  1. Drill the (threaded) bolt holes in the strut oversized so that the proper sized bolt is has some "slop" for adjustment. Perhaps just clearance for step #2.
  2. Epoxy new bolts "heads up" (same orientation as originally) back into the bolt recesses. Protect the strut from epoxy while using the strut and shaft to get the bolts "close enough" to the right place.
  3. Drill out the strut holes larger to give enough adjustment for shaft/strut alignment (as necessary).
  4. Fill the cavity with shmutz and use the epoxied-in bolts with nuts & washers on the bottom side of the strut to get the shaft/strut alignment perfect while the shmutz sets. I'm picturing shmutz mostly between the top of the strut "foot" and the hull with squeeze-out down the bolts and around the sides of the strut foot. The goal would be to have zero voids and enough shmutz to hold the strut securely in place for step #5.
  5. Fiberglass, building up with many layers, to rebuild the hull structure between the strut and the hull.
 

bigd14

Contributing Partner
Blogs Author
I like Jerry VB’s solution. Maybe for his step 2 you could drill and tap for the bolts before enlarging the strut holes and simply tighten them from below for alignment. Saves a step epoxying the bolts into place. And of course aligning shaft first as per Parrothead would be good.

Edit- using just 4 bolts in the corners for alignment might be easier than 6.
 

Prairie Schooner

Jeff & Donna, E35-3 purchased 7/21
@bigd14 @Parrothead @Jerry VB
Thanks guys. This is all helpful. At best I'm what I refer to as an "intuitive engineer". I will let your ideas simmer in my mind's stew for a while. The stew will be better for your ingredients. Fortunately (I guess), there are plenty of other projects to occupy me in the mean time.

I'll post further developments here.
 
Last edited:

Pete the Cat

Member III
When I put the new strut in my Tartan 37, I just made sure the engine coupling was perfectly aligned and that the shaft went as near as perfectly (I think perfection is impossible here but you can put some sticks in the down tube to hold it) centered--you might want the stuffing box off for this. Then propped the strut in place with the bolts and strut covered in mold release (my Tartan 37 strut is through bolted) so that t could not move. Covered the strut base with dense filler and cloth. I think you are doing approximately the same thing. Very important to get the geometry right on the engine alignment (I would not worry too much about the gap changing in the water) and through the down tube. This is your big chance to get everything aligned right. My guess is that is how they did it at the factory--but I am just guessing. FWIW.
 

Prairie Schooner

Jeff & Donna, E35-3 purchased 7/21
When I put the new strut in my Tartan 37, I just made sure the engine coupling was perfectly aligned and that the shaft went as near as perfectly (I think perfection is impossible here but you can put some sticks in the down tube to hold it) centered--you might want the stuffing box off for this. Then propped the strut in place with the bolts and strut covered in mold release (my Tartan 37 strut is through bolted) so that t could not move. Covered the strut base with dense filler and cloth. I think you are doing approximately the same thing. Very important to get the geometry right on the engine alignment (I would not worry too much about the gap changing in the water) and through the down tube. This is your big chance to get everything aligned right. My guess is that is how they did it at the factory--but I am just guessing. FWIW.
The engine alignment is out of my experience, and intimidating. Also, being of average 66 y.o. build and flexibility, I'm not sure I physically Can do the alignment. It seems really tight in there. We'd actually scheduled a marine mechanic to do the alignment then he went and got a full-time job on a Yacht as engineer. Plus, the time factor. We've got lots else to do. It is critical, though. It wouldn't be a bad time to replace engine mounts. Yikes.
We have a PSS on the boat. I've loosened the set screws tho haven't been able to move it yet. That might be a task for today. More boat yoga.
You're very right. This is a major reveal of a system and it would be foolish to waste the opportunity to maximize things. Seems to be a recurring theme, "Well, as long as we've got it open . . ."
 

Frank Langer

1984 Ericson 30+, Nanaimo, BC
The engine alignment is out of my experience, and intimidating. Also, being of average 66 y.o. build and flexibility, I'm not sure I physically Can do the alignment. It seems really tight in there. We'd actually scheduled a marine mechanic to do the alignment then he went and got a full-time job on a Yacht as engineer. Plus, the time factor. We've got lots else to do. It is critical, though. It wouldn't be a bad time to replace engine mounts. Yikes.
We have a PSS on the boat. I've loosened the set screws tho haven't been able to move it yet. That might be a task for today. More boat yoga.
You're very right. This is a major reveal of a system and it would be foolish to waste the opportunity to maximize things. Seems to be a recurring theme, "Well, as long as we've got it open . . ."
You said you had trouble moving the PSS. Remember that there are usually 2 set screws under the initial two that you can see, for a total of four set screws to remove, before the PSS can be moved.
Frank
 

Prairie Schooner

Jeff & Donna, E35-3 purchased 7/21
You said you had trouble moving the PSS. Remember that there are usually 2 set screws under the initial two that you can see, for a total of four set screws to remove, before the PSS can be moved.
Frank
Thanks Frank! Timely reminder! We were just about to head over to the boat.
 

Dave G.

1984 E30+ Ludington, MI
for a total of four set screws to remove, before the PSS can be moved.
Also those set screws are NOT reusable. So before you put it back together you'll need to order replacements. Not sure how old your PSS is but if it's 6+ yo or more it may be time for that project too(while your in there). They sell rebuild kits with new bellows, clamps, o-rings, and set screws of course. I think I paid about $90-100 for the kit but that was a while ago...
 

Frank Langer

1984 Ericson 30+, Nanaimo, BC
Also those set screws are NOT reusable. So before you put it back together you'll need to order replacements. Not sure how old your PSS is but if it's 6+ yo or more it may be time for that project too(while your in there). They sell rebuild kits with new bellows, clamps, o-rings, and set screws of course. I think I paid about $90-100 for the kit but that was a while ago...
There are previous threads/posts about timing of replacement/longevity of PSS. The manufacturer in Seattle used to recommend replacing or rebuilding every 15 years, then shortened it to 11 years, now at about 6 years. A sailor at our marina showed me the one he removed at 15 years, and it looked like new--thick, flexible rubber! As mine was about 18 years old, and still looked perfect, I phoned the PSS tech to discuss. He said that they last a long time--he has seen good ones at 25 years, as long as they have not been immersed in oil, tranny fluid, etc. He said their lawyer had recommended a more cautious timeline recommendation. As we were planning a trip to more remote areas, where service is not available, I decided to replace ours at that time. Upon removal, the old PSS rubber and other parts were fine, and I've kept them as a spare in case I ever need a similar rubber hose (eg. temporary exhaust hose repair?). I don't regret replacing mine, even just for peace of mind, but for sure I'm not going to replace it every 6 years unless I spill lots of oil on it. However, I do recommend checking it regularly for any cracks or chafing in the rubber bellows, ensure the double hose clamps are positioned correctly and tight but not overtight (don't cut the rubber) and the set screws are tight. The old PSS needs to be "burped" of air after haul-out to avoid it overheating.

Having said all this, I'm no expert in this area, am not second guessing PSS lawyers, don't want to get any tech staff in trouble (they were very pleasant and helpful), and am only sharing my experience for your consideration.
Frank
 

Christian Williams

E381 - Los Angeles
Senior Moderator
Blogs Author
The Dripless Shaft Seal thread below is now denoted as a Master Thread. I copied these last few messages there to consolidate the informaton


Pete the Cat

Member III
The engine alignment is out of my experience, and intimidating. Also, being of average 66 y.o. build and flexibility, I'm not sure I physically Can do the alignment. It seems really tight in there. We'd actually scheduled a marine mechanic to do the alignment then he went and got a full-time job on a Yacht as engineer. Plus, the time factor. We've got lots else to do. It is critical, though. It wouldn't be a bad time to replace engine mounts. Yikes.
We have a PSS on the boat. I've loosened the set screws tho haven't been able to move it yet. That might be a task for today. More boat yoga.
You're very right. This is a major reveal of a system and it would be foolish to waste the opportunity to maximize things. Seems to be a recurring theme, "Well, as long as we've got it open . . ."
I would encourage you to try to do the alignment yourself. I am 74 and have done a few since your age. I am not familiar with your access--that could be a limiting factor in some boats, but the job is not beyond the backyard mechanic level if your are patient and can actually reach the top and bottom nuts. My experience with "professional" mechanics has been mixed--there are some very good old ones (mostly old guys that I have learned from) and some folks now in the business who I would not want near my boat. Alignment requires more patience than innate skill--and just a bit of ability with being able to visualize spatial geometry, patience and deal with frustration. Take your time. This is an opportunity to get this done right and eliminate a lot of future problems and worry if done correctly. The key is to loosen or tighten the nuts a quarter (or less) turn at a time, rotate the coupling and measure the separation of the faces with a feeler guage. Making sure the engine mount threads are clean and lubricated will help make the adjustments easy and allow you to feel when you are snugging against the weight of the engine rather than just resistance from crud. And accepting that you will make seemingly endless trips from the mounts to measure the coupling gap to get the thing right. I can usually get it down to .004'' quite easily and then it takes a lot of back and forth to get down to .002"--I have found this is close enough to eliminate most of the vibration. Perfection is the enemy of good enough here. As you get to the final adjustments, you will want to work with both the top and bottom nuts snugged as you measure. I am sure there are Youtube videos on this. I am not sure I would replace the mounts unless I found some obvious degradation--but you are right, if you were going to do it, now is the time. . They can last quite a while if the engine has been aligned well and kept clean. I think Ericson's TAFG is a big plus over other boats in keeping things aligned once it is done right. Some boats flex while on the stands, I don't see that happening as much with the TAFG built Ericsons. So what ever you do out of the water seems likely to be fine when you splash it.
FWIW.
 

bigd14

Contributing Partner
Blogs Author
it would be foolish to waste the opportunity to maximize things. Seems to be a recurring theme, "Well, as long as we've got it open . . ."
Here be dragons!

I feel your pain. This is a very real conundrum, especially with summer sailing season imminent. Getting into the back end of the boat and fixing any motor mounts, hoses, exhaust, electrical, fuel, steering, leaks etc. is time consuming business and will likely put a serious dent in sailing time. It’s definitely a good time to dig into all those projects and then not have to worry about them for the next 10 years. I have been there with two boats now. In the end I was happy to have everything upgraded and sorted to my satisfaction. But there were many glorious sailing days where I was upside down in the bowels of the boat wishing I was out on the water. Only you can decide what is the “right” answer for you, your boat, and any close family or friends that are might wonder why the boat is still sitting on the hard after 6 months (or a year or more in my case).
 
Top