-

Untitled Document The 2024-2025 Fund Raising Season has Opened!
EricsonYachts.org has opened the season for raising funds to support the expenses of the site. If you would like to participate, please see the link below for additional information.
Thanks so much for your continued support of EricsonYachts.org!
You are using an out of date browser. It may not display this or other websites correctly.
You should upgrade or use an alternative browser.
You should upgrade or use an alternative browser.
Replacement of Cabin Sole [Master Thread]
- Thread starter Geoff Johnson
- Start date
My '85 E32-3 had a ragged 4" square in the vertical TAFG, cut awkwardly by a jigsaw in close quarters. I always figured somebody at the factory needed to get a wrench on the hidden keel bolt.
I never figured out those two mast-adjacent compartments. One is a shower sump. But which one? It sorta looks like the little bilge pump is in the wrong one. I didn't bother about it because I never used the shower (that model doesn't have a stall, you just get the entire head wet. I used an extended shower-wand hose through the opening port to shower on deck.)
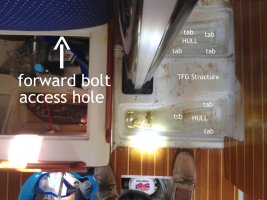 ...
...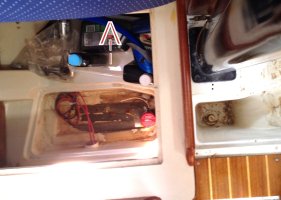
I never figured out those two mast-adjacent compartments. One is a shower sump. But which one? It sorta looks like the little bilge pump is in the wrong one. I didn't bother about it because I never used the shower (that model doesn't have a stall, you just get the entire head wet. I used an extended shower-wand hose through the opening port to shower on deck.)
 ...
...
Last edited:
Than makes sense: maybe …position a socket on the bolt via the access hole in that port side locker, poke a long extension rod through the hole by the mast, into the socket, then tighten the bolt via that extension rod. ???I believe that small hole in front of the mast is used to tighten the keel bolt. I think there is a posting about it somewhere on this site with a photo of it being done, but I maybe wrong. Maybe someone else seeing this reply has a better memory then me.
position a socket on the bolt via the access hole in that port side locker, poke a long extension rod through the hole by the mast, into the socket, then tighten the bolt via that extension rod.
Very similar procedure on the 30+.
Bolo
Contributing Partner
OK, I found what I thought I remembered. When you click on the link below and look at the photos you’ll see what I was referring to as far as access to the forward keel bolt.Than makes sense: maybe …position a socket on the bolt via the access hole in that port side locker, poke a long extension rod through the hole by the mast, into the socket, then tighten the bolt via that extension rod. ???
Post in thread 'Keel bolt access on 32-3'
https://ericsonyachts.org/ie/threads/keel-bolt-access-on-32-3.19388/post-150866
Bolo
Contributing Partner
Another step in the process of replacing the T&H sole. All patterns are cut with templates A, B, C re-trimmed in places after I took them back to the boat to check their fit. D & E were cut using acetate tracings of the old T&H which still need to be checked for fit, but not before their corresponding old sole sections are pulled up. Eventually all of them will serve as a temporary sole until it's time to cut out the new T&H pieces. Strange to see them laid out on my garage floor like this.
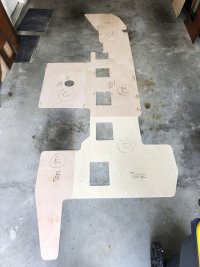

Almost looks too confining to actually walk on and live on, when viewed that way. I recently had our refinished sole pieces laid in our garage and it was difficult to believe that these were the roomy-enough walking surface in a 34 foot sailboat.
What with all of the actual "elbow room" inside the cabin, the T&H sole area is rather deceptive, isn't it?

What with all of the actual "elbow room" inside the cabin, the T&H sole area is rather deceptive, isn't it?
Bolo
Contributing Partner
It is deceptive and considering that when I'm on board I'm usually with my "first mate" so it's sometimes close quarters. Good thing we like each other!Almost looks too confining to actually walk on and live on, when viewed that way. I recently had our refinished sole pieces laid in our garage and it was difficult to believe that these were the roomy-enough walking surface in a 34 foot sailboat.
What with all of the actual "elbow room" inside the cabin, the T&H sole area is rather deceptive, isn't it?

Bolo
Contributing Partner
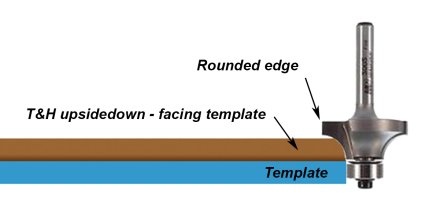
While examining the old T&H sole I removed from my boat (those pieces that came up in one piece) I noticed that the outside edges (except for those edges that butt into another section of the sole) are rounded underneath and the look to be done with a router bit. This looks necessary in order to have a correct fit where the T&H meet the TAFG which is also rounded at that point. My question is how is that done on a 1/4" thick piece of T&H plywood? The only way I could see would be to use the 1/4" plywood template again as a guide for the rounder/beading bit after it was used to cut the piece but in this case the template wound be on the bottom with the cut T&H on top but upside down with the top surface facing the template. The two pieces would be matched up (to sort of form a 1/2 sheet of plywood) and then I would round the bottom edge of the T&H using the template as my guide. I hope this makes sense! Attached a diagram of what I'm trying to describe.

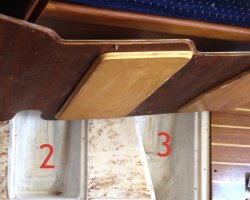
I remember that radius, which has to match (more or less) the TAFG mold designed to receive it.
I think I did a good deal of shaping the edge with a sander. I may not have even used a router.
 ...
...
The CPES/epoxy treatment becomes important because the shaping leaves end-grain plywood exposed and it needs to be sealed and hardened.
I think I did a good deal of shaping the edge with a sander. I may not have even used a router.
 ...
...
The CPES/epoxy treatment becomes important because the shaping leaves end-grain plywood exposed and it needs to be sealed and hardened.
Last edited:
That's what I did as well, and took a rasp down to the boat for any touch ups as needed when dry fitting. It doesn't have to be pretty.I think I did a good deal of shaping the edge with a sander.
Yes you can do it this way. I think at the factory it was done on a shaper with a large table.While examining the old T&H sole I removed from my boat (those pieces that came up in one piece) I noticed that the outside edges (except for those edges that butt into another section of the sole) are rounded underneath and the look to be done with a router bit. This looks necessary in order to have a correct fit where the T&H meet the TAFG which is also rounded at that point. My question is how is that done on a 1/4" thick piece of T&H plywood? The only way I could see would be to use the 1/4" plywood template again as a guide for the rounder/beading bit after it was used to cut the piece but in this case the template wound be on the bottom with the cut T&H on top but upside down with the top surface facing the template. The two pieces would be matched up (to sort of form a 1/2 sheet of plywood) and then I would round the bottom edge of the T&H using the template as my guide. I hope this makes sense! Attached a diagram of what I'm trying to describe.
View attachment 43004
Bolo
Contributing Partner
My new sole project continues with the purchase of the T&H 1/4" plywood at almost $600 for both sheets. Luckily I have a source here in south central PA (Near Hershey) that is a specialty "rare" wood lumber yard that is about four miles from my house. My other option was to drive to a store in Annapolis (4 hour round trip) and "roof" the plywood all the way back on my Jeep.
I'm now applying the clear penetrating epoxy sealer starting with the bottom of both sides of the sheets. Had some "Rot Doctor" CPES on hand but not enough to do the job. When I went to the Rot Doctor web site they stated that the CPES was "Out of Stock" so I ordered (on Amazon of course) Totalboat Clear penetrating Epoxy Sealer (https://www.totalboat.com/product/penetrating-epoxy/) and used that on the bottom of one sheet of the T&H and Rot Doc's CPES on the bottom of the other sheet.
The Totalboat brand is similar, of course, but is mixed differently, 2:1 similar to West System epoxies and other brands. It does not smell at all when used and you can mix one part of denatured alcohol is to "water" it down even more for better penetration. It then becomes more like the Rot Doc CPES. The Totoalboat brand leaves a warmer tone to the wood (at least on the back) then the Rot Doc CPES.
When I get around to the front of the T&H I'll probably use the Totalboat brand. Here is a link to a video on it's use that I found helpful.
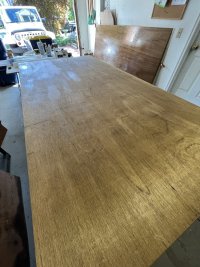
Image below: Foreground sheet of T&H (backside) with first coat of Rot Doc's CPES and second sheet (against the wall) that has two coats of Totalboat CPES.

Bolo
Contributing Partner
On second thought I’m going to use the Rot Doctor version of the CPES because the Totalboat brand leaves a bit of a glossy finish which could be a problem when I apply the final varnish. Rot Doc CPES was out of stock but I was able to find it on Amazon but with a different name. Same exact containers and description but with the name “SMITH Original CPES”.
Bolo
Contributing Partner
Getting closer to finishing my cabin floor replacement. Have all the pieces cut and holes drill for screws. Used CPES prior to cutting / drilling and had no issues with splintering T&H. I did use a router to round off the bottom edges where they meet the “pan” on the cabin deck. See my earlier posting, on this thread, about using a router on the edges. It worked like a charm and is definitely easier and went much faster than sanding the edges. ( https://ericsonyachts.org/ie/thread...in-sole-master-thread.1526/page-7#post-155736 )
Re-treated the cut edges and screw holes with two coats of CPES to help with water intrusion that delaminated the original sole in the first place. Next step, some light sanding and then the final coats.
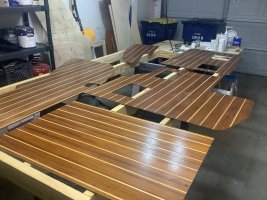
Re-treated the cut edges and screw holes with two coats of CPES to help with water intrusion that delaminated the original sole in the first place. Next step, some light sanding and then the final coats.

Last edited:
Looks great. Now you must confront the final step.
My choice is glossy spar varnish, seven coats (first time). But there are many choices.
My choice is glossy spar varnish, seven coats (first time). But there are many choices.
31 thousand views. Wow!

Bolo
Contributing Partner
Yes, many choices and I have a hard time choosing what shirt to wear in the morning too so this one’s gonna be hard. Actually I think that I’m going with Minwax polyurethane, which is oil based and suppose to be very durable, in either satin or semi-gloss. Gloss is appealing, yes, but I think that I need something that takes more of a beating without showing scratches. I can always re-coat in gloss if I change my mind. Still need to re-condition the bilge covers. Working one the first one to see how far off the finish might be compared to the new T&H and if it’s not right then I’ll make a new set which will be a good winter project.Looks great. Now you must confront the final step.
My choice is glossy spar varnish, seven coats (first time). But there are many choices.
Bolo
Contributing Partner
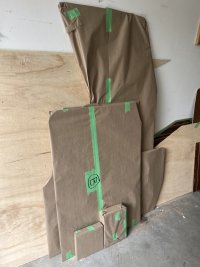
Spent some time this morning wrapping the finished sole pieces up in craft paper for the two hour trip to the boat. Looking forward to finally seeing the new sole in place.
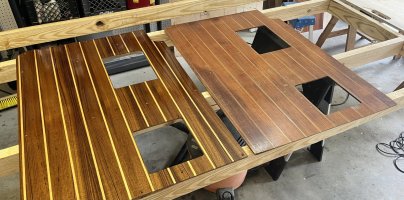
The old and the new. After the final coat of Minwax Polyurethane Gloss was dried it was interesting to see the comparison to the old sole. This was one of the old sole sections that popped right off with a few swings of my mallet on the pry bar. Moisture damage and time really took it's toll.
A suggestion to anyone thinking of cutting a new sole from Teak & Holly 1/4" plywood which I paid $300 per sheet for locally. Before I started the process of first applying two coats, per side, of CPES I built what I'm calling a "panel work frame". I used two plastic folding saw horse that have slots molded into them that allow for 2x4's to be inserted. Purchasing five studs I cut and screwed them together with the two center studs nested into the slots of the saw horses. The other side perimeter of the frame matches a 4 x 8 T&H sheet. The advantage here is the after the CPES treatment (which was also done using the frame) cutting the sole pieces was easier then laying them down on a solid 4 x 8 table or across two saw horses. The panel work frame gave me support across the whole sheet and during cutting & routing. When I ran into a 2 x 4 it was easy just to lift, move and drop the sheet down into an open space to continue. Plus when getting to the end of rough cutting a sole piece out of the sheet the fame supported whole T&H so that nothing bends or is damaged. A simple idea but one the worked very well for me.
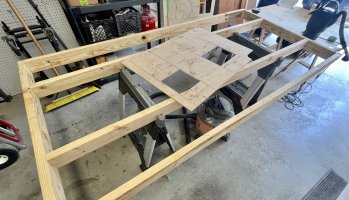
My "panel work frame" with one of the temporary sole pieces that also a template for routing. It's very easy to move around a sole template that's "sandwiched" with a rough cut sole piece during the routing process and get support from both ends of a section.
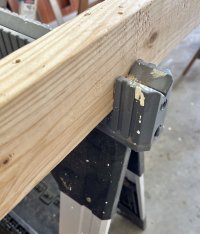
A close up of the "slot" molded into the plastic folding saw horses that I used which provided support to the center 2x4 of the panel work frame. The saw horses are "Fat Max" by Stanley but I'm sure there are other brands available that have the same feature. If you have home made wooded saw horse then I guess you could do the same by just using a few long dry wall screws when the 2x4 meets the horse.
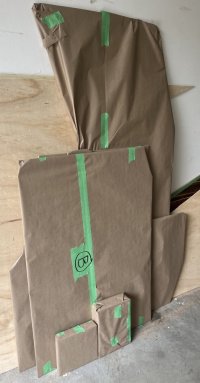
New sole pieces wrapped up and ready for their trip to the boat. I'll post more images of the install later.

The old and the new. After the final coat of Minwax Polyurethane Gloss was dried it was interesting to see the comparison to the old sole. This was one of the old sole sections that popped right off with a few swings of my mallet on the pry bar. Moisture damage and time really took it's toll.
A suggestion to anyone thinking of cutting a new sole from Teak & Holly 1/4" plywood which I paid $300 per sheet for locally. Before I started the process of first applying two coats, per side, of CPES I built what I'm calling a "panel work frame". I used two plastic folding saw horse that have slots molded into them that allow for 2x4's to be inserted. Purchasing five studs I cut and screwed them together with the two center studs nested into the slots of the saw horses. The other side perimeter of the frame matches a 4 x 8 T&H sheet. The advantage here is the after the CPES treatment (which was also done using the frame) cutting the sole pieces was easier then laying them down on a solid 4 x 8 table or across two saw horses. The panel work frame gave me support across the whole sheet and during cutting & routing. When I ran into a 2 x 4 it was easy just to lift, move and drop the sheet down into an open space to continue. Plus when getting to the end of rough cutting a sole piece out of the sheet the fame supported whole T&H so that nothing bends or is damaged. A simple idea but one the worked very well for me.

My "panel work frame" with one of the temporary sole pieces that also a template for routing. It's very easy to move around a sole template that's "sandwiched" with a rough cut sole piece during the routing process and get support from both ends of a section.

A close up of the "slot" molded into the plastic folding saw horses that I used which provided support to the center 2x4 of the panel work frame. The saw horses are "Fat Max" by Stanley but I'm sure there are other brands available that have the same feature. If you have home made wooded saw horse then I guess you could do the same by just using a few long dry wall screws when the 2x4 meets the horse.

New sole pieces wrapped up and ready for their trip to the boat. I'll post more images of the install later.
Attachments
windblown
Member III
Bob,
Congratulations on getting this far! The new sole looks really great, and it's been fun to watch your project. Can't wait to hear how the installation goes and see the final result.
This past winter, our 32-3 sole rather suddenly started to pop its finish all around the edges in places where we've never seen any evidence of water. We've had evidence of water getting to the sole near the base of the mast and near the nav station, but otherwise, our sole was in really good condition, until this spring.
It may become this winter's project, and I am grateful for your documentation and suggestions.

