• Untitled Document

    The 2024-2025 Fund Raising Season has Opened!

    EricsonYachts.org has opened the season for raising funds to support the expenses of the site. If you would like to participate, please see the link below for additional information.

    Thanks so much for your continued support of EricsonYachts.org!

    2024-2025 Fund Raising Info

  • Untitled Document

    Join us on January 24th, 7pm EDT

    for the CBEC Virtual Meeting

    EY.o January Zoom Meeting

    All EYO members and followers are welcome to join the fun and get to know the people you've met online!

    See the link below for login credentials and join us!

    January Meeting Info

    (dismiss this notice by hitting 'X', upper right)

Replacement of Cabin Sole [Master Thread]

Christian Williams

E381 - Los Angeles
Senior Moderator
Blogs Author
My recent epiphany was that the varnish Rapid-Coat Epifanes is NOT pronounced as if it has a Greek root.

It is Epuh-fanes.

No wonder nobody knew what I was talking about!

(The half-inch works fine as a sub for the original 11/16ths floor of the 381)
 

Loren Beach

O34 - Portland, OR
Senior Moderator
Blogs Author
Very... few... sailing forums can boast an erudite epiphany to match the sentence in reply 161.
:egrin:
 

Pete the Cat

Sustaining Member
I went round and round on this issue, swinging myself like a rat on a string.

I wound up just putting bungs in 50 holes (sole only, not trim) and it wasn't too bad. But now I have to nick them off with a sharp chisel. In the past I have screwed this up by nicking below flush, which means picking out the bung and starting over.

I spent nearly an hour this morning sharpening my chisel, a sure sign of hope reigning over probability.

Almost finished the 381 sole replacement, which has been a bear. Thirty-seven work days so far, two coats of varnish-in-place remain. When it stops raining.
I know your pain. I have found that there is really little to control the bung nick process beyond being sure of the perfect sharpness of the chisel, the dryness of the wood and adhesives, and striking (wood mallet?) perpendicular to the grain of the bung. I have a theory about picking the bung material for fineness of grain, but that will have to wait for the next try at perfection. I am competing for OCD champ here, but you would never know it by looking at my work result.
 

Loren Beach

O34 - Portland, OR
Senior Moderator
Blogs Author
I have had enough difficulty in setting teak bungs so that I could sight across the exposed part to chisel it toward the "uphill" side,
that I turned to using a small "Japanese" pull saw to remove 97% of the protruding bung.
I put a layer of blue tape on the side toward the surface to keep the saw from scratching it. This leaves a little bit of bung to sand down flush, but not much.
OTOH, when I succeed in getting them flush, it is a feeling of real accomplishment...... ! :)

Apropos of Whatever, this thread has clocked 37K views since 2004. Wow! It might be called a 'soul survivor', maybe. Perhaps...
 
Last edited:

Bolo

Contributing Partner
I went round and round on this issue, swinging myself like a rat on a string.

I wound up just putting bungs in 50 holes (sole only, not trim) and it wasn't too bad. But now I have to nick them off with a sharp chisel. In the past I have screwed this up by nicking below flush, which means picking out the bung and starting over.

I spent nearly an hour this morning sharpening my chisel, a sure sign of hope reigning over probability.

Almost finished the 381 sole replacement, which has been a bear. Thirty-seven work days so far, two coats of varnish-in-place remain. When it stops raining.
I thought that it never rains in CA.
 

Bolo

Contributing Partner
"Perfection is overrated" has been my mantra for about 8 years now. It started with a fender bender in traffic. Guy in work truck bumped my rear bumper of my then 2 month old new vehicle. We both pulled off to a side street to inspect the damage. His truck left a perfect hex impression centered nicely in my bumper from one of the four license plate bolt heads. I suddenly realized that I could live perfectly fine with it and told him to forget it. It was not worth him getting into trouble. Since then my car has the usual door dings, scrapes and marks of 8 years of use and that hex is still my favorite!
“Perfection is Overrated”. I like that and I think it’s deserving of a bumper sticker which is ironic in your case, Kiba. You can buy one here: https://www.redbubble.com/i/sticker/Perfection-is-Overrated-by-mp397/53385644.QK27K

In my full time working days as a commercial freelance photographer I often strived for perfection in my work, which was as you can guess an impossible goal, and one that was unattainable because at least in the realm of photography perfection is different for everyone. But I tried to the chagrin of my assistants and to the delight of my clients who wanted perfection but never really wanted to pay for it. So I eventually heard something like, “That’s good enough.” Or, “We can work with that.” And my favorite, “You can fix that in Photoshop, right?”
 

G Kiba

Sustaining Member
“Perfection is Overrated”. I like that and I think it’s deserving of a bumper sticker which is ironic in your case, Kiba. You can buy one here: https://www.redbubble.com/i/sticker/Perfection-is-Overrated-by-mp397/53385644.QK27K

In my full time working days as a commercial freelance photographer I often strived for perfection in my work, which was as you can guess an impossible goal, and one that was unattainable because at least in the realm of photography perfection is different for everyone. But I tried to the chagrin of my assistants and to the delight of my clients who wanted perfection but never really wanted to pay for it. So I eventually heard something like, “That’s good enough.” Or, “We can work with that.” And my favorite, “You can fix that in Photoshop, right?”
Love the sticker Bob! Haven't seen that one. I was thinking t-shirt. As a complete armature photographer, I love it when people comment on how good my camera is! I tell them I was happy to hold it when the picture was taken. I'm sure you have a list of better responses being a professional.
 

Bolo

Contributing Partner
Love the sticker Bob! Haven't seen that one. I was thinking t-shirt. As a complete armature photographer, I love it when people comment on how good my camera is! I tell them I was happy to hold it when the picture was taken. I'm sure you have a list of better responses being a professional.
Sometimes when people would see me on the job they would ask what kind of camera I was using. I just told them that they probably couldn’t afford it.
 

footrope

Contributing Partner
Blogs Author
Has anyone tried Coosa Bluewater panels for their sole? This stuff is commonly used in powerboat construction so I assume it's crazy strong.
Coosa is used in work boat decks, but they probably use the 2" thick (or perhaps thicker) boards. Also, the surface of Coosa board is soft and must have an appropriate layer of impact protection.
 

Pete the Cat

Sustaining Member
Just watched your YouTube video. Nice job. I enjoy your learned technical approach. But your boat restorer's philosophy, humor and joy are worth watching as well. You did a great job of capturing the frustration and spirit of the never ending process. Great work on the boat and on the video production.
 

Christian Williams

E381 - Los Angeles
Senior Moderator
Blogs Author
Good threads on topic:


Nick J

Contributing Partner
Moderator
Blogs Author
In my random craigslist perusing, I came across @C.A. Fields E-38 for-sale add here:


Comox E38 Sole.jpg
Looks like another great example of a cabin sole replacement (or the absolute best example of cabin sole maintenance!). Hope he doesn't mind me posting the pic here.
 

Prairie Schooner

Jeff & Donna, E35-3 purchased 7/21
Not sure about the differences between '82 and our '86, but I'd guess it's a replacement because: There's no trim around the access panels. Our panels have filleted holes for lift, not metal inserts.
 

Christian Williams

E381 - Los Angeles
Senior Moderator
Blogs Author
Agree. The photo is also a good example of color and tone. Clear finishes leave the stock T&H veneer looking much like it does raw, which for some of us is the goal. The pic above looks like an interim choice, or maybe it's clear but the tone is affected by the high gloss. Epifanes Rapidcoat, a fast-curing product I used for initial coats, is a very dark stain, which freaks out some users. I liked it because my original sole was quite dark.Interlux Schooner has stain, too, but not quite as dark as the Rapidcoat, and if only Schooner used the result would be more "honey."

CPES, which is the initial coating, also darkens plywood some (I would not use it again on veneer, where it pools rather than absorbs).

No question that tests on new material are necessary so as to avoid unwanted surprises.

My old sole, with water damage (bilge hatch is backwards) . And new sole, quite dark.
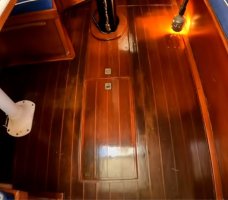
sole w water damage 2023.JPG...new sole 2024.JPG
 
Last edited:

Seafever

Junior Member
sole (soul) removal

Geoff;
We removed the sole on Escapade this past winter. It was glued (5200 I believe) down. Removed the screws and used flat pry bars ( wonderbar) to get it up. Made posterboard templates first. Did it in sections so as to have something to help align the new pieces. Replaced the entire sole rather than trying to get a match between old & new. The pieces that wern't rotten came up in one piece, the rotten sections came up like toothpicks. Used a 1 1/2" wide flat chisle to scrape the glue & remainder of the wood from the tops of the stringers.
We cleaned (wire brush & course scotch brite pads) & painted the bilge areas under the sole. Has done wonders in eliminating "boat breath". Coated the underside & edges of the new sole w/West System epoxy (2 coats) & used spar varnish on the top side. Also removed the keel bolts, cleaned & rebedded them while they we're readily accessible.
Just used the screws to hold new sole in place. Filled old holes in stringers w/epoxy and drilled for the new ones w/o worrying about hitting an old screw hole.
All in all, not a bad project depending on your woodworking skills. 3/4" teak & holly ply is about $215.00 pre sheet. Took 2 sheets to do the 34. Have pictures of the project if your interested.
Have fun & sail fast.
Bud E34 "Escapade"
 

Filkee

Sustaining Member
I’m still holding on to the larger scraps of what I pulled up years ago. Any bright ideas on what to do with the bits? I used one chunk as a shelf liner in the pantry at home.
 
Top