Replacement of Cabin Sole [Master Thread]

Geoff Johnson

Fellow Ericson Owner
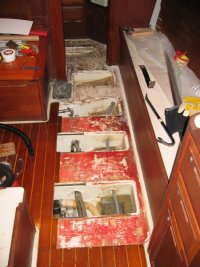
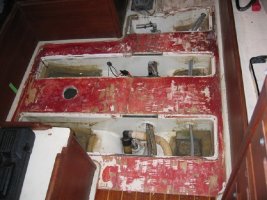
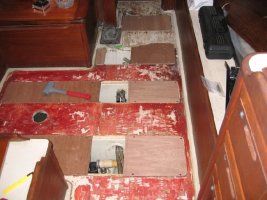
Here we are after another 3 to 4 hours of demolition using mostly wood chisels. Fortunately, 5200 was not used. It's a red glue of some sort. Fortunately, I was able to save most of the 1/2" sections between the stringers to use as patterns for new ones. I see no point in gluing them down like the originals, so will just screw the replacements in place. One more tool tip - a dead blow hammer is a lot easier on the wrist and the ears (I found I had to wear hearing protection with a metal hammer in that confined space).
 

Attachments

  • CabinSole0014sm.jpg
    CabinSole0014sm.jpg
    242.5 KB · Views: 645
Last edited:

Geoff Johnson

Fellow Ericson Owner
The demolition continues. However, the temperature last Saturday was nearly freezing so I lasted only a couple of hours (I suppose I could bring an electric heater). Now that I can see the TFG in all its glory, I am impressed with how strong it is. At the end of the day, I dropped some of the unfinished new floor boards in place. I am beginning to see light at the end of the tunnel. Since I do not want to glue the new boards down, I have been thinking of screwing them down over a layer of that non-slip mesh you can buy in the boat stores for lining cabinets. A small scale test at home was promising; the sole acts almost like it was glued down. It might let me use a lot fewer screws.
 

Attachments

  • CabinSole0017-1sm.jpg
    CabinSole0017-1sm.jpg
    279.5 KB · Views: 389
  • CabinSole0019-1sm.jpg
    CabinSole0019-1sm.jpg
    263 KB · Views: 391
Last edited:

u079721

Contributing Partner
Wow

Geoff,

I am in awe of your work so far. As for finishing up the installation, I would certainly vote for some type of removable system like screws if at all possible, as it would be a shame not to be able to regain access to those areas of the bilge that you have open now.

I also like the idea of putting a layer of cushioning mat under the floor prior to mounting, but wonder about whether this would hold moisture against the wood, and promote rot? (Just a concern.)
 

Geoff Johnson

Fellow Ericson Owner
Thanks, Steve. One of the reasons I am doing this is to make the sole waterproof so I plan to brush on a second and third coat of penetrating epoxy and then varnish both sides. In addition, I think a mesh layer between the teak and holly and the underfloor (there will be epoxied mahogany plywood between the stringers) will keep the underside drier. A few years ago when I had the front of my house re-shingled, the carpenter installed a plastic mesh between the cedar shingles and the siding. That's probably what gave me the idea.
 

Geoff Johnson

Fellow Ericson Owner
Loren (and anyone else with a screwed sole),

Since you have not gone over to the Dark Side in the screw vs. glue wars, can you help me with the following:

1) The source for your square drive bronze screws;
2) The approximate number and location (pattern) for the screws;
3) The size of screw used (and the thickness of your sole).


Thanks.
 

Loren Beach

O34 - Portland, OR
Senior Moderator
Blogs Author
No Loose Souls around Here...

http://www.mcfeelys.com/

Try this URL for McFeelys. That's where I got my bronze square drive screws. I believe that they are #10. Length would depend on how thick your sole pieces are and what you are driving them into. I countersunk just enough to get the head flush or perhaps a 32nd recessed. Nice thing about the square drive head is that, unlike the phillips, you do not have sharp points to cut you or the spinnaker you stood on while trying to re-pack it while the boat is slam-tacking... :rolleyes:

I found the same (appearing) screws at We$t Marine, but they were twice as much money each.

I laid out the pattern according to where the substrate is for the screws to get best grip, and then tried to make the layout on port and starboard sides symetrical, and finally made sure that the screws are only in the teak and not the light-colored holly. This way the screw heads are almost invisible to a casual glance.
:)

Best,
Loren in PDX
Olson 34 Fresh Air
 
Last edited:

Geoff Johnson

Fellow Ericson Owner
I guess my concern is that I will have a 1/4" sole and I want to be sure it will lay flat and be secure with as few screws as possible. If you are using a 1" screw, then you must have a 3/4" sole, which makes things easier.

I suppose I could start with a few and then add more as necessary, but I am hoping to be able to drill the screw holes before final finishing so that the epoxy and varnish can coat the screw holes. Otherwise moisture can enter the plywood through the screws. Or I suppose I can put silicone under each screw head.
 
Last edited:

Mindscape

Member III
The hidden bilge

Geoff - during this adventure have you found any better way (other than the keel bolt access hole in front of the mast) to access the 'hidden bilge'?
 

Geoff Johnson

Fellow Ericson Owner
Unfortunately, no. I was surprised there was no access when I removed the sole in front of the head door. When my yard dropped my keel for rebedding several years ago, it had to enlarge the opening under the port settee, but that allows me only to see the front keel bolt with a flashlight while standing on my head.

To digress, I was hoping to find access since I plan to encase all the bolts in PVC tubing to keep the water away. I have some photos of a prior attempt elsewhere on this site, but I used 3M 4200, which is not friendly with PVC and failed after a couple of years (but the idea was good!) This time I am going to use 3M 4000, which is supposed to work with plastics.
 

Justin Lee

Moderator
You've got soul!

Geoff, it has been awhile since I have been on the forum...we were unable to even use our boats last year due to low water. I am hoping for a VERY wet spring & perhaps at least a month or two in the water this year! I am fascinated by your cabin sole project as I have been contemplating this project for a couple of years. It looks like you have done the entire floor rather than just replacing one section? I thought about trying to only replace the main section of the salon going forward into the v-berth area....but having seen your project...I think replacing the entire sole at once is probably in order. Do I uderstand you correctly that you are gluing 1/2" ply to the bottom of the 1/4" sheets wherever there is an opening in the TFG?

Thanks for posting all the detail!
Justin Lee
Gravitystorm
1985 E32-III
 

Geoff Johnson

Fellow Ericson Owner
Hi Justin. You could replace just the section in the main salon and the head area, but several things argue against it. First, you may not be able to find matching teak and holly plywood. The OEM installation on my boat had more of a reddish cherry look to it and the replacement wood is much browner. Second, while you can probaly remove sections cleanly I found it desirable to change the seam in the salon, which ran through the bilge access openings to a location more under the salon table. Third, a good part of the time required is from setting up the work area, so once you are set up it takes relatively less time to cut additional sections. So the bottom line is, you might as well dive in rather than wade in from the shallow end.

As for how to install the two layers (the 1/2" ply between the stringers and the 1/4" finish floor) since the underlayment has to be attached to the stringers (which Ericson did with screws and silicone) you really cannot glue the underlayment to the top layer and then install everything. Ericson installed the underlayer and then glued the top layer to the underlayer. My plan is to do the same, but screw the top layer to the underlayer, but I haven't worked out the details yet. I would like to find some sort of bedding compound that has no adhesion (to allow removal) to give the top layer a more solid feel and even out any minor imperfections in the underlayer. Failing that, I will try the non-slip mesh I mentioned earlier.
 
Last edited:

Geoff Johnson

Fellow Ericson Owner
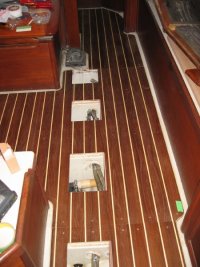
Bilge access covers

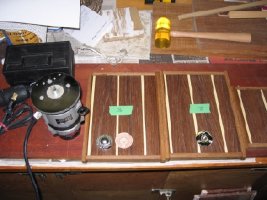
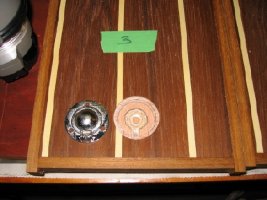
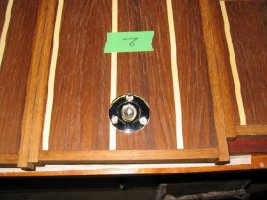
Over the weekend I got around to installing the hardware on the five bilge access covers. The hole were cut using my trusty router/trimmer using a template made with a hole saw in 1/2" plywood. You have to experiment to find the right combination of hole saw, router collar and router bit that will give you a cutout the diameter of the hardware. I used a second template to cut a smaller inner ring because of the stepped nature of the pull ring's underside and then used a router cove bit in an electric drill to hollow out the depression in the middle. A hand chisel was used to carve out the area for the hinge mechanism.

The bilge cover blanks will be trimmed to size once I get the sole section back from the boat and can use the cutouts in the sole as a template.
 

Attachments

  • CabinSole0028sm.jpg
    CabinSole0028sm.jpg
    272.7 KB · Views: 375
  • CabinSole0025sm.jpg
    CabinSole0025sm.jpg
    262.1 KB · Views: 370
  • CabinSole0026sm.jpg
    CabinSole0026sm.jpg
    287 KB · Views: 388

Geoff Johnson

Fellow Ericson Owner
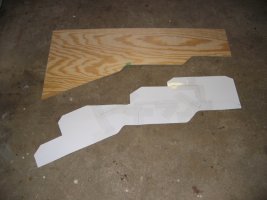
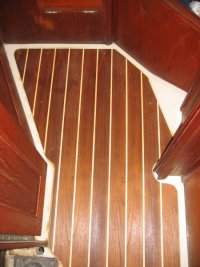
The new underfloor has been cut and temporarily screwed into place for the final fitting of the teak and holly ply. The most forward section by the head door has to be trimmed from the port side (the pieces were cut to be aligned on the starboard side, which has a relatively straight run) and since it is such an intricate shape, I made another cardboard pattern and then a plywood template so that the cuts can be made with a single router pass (at least that's the plan). When making a cardboard pattern for a complex shape, I find it is easier to use small pieces of cardboard (I use the the cardboard from laundered shirts), which can be moved to the edges and then taped together with packing tape. It takes a lot of the guess work out of the process.
 

Attachments

  • CabinSole0029sm.jpg
    CabinSole0029sm.jpg
    265.8 KB · Views: 339
  • CabinSole0037sm.jpg
    CabinSole0037sm.jpg
    260.6 KB · Views: 316
Last edited:

Geoff Johnson

Fellow Ericson Owner
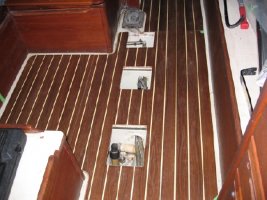
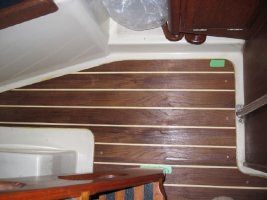
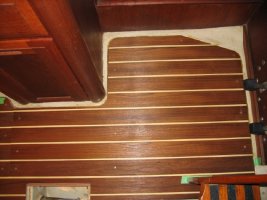
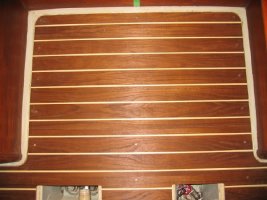
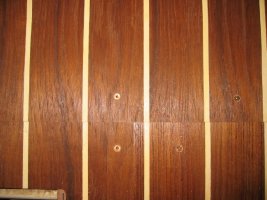
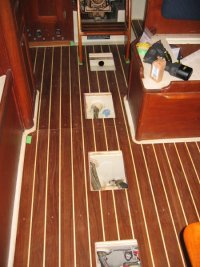
At last! The (unfinished) floor is in place and screwed down. With beveled edges to accomodate the curvature recessed edges in theTFG and the tight joints between the pieces, the six sections fit together like a puzzle and do not move around even without the screws. To screw the floor down, I used #6 1/2" bronze square drive screws. Where the floor overlaps the wooden underfloor, I will probably switch to 3/4" screws. When screwed in place the floor feels very solid.
 

Attachments

  • CabinSole0038sm.jpg
    CabinSole0038sm.jpg
    231.2 KB · Views: 323
  • CabinSole0047sm.jpg
    CabinSole0047sm.jpg
    223.5 KB · Views: 322

Geoff Johnson

Fellow Ericson Owner
More photos . . .
 

Attachments

  • CabinSole0044sm.jpg
    CabinSole0044sm.jpg
    268.3 KB · Views: 316
  • CabinSole0045sm.jpg
    CabinSole0045sm.jpg
    278.9 KB · Views: 323
  • CabinSole0046sm.jpg
    CabinSole0046sm.jpg
    279 KB · Views: 320

Geoff Johnson

Fellow Ericson Owner
Thank you, Loren. I am very pleased by the precise cuts allowed by using a router (as previously described) on plywood coated with penetrating epoxy. I attach a photo showing the "T" joint where three sections fit together just in front of the companionway steps.
 

Attachments

  • CabinSole0043sm.jpg
    CabinSole0043sm.jpg
    280.5 KB · Views: 317
  • CabinSole0041sm.jpg
    CabinSole0041sm.jpg
    237.1 KB · Views: 315

Mindscape

Member III
Great Work

Geoff - congrats!!! It looks great in the pictures you've posted and I'm sure once you get a finish on the sole it will be a thing of beauty! Thanks for taking the time to post during the project. this is a project I will have to do at some time and your insight should save me a lot of work - thanks again.
 

Mikebat

Member III
Is the space under the sole useable in some way? Tankage? Batteries? My sole is in good condition overall, but there are greyish stains creeping into the grain from the edges in some places. Not only do I want to create some stowage area, I also want to redo the sole attachment so that it can be removed easily for all the seaworthy reasons mentioned before. There are lots of good ideas about this in this thread, but no one seems to have tried making this space useable. Even some small lockers for stashing canned goods would be worthwhile, I think. But if there's enough space, putting some golf cart batteries down there to create a bank for house power would be fantastic. Is there enough space for that?
 

Geoff Johnson

Fellow Ericson Owner
No, there is not enough storage space to make it worth removing the floor to get at it and there is definitely not enough space for even the smallest battery.

BTW, the removability of the floor proved itself last weekend when I discovered that a fuel leak from a pump fitting had allowed diesel to leak under the floor near the nav station. It took only a couple of minutes to remove that section of the sole, wipe it off and replace it. There was no damage to the sole because of the epoxy coating.
 
Top