Replacement of Cabin Sole [Master Thread]

Geoff Johnson

Fellow Ericson Owner
Thanks, Martin, good advice. What do you think of epoxy on the top surface (as a base for the varnish)? This is what a quick Google search turned up:

"You should consider sealing the cabin sole with Clear Penetrating Epoxy
Sealer (CPES). This is a 50:50 ready-to-mix and is much thinner than
normal epoxy resin and will penetrate deeper. I would recommend 2 coats
and then a light sanding with fine paper. After that you can lay down
varnish, or one or two-part urethanes for a good bond. We have used this
system extensively on our boat, as well as those of others, and found the
final result superior to just the varnish or urethanes. The CPES darkens
the wood slightly, just as an initial coat of clear varnish will.

You can get full details on the CPES from our website.

The Rot Doctor
http://www.rotdoctor.com/"
 
Last edited:

JORGE

Member III
Since you're talkin cabin sole

On my E32-2, I have some softness in the FBG sole, just aft of the forward berth, between the head and sink(on the starbd side). Has anyone had this problem? I don't know what is underneath?
 

escapade

Inactive Member
sole redeeming

Rod;
To try to answer your questions first. I used polysulfide under the washers. Remember, 5200 (3M) is an ADHESIVE/sealant. You might want to remove them someday. I used a "breaker bar" w/2' of pipe as a torque improver to tighten the 1" dia. keel bolts. You want about 150=200 ft./lbs, torque. Your 30+ has 3/4" keel bolts, so they will need slightly less torque. You want them tight as possible without "crushing" the FRP underneath. It's kinda a "feel" thing. I've been working on stuff my whole life so it's sometimes hard for me to explain something. It just feels right. I used bilge coat from WM to finish the bilge. If the surface is clean & dry @ application it really seems to adhere very well.
Your 30+ sole is somewhat different from the 34. Yours is 1/4" over a FRP pan (the hull liner). I would use same basic procedure. My 30+ had the sole glued & screwed in place w/o any rot so I just refinished it in place.
Geoff;
The 3/4 ply is actually .710" thick (18mm). I considered laminating also, by the time you buy the extra material, adhesive, etc. you will have about the same invested plus a lot of extra work. Didn't seem worthwhile to me. As far as finish materials, they all are probably good as long as they seal out moisture, as Martin pointed out. Depends on what you like to use. I opted for spar varnish cut w/mineral spirits & LOTS of coats, sanding in between. I've never been accused of being the brightest light bulb on the Christmass tree! But hey, your asking my opinion. And you know what they say about that. Hope this helps answer some more questions.
Have fun & sail fast
Bud E34 "Escapade"
 

Martin King

Sustaining Member
Blogs Author
of shoes and ships and sealing wax

The thing about an epoxy underlayment on brightwork is that
it's harder to sand than just about anything else. So if it were me,
I'd make sure the sole (soul?) was removable and could be placed
on a bench at a convenient working height. Since middle age has
set upon me with a frightening pace, my knees, back, you name it
hurt way more now than they used to- and the prospect of sanding
for hours on end while crawling on all fours just doesn't hold the
romance it used to. Another finish I have experimented with for brightwork
is a clear gelcoat put out by Duratec. www.duratec1.com There is a local boat manufacturer here that is using it in their interiors. It can be sprayed or brushed, it kicks fast and can be wet sanded and buffed to a high gloss, and seems to hold up fairly well-and it's cheaper than epoxy.

Martin
E31C
 

Geoff Johnson

Fellow Ericson Owner
and cabbages and kings and why the sea is boiling hot and whether pigs have wings

After some investigation, I think I am going to forego the 1 mm veneer plywood and go with this source:

http://www.woodworkingforwatercraft.com/cabinsole.html

This is what I was told when I inquired about the price:

"Price for our product, 1/4" thick hand laid engineered teak & holly in a
4x8 sheet is $770. However I do make the sections cut to fit from your
pattern with 4 coats of finish for $28.48 per sq. ft., this price includes
blanks."

It is expensive (over 3 times the cost of veneer plywood), but I am hoping that if I have to pay only for the actual material I need, the cost differential will not be as great.
 
Last edited:

Geoff Johnson

Fellow Ericson Owner
I'm back to the plywood since the sole on my boat is not a constant thickness; where it crosses the TFG it's only 1/4" and elsewhere it is 3/4". So I am using 1/4" teak and holly plywood backed by 1/2" mahogany plywood where required. I made the patterns out of a frosted mylar I found in an art store and am in the process of applying the penetrating epoxy to both sides of the teak and holly ply sheets before cutting it. Out of an excess of caution, I have held off from ripping out the old sole until I at least get the the new sole rough cut. Now should I screw it down or go for the Rolls Royce solution, PYI's 316 stainless floor fasteners?

http://www.pyiinc.com/index.php?section=panel_anchor&action=main&sn=1
 
Last edited:

Loren Beach

O34 - Portland, OR
Senior Moderator
Blogs Author
I like my system of bronze square-drive fasteners flush with the sole... but those new SS ones look rather spiffy. I wonder if, instead of visually blending in to the surrounding teak like mine, they would be a bit too shiny and eye catching?

Loren
 

Geoff Johnson

Fellow Ericson Owner
They are a bit over the top. Seems to me you could appoximate the fasteners with machine screws and threaded inserts (WM catalog, p. 602). Then you could use a bronze machine screw to blend in.
 

Geoff Johnson

Fellow Ericson Owner
BTW, Bud (escapade) what did you do about the base for your table . . . in the photo above it looks like a hole corroded through it? Mine has some flaking paint on the surface and I was considering getting it powder coated, but will probably just paint it.
 

escapade

Inactive Member
the final answer

Geoff;
My table bases were so badly corroded that he Admiraless suggested we replace them with new pieces. Which made a lot of sense in our case. The structural integrity of the bases was gone and powder coating wouldn't have hidden the damage. If your bases are in good shape with only some cosmetic flacking I would think that powdercoat would be the way to go. It is what I had considered but mine were just too bad. I believe that I spent about $80.00 on 2 new table bases @ W.M. I never priced coating, but would guess that it would be less that that. If not, then replace with new. Sounds like your project is getting a lot more involved that mine what with having to laminate the 1/2 ply to the 1/4. I did the same as you are though, only rippng up a portion of the sole at a time. Makes getting the new pieces oriented MUCH easier. I will get a clouple pic's of my finished sole. Hopefully it will give you encouragement!
Have fun & sail fast
Bud E34 "Escapade"
 

Geoff Johnson

Fellow Ericson Owner
I hadn't thought of getting a new base. I see there is a model that allows the pedestal to be removed and replaced by a plate freeing up space.

As for my plan of attack, I intend to cut all of the 1/4" teak and holly pieces at home and then lay them on top of the existing sole. I intend to use a jig saw to cut the wood close to the line and then do the final shaping with a bench belt sander (4 x 36). Only when I am sure I have a viable replacement, will I rip out the existing sole. I might try ripping out one section at a time, but the joints between my sections are so old and varnished together, I doubt the sections will come out cleanly. One advantage I have is that my sole is flat - I don't have the angled sections you have in the stern.
 

Geoff Johnson

Fellow Ericson Owner
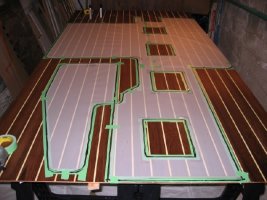
The rough cutting of the teak an holly ply continues and I have learned a few things so far:

1) It's a good idea to apply CPES (clear penetrating epoxy sealer) before cutting as it reduces splintering to zero and reduces damage to the surface from handling since it toughens the wood. 10 ounces will coat one side of a 4 x 8 sheet.

2) When laying out the patterns, do not mark the wood (lines have to be moved), but rather lay down (green) masking tape and mark your lines on that. The lines are also a lot easier to see.

3) Even a high quality (Bosch) jig saw is not a precision tool and the blade cannot be made to behave even with a straight edge.

4) A router is a precision tool and when coupled with a straight edge and a pilot bit (router bit with a roller bearing on top) can be made to trim wood with an accuracy of perhaps a couple hundredths of an inch. I have now succesfully made what I believe will be the most difficult cut (after ruining one section) which is the joining of two pieces parallel to the holly stripes so that they match the stripes on the adjoining piece. I have also used the router (Porter-Cable 310 trimmer with an offset subbase http://www.patwarner.com/pc310_special.html ) to "saw" one large piece into two using a 1/8" solid carbide bit. The alternative would have been a table saw, but saw blades have a much wider kerf and I wanted the reduction in distance between the adjoining holly stripes to be as inconspicuous as possible.


So the game plan now is to match cut all the mating sufaces of the six pieces (by pushing them together and running the 1/8" bit between them to get an identical profile on both sides of the cut) and then take everything to the boat to trim the edges.

I have also made the pattern for the cutouts of the five bilge access plates, four of which are the same size. The pattern is the exact size of the existing opening and the plan is to use a collar guide on the router which will hold the router bit about an 1/8th inch inside the cutout (thereby leaving a "blank" from which to make the cover with a solid teak border) and then use the pilot bit to trim the opening flush with the pattern.

I can see this is going to take me all winter.
 

Attachments

  • CabinSole0010sm.jpg
    CabinSole0010sm.jpg
    277.3 KB · Views: 635
Last edited:

cawinter

Member III
thanks for the progress reports

Geoff,
After collecting everything that has been written about the dreaded floorboard project I enjoyed your blow-by-blow. Maybe one of these days I just have to come up to see what it looks like. I have not started because I always found something that was maybe more urgent but also much more doable with my tools.
 

Geoff Johnson

Fellow Ericson Owner
Thanks, but a trip right now would be a bit premature, but you are welcome. I have rough cut all six pieces and fine fitted three so far by laying them on the existing sole starting with the bow and working toward the stern and lining everything up with the more or less straight edge on the starboard side. Extending/marking the edges of the old floor on the surrounding gelcoat with masking tape shows me where to cut the new sole when I lay it on top of the old. This project is definitely pushing my carpentry skills (although come to think of it I did get an A in shop class in the fifth grade.)

So far things have gone pretty well (except that the new teak is distinctly browner that the existing woodwork). For the radius inside curves, I found the trick is to make a template for the router (using a pilot bit). Once the other three pieces are fine fit and I have cut out the five bilge cover openings (again using a template and router) I will screw up my courage and rip out the existing floor - the point of no return!
 

JORGE

Member III
Teak flex

Hey Geoff,
I'm thinking about replacing the FBG cabin sole on my E32, and I tracked a teak related website selling "Flex-i-teek", it is something I will check into. Otherwise, I'll possibly buy a sheet of regular teak plywood, and cut dado's to inlay holly, birch, ash or similar wood.


http://www.worldpanel.com/
 

cawinter

Member III
keep us informed

Geoff,
Keep us informed on this project. I am in awe of the number of 'views' this has received.
Thanks.
 

ted_reshetiloff

Contributing Partner
Coating for Sole

I restored an old Jet 14 sailboat a few years ago and in doing so built floatation tanks under the deck using Oakume ply. I coated the wood with 2 coats of west system epoxy and used their 207 coating hardner. It did not darken the wood and all. I applied it with a foam roller and tipped it out with a decent brush. After washing with soap and water to remore the amine blush I applied 8 coats of Epiphanes varnish. This has held up extremely well to exterior conditions. Water and sun mainly. The epoxy is an excellent sealer and is very durable. The varnish has UV inhibitors that epoxy does not. The combination of the two has worked very well for me in several projects.
 

Attachments

  • 699 @ Konigsburg 2002.jpg
    699 @ Konigsburg 2002.jpg
    27 KB · Views: 667

Geoff Johnson

Fellow Ericson Owner
I think the better choice is CPES (clear penetrating epoxy sealant) which is made by at least a couple of vendors. It has the viscosity of water, is absorbed deep into the wood, and leaves no blush. Apparently it is the secret ingredient as a first coat for long lasting exterior varnish.
 

escapade

Inactive Member
sole (soul) chemistry

Keep in mind that all epoxy's are similar. The watery consistency is achieved by using solvents added to the base chemicals. Therefore to achive the desired waterproofing properties you will need to apply many more coats of material. Not that this is in itself bad, but just so you are aware that 2 coats probably isn't adaquate protection. The material is too expensive & the project too involved to take shortcuts, IMHO. The finished product is worth it though. Geoff, it sounds like you are really getting into this project. Keep up the good work.
Have fun & sail fast
Bud E34 "Escapade"
 

Geoff Johnson

Fellow Ericson Owner
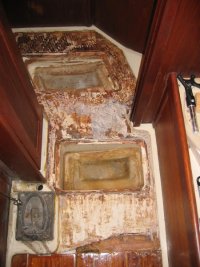
I spent about four hours on Saturday cursing Ericson. There must have been a sale on 5200 the day my cabin sole was installed. Anyway, as you can see from the attached photo, the sole forward of the mast has been removed using my trusty Wonderbar (not bra) and knee pads. The sole came out in small pieces and was decidedly damp so I am glad I am doing this. I am also glad I opted for 1/4 inch plywood since two thirds of the surface will accommodate only 1/4 ply. I had hoped that removing the sole would give me access to the forward keel bolt which is just below the hole forward of the mast, but everthing seems to be sealed in. The aft part of the sole has been mostly cleaned of glue using a wood chisel, but the forward part remains to be done.

The recent snow storm in the East has also given me the opportunity to make good progress on the 5 bilge hatches. The T&H ply has been cut and epoxied to 10 ply 1/2" mahogany. I then cut the blanks to "size", meaning about 1/4" too small on each side. Next I ripped some 3/8" teak into 3/4" strips to border the hatches and to make them slightly oversize so that I can cut them for a perfect fit.

I am definitely not going to glue down the new sole, but wonder how many screws are need for a secure fit. There is a lot to be said for a removable sole. For one thing, making a new one would be trivial since the the old one can be used as a pattern and making a new one is just a matter of cutting the ply roughly to size and then running around the edge of the old one (used as a pattern) with the router and pilot bit. In fact, if anyone is planning to follow in my footsteps, I recommend first making a wood pattern from cheap ply. I have had to remake two of the six sections and am now out of T&H ply.
 

Attachments

  • CabinSole0012sm.jpg
    CabinSole0012sm.jpg
    246.7 KB · Views: 699
Last edited:
Top