Guest viewing is limited
- You have a limited number of page views remaining
- 27 guest views remaining
- Register now to remove this limitation
You are using an out of date browser. It may not display this or other websites correctly.
You should upgrade or use an alternative browser.
You should upgrade or use an alternative browser.
a funny aside
The owner of the boat (my mom) found the hull number today. its 669..and Its on the main sail, we saw it when we sailed it back and thought maybe it was a racing number..
Good thing it wasnt 666.. LOL.. imagine getting that hull number (no offense if anyone here has that number).. think Ericson skipped that one? Kinda rough to be sailing around with a big 666 on the main.")
The owner of the boat (my mom) found the hull number today. its 669..and Its on the main sail, we saw it when we sailed it back and thought maybe it was a racing number..
Good thing it wasnt 666.. LOL.. imagine getting that hull number (no offense if anyone here has that number).. think Ericson skipped that one? Kinda rough to be sailing around with a big 666 on the main.
So the time has come.
So now that the weather is nice, and we have had time to think about the repair, we are going to jump in and do it. Along with some hired help who is very good with fiberglass. We think we are going to go with closed cell foam to repair the triangle in the bow.
Any advice on how to make it fit the shape of the deck? Any advice before we tackle this project? Im pretty sure I have the method down from what I've read and advice from ya'll on here.
1. pick a weekend with good weather...(check!)
2. unattach forestay and secure more forward to a dock with bungee cord to take pressure off of bow.
3. use a circular saw and cut out the top layer of the deck leaving a 2 inch edge around the sides.
4. remove rotten balsa core and make sure area is clean and dry.
5. lay closed cell foam (cut to size) in bed of thickened epoxy.
6. cover with thickened epoxy.
7. bevel 2" edges then apply new fiberglass to deck
8. fiberglass top skin that was was removed back on.
9. let cure and the rest.
Sound right? any quick advice or things to be careful of? and what should we do with the foam to ensure it fits the shape of the deck? can we grind on it.
Thanks again and I'll make sure to post pics of every step of the way to help others who are dealing with the same thing.
Keepin' the Pressure On
When it comes to getting the epoxy to conform to uneven (or even) surfaces I have been using a layer of thin plastic sheeting to cover. Then I put an inch of old soft foam pad on. And then I apply weight with with pieces of wood all over, with iron, sand bags, or clamps if I can figure out a way to apply clamp pressure uniformly.
I do not have a vacuum bagging table or equipment, although at times I kinda wish that I did.
With my crude pressure methods, the excess resin still oozes out under the plastic where I can easily knock it off the next day.
Like I say, this is not the preferred way, but as my late father used to say about doing things with few tools in the days of the Great Depression, "Poor folk have Poor ways."
:unsure:
(He later became an electrician and then an engineer, all thru ICS home study. I always remember his "can do" approach and innovative solutions to problems.)
Loren
Neat. I spoke with someone at James Town Distributors. They have a Core Cell foam, double cut to fit contured sufaces. He said I will need this in the way of Epoxy:
West System
105 epoxy-gallon
206 slow hardener-quart
403-filler/adhesive-microfiber to fill under edges and lay foam in
for the overdrill/redbed of the deck hardware
105 epoxy
410-microlight filler
Sound right?
The guy on the phone said to mix the 105 and 206 to syrup, then add 403 to a mayo or peanut butter consistency. then fill under 2" edge and then lay foam in a bed of this mixture. He said it was fine to let the stuff under the egde and the foam laid in the bed cure at the same time.
Anyone see any issues with this? When we were discussing earlier I thought we were supposed to let the 2 inch edge cure completely first..Also he said by using the 403 filler that no fiberglass strands would be needed. Sound right?
You can do both at once, in fact its easier. Just make sure you get it thick enough. Its not fun once it starts to ooze a little too much! You should be able to turn the bucket upside down and the stuff won't move. However, work quick, especially if its warm outside, because if you leave it too long in the bucket it will heat up and start smoking. It will start getting runny right before this and will smell noticeably stronger. At this point you have about one minute until it really kicks and becomes useless.
It's better to start with small batches so you don't burn up a huge pot. But remember once you start scaling up, it heats up quicker.
Be not afraid, and expect to burn a few pots. Just part of the game. :nerd:
It's better to start with small batches so you don't burn up a huge pot. But remember once you start scaling up, it heats up quicker.
Be not afraid, and expect to burn a few pots. Just part of the game. :nerd:
The job is finally done!
So this weekend we jumped in and did the bow repair. We discussed it so much earlier in this thread, I wont go back into the details leading up to the repair.
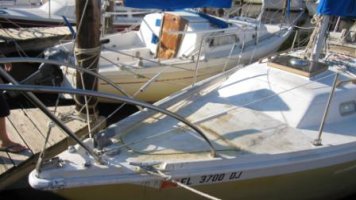
We hire some young help who is good with fiberglass to help. This bow repair, and the rebedding of the bow pulpits and stanchion bases in the bow took 2 full days. I have attached pictures below.
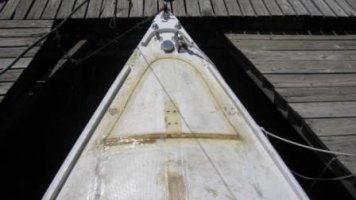
First we took out all of the hardware off of the deck. The previous owner did a repair, so we made the aft edge of the new repair start at forward seam of the PO's previous repair.
So this weekend we jumped in and did the bow repair. We discussed it so much earlier in this thread, I wont go back into the details leading up to the repair.
We hire some young help who is good with fiberglass to help. This bow repair, and the rebedding of the bow pulpits and stanchion bases in the bow took 2 full days. I have attached pictures below.
First we took out all of the hardware off of the deck. The previous owner did a repair, so we made the aft edge of the new repair start at forward seam of the PO's previous repair.
Attachments
-
 Boat 1.jpg36.9 KB · Views: 123
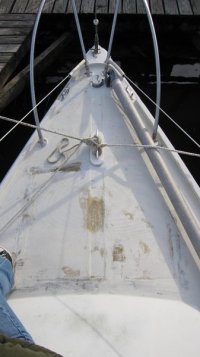
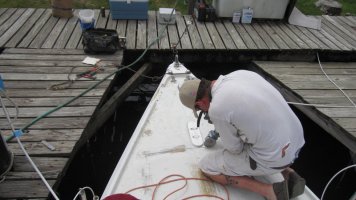
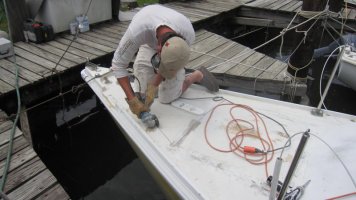
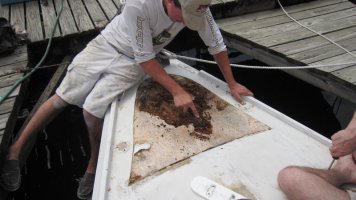
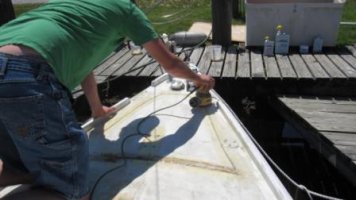
So we removed the hardware, marked the area that was soft, just aft of the anchor chain and just forward of the old repair. we then cut into the deck with a saw. We pried the top skin off with a scraper and screwdriver. Underneath it we found the rotten wood and scraped it all off. That took a little while with the wood that was still good because it was stuck on pretty good.
Attachments
-
 Boat 2.jpg76.3 KB · Views: 96
 -
 Boat 3.jpg79.8 KB · Views: 75
 -
 Boat 4.jpg77.7 KB · Views: 78
 -
 Boat 5.jpg79.5 KB · Views: 100
 -
 Boat 6.jpg77.1 KB · Views: 103
Oh yeah one thing I forget to say was that we removed the forestay and tied it to the dock with a rope to take the pressure off of the bow.
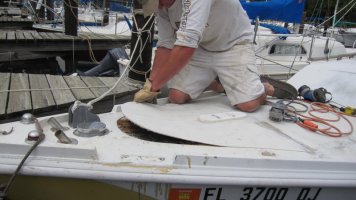
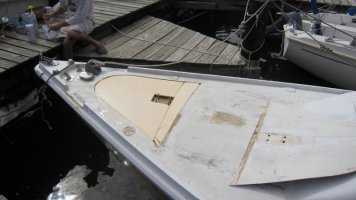
We scraped all the wood off, then cut the foam to fit the area. The area in the middle where the cleat was in the first picture was weak from stress fractures, so we cut out the foam for that area and filled with thickened epoxy to make it stronger. We taped the undersides of all the deck hardware and filled the clean deck with thickened epoxy. Then we put the foam in and filled the middle area where the cleat was with more thickened epoxy.
We let that cure then we put a layer of fiberglass on top of the foam. We also filled the stanchion base holes with thickened epoxy. The sun then went down and we had to wait for the next day to come back.
Attachments
-
 Boat 7.jpg65.5 KB · Views: 80
 -
 Boat 8.JPG13.9 KB · Views: 76
 -
 Boat 9.JPG22.4 KB · Views: 76
 -
 Boat 10.JPG21.6 KB · Views: 96
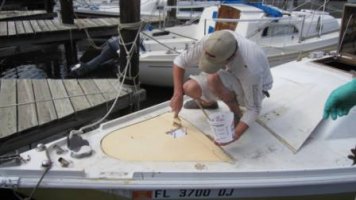
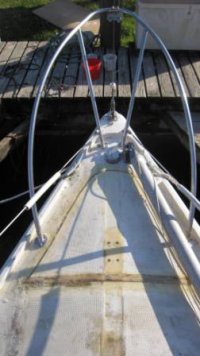
The next day we came back out to finish the job. We fiberglassed the top skin back on, then put two layers of epoxy over the seam of the repair, We sanded as much as we could and scraped off epoxy that dried on the deck.
we drilled through the overdrilled holes we filled with epoxy for the stanchion bases and then rebedded the hardware with butyl tape! the gray color, works like a charm..great stuff we found at the RV store.
After everything was rebedded and cured, we reattached all the hardware and she is ready to go..
Not a perfect deck but it wasn't perfect to start with, the whole thing needs to be repainted which we will do soon enough. I hope this thread has been helpful to anyone trying to do this repair.. It didn't cost too much, A whole lot cheaper than the marinas wanted to charge.
labor for two days $250
foam was $40-still have some left
epoxy, hardner, and filler-$150
acetone, paint brushes and misc stuff $50
so roughly $500 bucks.
Attachments
-
 Boat 11.JPG19 KB · Views: 104
 -
 Boat 12.JPG21.5 KB · Views: 79
 -
 Boat 13.JPG23.2 KB · Views: 109
 -
 Boat 14.JPG24.5 KB · Views: 73
 -
 Boat 15.JPG26 KB · Views: 90
"Sun Block" for boats
One of the one-part finishes like Brightside might do OK to protect it for now. UV is fierce where you are and it does indeed degrade the epoxy surface. Better check the paint company data sheet or just ask them directly which product is best for bonding your finish coat to later.
The few times I have needed to call a manufacturer I have always received good help from their technical folks. Take notes....
Strictly in the FWIW dept, you might find that this is a great excuse to try a one part finish with the non-skid additive, using the foredeck as your test site -- before committing to the rest of the whole deck refinish.
Loren
Last edited:

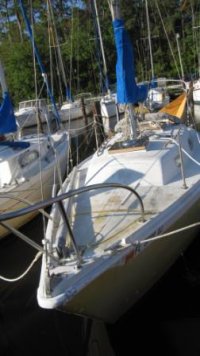
Deck after it was painted
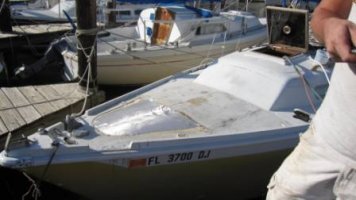
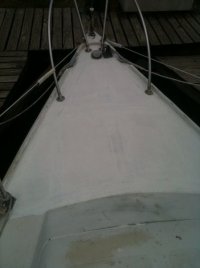
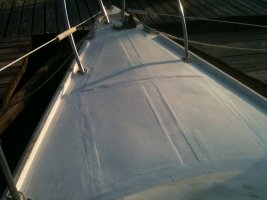
We painted the deck with some left over white paint my mom had. It looks alot better. eventually I think we'll put awlgrip on the deck, but for now I have attached two pics of the deck painted, one when the sun is up, and the other when the sun is coming down (you can see the seam more then)
We painted the deck with some left over white paint my mom had. It looks alot better. eventually I think we'll put awlgrip on the deck, but for now I have attached two pics of the deck painted, one when the sun is up, and the other when the sun is coming down (you can see the seam more then)
Attachments
-
 deck painted.jpg28.8 KB · Views: 77
 -
 Lake Ponchartrain Beach 025.jpg77.3 KB · Views: 94
stuartm80127
Member II
Dealing with bad coring
[An effective and less destructive way to repair yours,since it sounds like a smaller area is to drill a few 5/8" holes just through the top skin,allow to dry thoroughly over a week and then using a turkey baster fill the area with smith & co penetrating epoxy..]
Folks, I did something akin to this and while it produced good results, I would never do it again. Yes, the year spent drying the balsa core indoors in CO (RH < 25%), the injecting of Dr. Rot penetrating sealer and epoxy... and then filling the holes with epoxy to seal them permanently. I ended up cursing myself for this job as it could have looked just as good and taken much less cost and time to do it "right." Don't get me wrong, my decks can be jumped on and they are solid. Just the time and money spent on the swiss cheese approach.
Next time I will tap the decks from the bow to stern noting the hollow thud of rotten/missing core and continue until it sounds fine then add two inches and mark a line. Do your 3/16 drilling to 1/2 inch max depth at this point aft to see when the core comes out dry. Once dry core line is found draw your final line and that's where you cut to. I would then cut the deck with a mini circular type saw set to 5/16" depth and then pull back/chip away the glass and excavate all of the balsa core to the point where it's good again. Wait one week in hot weather for surrounding core to dry out. In the meantime order some white KiwiGrip and take a piece of deck material to Ace Hardware and ask them to match using their standard paint dyes. Its an amazingly good match based on my own experience. Add in some physical barrier channels at the edges to keep water from spreading in the future. Then I would add in new 1/2" end grain balsa core using thickened West Epoxy with slow hardener. I would then come back the next day and then roll unthickened west epoxy with slow hardener all across the top and let it penetrate. An hour after it becomes tacky, then you roll on slow cure epoxy with hardener in it and then re-install the original glass over it. Once cured (24 hours min) come back and grind in 12:1 bevels or about a 3" bevel on each side given 1/4 glass thickness. Then fill those voids with at approx eight layers of light bi-axial cloth with fast hardener in them until it is slightly below the level of surrounding glass. Then fill in the rest with epoxy with fairing compound and fast hardener and let sit for 24 hours. Then come back and fair to a flat surface. Sand the rest of the deck and wash with water & dry. Come back and paint with Kiwigrip and enjoy a brand new looking and excellent grip deck that will match the color of surrounding deck and look very nice.
Stuart