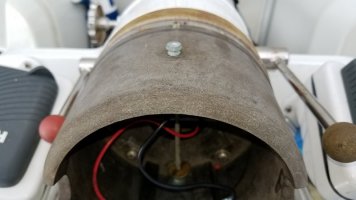
Yacht Specialties Pedestal Disassembly, with Photos [Master Thread]

Christian Williams

E381 - Los Angeles
Senior Moderator
Blogs Author
(Yacht Specialties/Merriman binnacle steering manual: https://ericsonyachts.org/ie/resources/merriman-binnacle-catalog.187/ )

( Edson pedestals: https://backwinded.wordpress.com/20...iesel-engines-throttle-shift-and-stop-cables/ also Edson 335 pedestal with Yanmar 3YM30 https://ericsonyachts.org/ie/ubs/e38-200-quincy-engine-control-replacement.999/ )


This pedestal is on a 1984 Ericson 381, but the general idea is the same on all YS/Merriman pedestals.

The job isn't difficult, but there are many pieces. A photo record is useful when reassembling.

The sticking point is often seized stainless machine screws in old aluminum castings. A penetrating lube such as "PB Blaster" is required, along with patience and the usual bag of tricks.

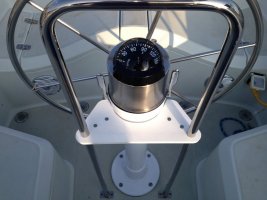
The following sequence illustrates dismounting the entire pedestal from the boat, and begins after removal of the pedestal guard, steering wheel, and compass. When replacing shift and throttle cables only Steps 2-4 are necessary.
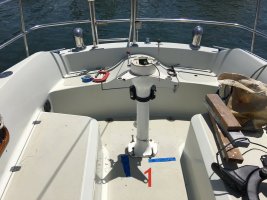
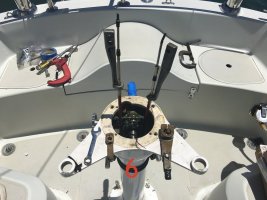
Ped1.jpg

1. Remove the large stainless countersunk bolts from the deck. The nuts beneath also secure the quadrant sheaves assembly box. Let it sag, but note how cables, chain and 12v wires are routed through their openings.
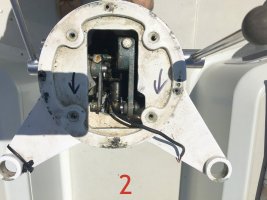
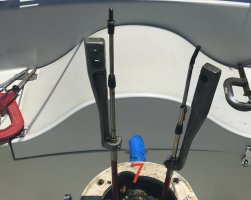
ped2.jpg

2. Remove four stainless machine screws from the shift housing collar ring. Set ring aside.

.Step 3.JPG...
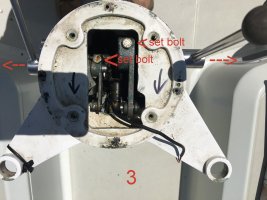
3. Remove throttle and gearshift arms. They are fixed to bronze levers visible in the rectangular opening. Loosen the set-bolts and pull the throttle and gearshift arms out horizontally.
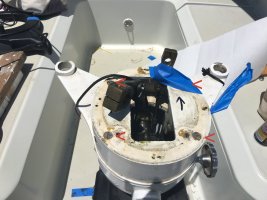
Ped Step 3A.JPG

3A. Remove the four large stainless machine screws securing the shift lever housing. Red arrows in photo above.
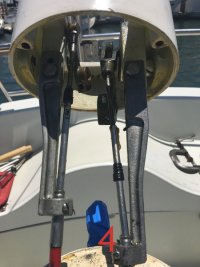
Ped 4.jpg

4. Pull the shift lever housing up about a foot. There should be enough slack in the (Morse or Teleflex brand) control cables to permit this. If not, detach the control cables from transmission and engine. It's a good idea to replace the cables with new ones anyhow The difference is butter-smooth rpm control and gear shifting.

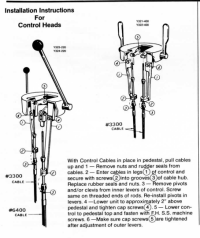
For good diagrams of the control cable connections see this archived catalog: https://ericsonyachts.org/ie/resources/merriman-binnacle-catalog.187/

Installation illustration below is from: https://ericsonyachts.org/ie/resources/yacht-specalities-catalog-4.180/
1661892341885.png
5. Detach the shift lever housing from the cable connectors and set it aside.
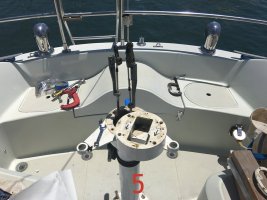
Ped5.jpg

(continued)
 

Christian Williams

E381 - Los Angeles
Senior Moderator
Blogs Author
Pednew6-001.jpg

6. Detach from the control cables the bronze lever arms. Set them aside. It is a good idea to put all kindred parts and their associated pieces into separate well-marked sandwich bags. Misplacing any of this stuff is disaster.

ped7new.jpg

7. The cable-end holders are attached to the cables by a set screw. Loosen the screw, push off the worn-out rubber telescope gaskets, and the cable-end holders will slide off the cables. Note how the holders work: the set screw holds the cable jacket. A common cause of problematic shift and throttle controls is that the set screw has lost its grip.

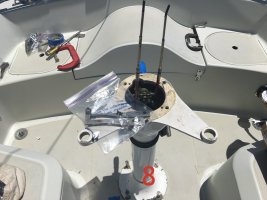
Ped8-001.jpg

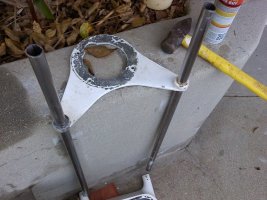
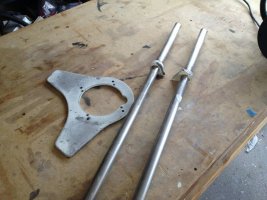
8. Remove the pedestal guard connector plate that receives the guard tubing. If this delta-shaped piece is broken or frozen, it can be successfully remade in King Star Board. The control cables can now be removed for replacement, or left where they are.

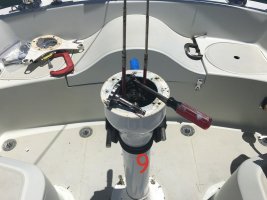
Ped9-001.jpg

9. Observe the wheel brake assembly. The adjustment knob shaft is held by a set screw. Remove set screw and withdraw knob shaft horizontally.

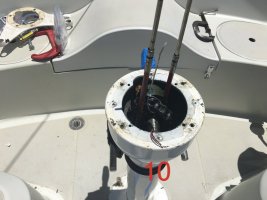
Ped10.jpg

10. With rudder centered, mark center top of the steering chain with string or cable tie. This helps during reassembly.
 
Last edited:

Christian Williams

E381 - Los Angeles
Senior Moderator
Blogs Author
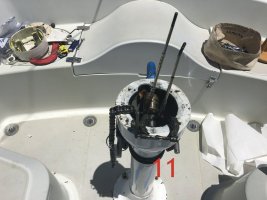
Ped11.jpg

11. At the steering quadrant below deck, detach one steering cable from the quadrant. Note whether the steering cables are crossed in the pedestal, so they can be reassembled correctly. At the pedestal, pull the loose half of the chain up and detach it from the quadrant wire by opening the master link.

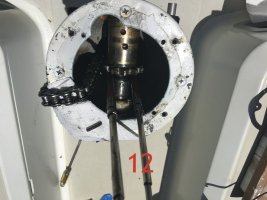
Ped12.jpg

12. Allow the disconnected half of the chain to fall through the deck. The pedestal is now free, and can be lifted, leaving the other end of the chain on deck. For painting or other exterior repair, the brake shoes and the sprocket can be left installed.

To remove the sprocket and shaft, first remove the brake shoe assembly by unscrewing one side and sliding it off the shaft.
Locate and remove one set screw on the sprocket.
Locate and remove the roll pin that secures the sprocket on the axle.
The roll pin goes all the way through the shaft, and can be gently knocked out the other side with a drift pin. A new one will be necessary, in stainless steel.

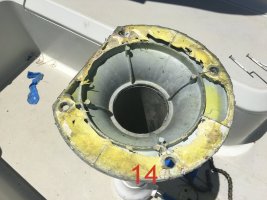
Ped14.jpg

The YS aluminum pedestal bases are subject to corrosion to the point of destruction. If the base is a total loss, the tube can be sleeved and a half-inch base plate welded on as a substitute. ( http://www.ericsonyachts.org/infoexchange/entry.php?119-Pedestal-Rebuild )

Yacht pedestals during heavy weather have to support several crew simultaneously grabbing and lunging for support, and a standing helmsman has no other means of support but the wheel itself. A strong pedestal guard is necessary in addition to a sound pedestal, and set screws at bases and spreader arms should be tight to spread the loads.

Every 30-year-old aluminum pedestal--its base, guard, gears, wheel, sprocket, chains, sheaves and quadrant--benefits from careful examination and a skeptical eye. A bit of maintenance now may head off the breakage of an irreplaceable part, or crew member.
 
Last edited:

fool

Member III
Merriman Binnacle Instructions and Part Numbers

I have a 3.4 mb pdf catalogue with part numbers and instructions from Merriman. It exceeds allowable upload size. I thought it was a terrific discovery and would like to share the information. Please advise on adjustment to file size or appropriate place to store this document.

Techologically challenged,

Max
 

Sean Engle

Your Friendly Administrator
Administrator
Founder
Sorry about getting so late to this game - I lost my login credentials on my work computer and had to wait, and then kept missing the window after work, etc...

Anyhow - the upload:

Can you scan the documents you have into a pdf format? If so scan at 150-200, and advise how big of a file it is, etc. I can set up an upload, etc.

You can email directly through the "Contact Me" link below...

Thanks for the contribution for EricsonYachts.org!

//sse
 

alcodiesel

Bill McLean
Did this ever get downloaded? [YES, NOW AVAILABLE. SEE LINK AT TOP OF PAGE]

[h=2]Merriman Binnacle Instructions and Part Numbers[/h]
I have a 3.4 mb pdf catalogue with part numbers and instructions from Merriman. It exceeds allowable upload size. I thought it was a terrific discovery and would like to share the information. Please advise on adjustment to file size or appropriate place to store this document.​


Techologically challenged,


Max
 
Last edited by a moderator:

fool

Member III
Merriman Binnacle Instructions and Part Numbers

I have a 3.4 mb pdf catalogue with part numbers and instructions from Merriman. It exceeds allowable upload size. I thought it was a terrific discovery and would like to share the information. Please advise on adjustment to file size or appropriate place to store this document.

Techologically challenged,

Max​

PM or email to me and I'll email them to you. Sorry, I was never able to figure out how to post to the forum. I did have a recent adventure in adjusting the Merriman wheel brake which had a happy ending if you want the complete story...hint: the transmission lever has a half moon key in a slot that is best not dropped down the binnacle. But be careful what you wish for as more than likely I'll extol the virtues of Captain Moab's Ship Balm and All Natural Lubricant & Protectant - waterproof protection for boat and crew.

September.Sun.Ericson35MKIII@gmail.com
 

Red Squirrel

1985 Ericson 28-2 Hull# 607
YS Merriman pedistal manual

Hi Sean,

Did you ever get this manual?
I can’t find it on the download site. Could you email it to me?

thanks
joe


Sorry about getting so late to this game - I lost my login credentials on my work computer and had to wait, and then kept missing the window after work, etc...

Anyhow - the upload:

Can you scan the documents you have into a pdf format? If so scan at 150-200, and advise how big of a file it is, etc. I can set up an upload, etc.

You can email directly through the "Contact Me" link below...

Thanks for the contribution for EricsonYachts.org!

//sse
 

fool

Member III
Hi Sean,

Did you ever get this manual?
I can’t find it on the download site. Could you email it to me?

thanks
joe

Hello Joe,

Sent you a PM with my email address. I've yet to figure out how to upload the manual and will forward it to you directly.

Regards,

Max
 

slipstreamer

Junior Member
Hello Joe,

Sent you a PM with my email address. I've yet to figure out how to upload the manual and will forward it to you directly.

Regards,

Max

Hello Max,
I recently bought a 35 Mk III and need to figure out how to get the compass off the pedestal so I can access the instrument cables as I am rewiring... Any information on this would be great! I have sent you a PM with my email for the PDF
Thanks!
Steve
 

Christian Williams

E381 - Los Angeles
Senior Moderator
Blogs Author
The compass case? Usually it is just removing any screws you can see (however tiny). Starting with the light fixture.

Once exposed, the actual compass mounts should be pretty clear.

If that doesn't help, post a photo of your compass.

Oh, and welcome to the forum.
 

slipstreamer

Junior Member
Christian - thanks for the welcome! Would you believe of my gazillions of photos of bits of the boat, I don't have a clear shot of the helm and compass! However, your description fits what I saw yesterday - four very small (#4?) screws at the base of the compass. They were frozen so I did not want to force - not knowing if that was where I should start... With your advice, I will be more persistent. Thanks again.
Steve
 

Christian Williams

E381 - Los Angeles
Senior Moderator
Blogs Author
Yep, that's where to start. Just drill them out, new ones later.

There is no question about our boats that somebody here can't answer, and usually pretty fast.
 

jreddington

Member III
Separate Pedestal Guard Connector Plate from Guard Tubing

Great walk through. It's a logical process. However, the last I did it was before the prevalence of digital photos so I had some head scratching moments on reassembly.

I'd like some advice on separating the Guard Connector from the Guard Tube. Last time I did this project, I just took off both together. I gently tried to separate them but with the inevitable corrosion, no budge. Did not want to break the connector.

Any advice on this? I do have the usual suspects as far as penetrating oil including WD-40, PB Blaster, and even Kroil. I can take the two off together and manipulate off the boat. I'm guessing tapping at the lip of the holes for the pedestal is it but don't want to break the plate.
 

Christian Williams

E381 - Los Angeles
Senior Moderator
Blogs Author
On my E32-3, the stainless guard tubes had corrosion-welded to the aluminum plate. Tried for two days to separate them, no dice.

I sawed the ears off, then made a King Starboard overlay which bolted onto the remaining YS metal.

1-1204120804a.jpg1-IMG_0061.JPG1-IMG_0140.JPG
 

slipstreamer

Junior Member
Yep, that's where to start. Just drill them out, new ones later.

There is no question about our boats that somebody here can't answer, and usually pretty fast.

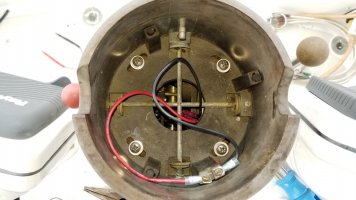
Well, I finally got back to the boat to see what is what and I found out something interesting! The four screws turned out to be two perpendicular adjustment rods for the compass compensation. Thankfully, I figured this out before drilling them out! I had noticed that there is a sprung "pin" on the binnacle and had not figured out what it was - until.... I decided to just see if I could lift out the compass unit and noticed the pin move. I pulled the pin and the compass unit came right out, revealing the two compensation rods and four bolts that secure the binnacle to the pedestal. From there it was plain sailing. One mystery remains: I would expect the compensation rods to have a moving magnet or two associated with them that would adjust the field, but I could not spot anything. Has anyone seen a set up like this before and can you tell me how this works, or what my set up is missing??

Thank you!
 

Attachments

  • 20171122_112256.jpg
    20171122_112256.jpg
    67.1 KB · Views: 69
  • 20171122_112313.jpg
    20171122_112313.jpg
    50 KB · Views: 46

Kenneth K

1985 32-3, Puget Sound
Blogs Author
Danforth Constellation Compass

One mystery remains: I would expect the compensation rods to have a moving magnet or two associated with them that would adjust the field, but I could not spot anything. Has anyone seen a set up like this before and can you tell me how this works, or what my set up is missing??

Thank you!

I have the same compass and case. Its a Danforth Constellation Express compass. Your little trick about pulling that spring-held pin in the case was just what I needed to remove the compass from the binnacle. Mine had a 2" bubble in the dome. I've talked to 2 compass shops--the going price to rebuild one is $250-$280. I refilled the dome myself with the appropriate fluid, but both shops said the leak is likely to re-occur. For $250, I thought home-repair was worth a try.

They explained to me how the compensation rods work. At each end of each rod, there is a small magnet mounted perpendicularly through the rod (the magnets are "inside" the brass end-plates, visible in your photo). The "neutral" position of the magnet is parallel to the horizon. The compensation bars are only meant to be turned up to 90 degrees forward or back. As the magnet is rotated towards vertical, it has a larger effect on the compass. Obviously, one rod is used for N-S corrections, and the other for E-W.

Both shops said this is a top-notch compass, and that a similar replacement would run about $600.

I think I'll re-fit mine with an LED lamp when I reassemble it.
 
Last edited:

Loren Beach

O34 - Portland, OR
Senior Moderator
Blogs Author
A bit more compass trivia in a blog entry:
http://www.ericsonyachts.org/infoexchange/entry.php?87-Compass-Restoration

My 2014 experience in a narrow channel handling big rough seas, proved that the card is more readable and comprehendable than the slower-changing heading info on the GPS screen, and mentally it seems to have a faster "acquisition time" for the human eye/brain interface.
Of course, that might be due to me having a lot to think about at the time... and having an "interface" that has slowed with age...
:rolleyes:

Thanks also for the information about the adjustment rods; I kind of wondered just how they work.

Loren

ps: when crossing the Columbia River bar, Mr. Greeley had the right idea -- " Go west young man" :0
 
Last edited:
Top