I just completed a long awaited traveler upgrade project. There are plenty of blogs and posts about traveler upgrades on this site which I used for inspiration and advice. Here are a few of them:
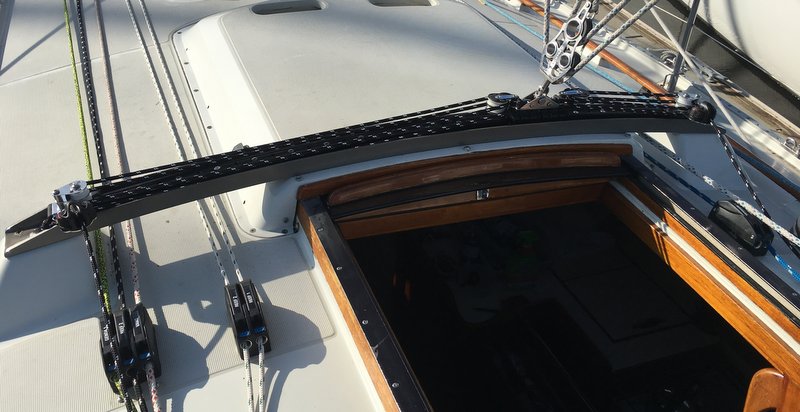
Here is the original setup as the boat came to me. The traveler lines cross and chafe each other as they make their way to the end sheaves which are 90 degrees to each other. Worse, the blocks attached to the traveler car regularly foul and jam the whole works up.
Originally I was going to purchase a new traveler car from Ronstan that had integrated sheaves, which would eliminate the troublesome blocks. These were hard to find, but eventually I found one for around $250.
But then a flash of inspiration hit me. Why not modify my existing car to match the integrated sheave style car? My original traveler car looks like this model:
The only difference I could tell is the addition of the sheaves between the car and the channel. So I spent a few weeks researching sheaves and hardware and ordered stuff from Amazon and McMaster Carr. Once it arrived, I drilled out the rivets holding the channel and the car together. With new 1/4 inch bolts, the Harken ball bearing sheaves fitted nicely into place and the assembly was tightened down with low profile nylock nuts. The bolts I ordered from McMaster Carr were uncharacteristically different from the description and drawings on their website (I wanted shoulders on the bolts where they ran through the bearings and they arrived without shoulders). So I had to purchase new ones with shoulders from West Marine and cut them to fit in the field. The final installation is much cleaner than the original and I saved several hundred dollars.
To address the control end problem I got longer bolts for the control end sheaves assemblies and stacked them vertically. I also wanted shoulders on the part of the bolts that bear on the sheave bushings so I had to use a hex bolt. Hopefully this wont snag on lines and people too much. I also went down a line size from 3/8 to 5/16. The lines now run very fair between the car and the control ends and I gained an extra 6 inches of car movement in each direction. I haven't sailed with it yet, but it already runs much smoother at the dock than it used to. Hopefully this has solved all of the traveler issues. Oh, and I upgraded the entire mainsheet system to Garhauer blocks. Should be a nice upgrade all around.
Edit- Went for a sail this afternoon and the traveler is flawless!
E381 - Ronstan Traveler Upgrade, Thelonious II
The traveler of a sailboat allows adjustment of the lateral position of the boom and therefore the angle of the mainsail to the wind. With the angle set, main sheet tension controls twist, which allows air to spill from the upper sail. On...
ericsonyachts.org
E35-3 - E35-3 Traveler Upgrades (Control-Ends & Blocks)
When we first took delivery of our E35-3 one of the first things we noticed was the horribly difficult-to-operate Traveler. Upon further inspection we found that 2 of the existing control-end sheaves had been siezed, and as a result the control...
ericsonyachts.org
E32-3 - Mainsheet Traveler Upgrade
A few words first… When I read any “How To” article on-line I’m always cautious about the information especially if it’s from a “non-professional”…..like me. I’m just a photographer who really likes sailing and repairing / upgrading his boat. So...
ericsonyachts.org
Here is the original setup as the boat came to me. The traveler lines cross and chafe each other as they make their way to the end sheaves which are 90 degrees to each other. Worse, the blocks attached to the traveler car regularly foul and jam the whole works up.
Originally I was going to purchase a new traveler car from Ronstan that had integrated sheaves, which would eliminate the troublesome blocks. These were hard to find, but eventually I found one for around $250.
But then a flash of inspiration hit me. Why not modify my existing car to match the integrated sheave style car? My original traveler car looks like this model:
The only difference I could tell is the addition of the sheaves between the car and the channel. So I spent a few weeks researching sheaves and hardware and ordered stuff from Amazon and McMaster Carr. Once it arrived, I drilled out the rivets holding the channel and the car together. With new 1/4 inch bolts, the Harken ball bearing sheaves fitted nicely into place and the assembly was tightened down with low profile nylock nuts. The bolts I ordered from McMaster Carr were uncharacteristically different from the description and drawings on their website (I wanted shoulders on the bolts where they ran through the bearings and they arrived without shoulders). So I had to purchase new ones with shoulders from West Marine and cut them to fit in the field. The final installation is much cleaner than the original and I saved several hundred dollars.
To address the control end problem I got longer bolts for the control end sheaves assemblies and stacked them vertically. I also wanted shoulders on the part of the bolts that bear on the sheave bushings so I had to use a hex bolt. Hopefully this wont snag on lines and people too much. I also went down a line size from 3/8 to 5/16. The lines now run very fair between the car and the control ends and I gained an extra 6 inches of car movement in each direction. I haven't sailed with it yet, but it already runs much smoother at the dock than it used to. Hopefully this has solved all of the traveler issues. Oh, and I upgraded the entire mainsheet system to Garhauer blocks. Should be a nice upgrade all around.
Edit- Went for a sail this afternoon and the traveler is flawless!