• Untitled Document

    The 2024-2025 Fund Raising Season has Opened!

    EricsonYachts.org has opened the season for raising funds to support the expenses of the site. If you would like to participate, please see the link below for additional information.

    Thanks so much for your continued support of EricsonYachts.org!

    2024-2025 Fund Raising Info

Replacement of Cabin Sole [Master Thread]

Filkee

Sustaining Member
More photos . . .
These photos are incredibly helpful. I’m contemplating my screw pattern now. Did you find this to be sufficient or overkill? I was thinking with the table pedestal screws in place it, I might not need as many around the dinette.
 

TAPH2O

Member II
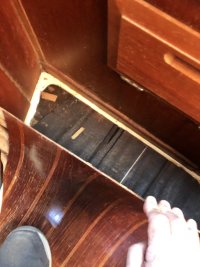
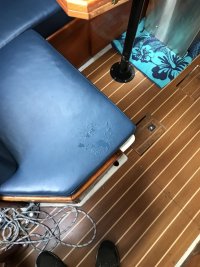
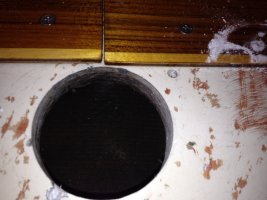
Anybody have experience with cutting out bilge access in these liners.
my daughters e-36c has these glued down sole but after lifting up a corner it is solid fiberglass and would like to have access to bilge area for extra storage.
 

Attachments

  • 0AD186E9-0181-4EB3-B349-32C886E8A639.jpeg
    0AD186E9-0181-4EB3-B349-32C886E8A639.jpeg
    155.8 KB · Views: 28
  • 2BEC386D-0C31-4A4D-A70A-9F3B87AC8DE4.jpeg
    2BEC386D-0C31-4A4D-A70A-9F3B87AC8DE4.jpeg
    201.2 KB · Views: 28
  • 6413AE42-8B22-4D44-8CAD-5BE86CE07C37.jpeg
    6413AE42-8B22-4D44-8CAD-5BE86CE07C37.jpeg
    284.9 KB · Views: 28

Christian Williams

E381 - Los Angeles
Senior Moderator
Blogs Author
A note from memory: screws into the TAFG need special care. Any attempt to force a stainless screw, as we might with wood, can easily break it off. The pilot hole has to be right, and very little thread bite is required. I think I experimented on a hidden area of the engine stringers to get the pilot hole size just right.
 

bigd14

Contributing Partner
Blogs Author
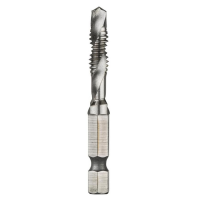
Good reminder from Christian. TAFG + wood screws = UGH... I have a number of broken off stainless screws in the TAFG. First one I figured was bad luck, second one did the same thing. Finally after the third one I learned what I should have on the first. I ultimately tapped mine in and used machine screws. Used this handy Dewalt combo drill and tap from Home Depot. This was not entirely foolproof, with a few of the screws blowing out the threads when too much pressure was applied. But no more broken fasteners. I could use epoxy to secure them better but there are not enough of them to worry about it. 1611468264678.png
 

Bolo

Contributing Partner
Unfortunately I have been forced to now start the process of replacing the T&H deck on my E32-3. This past winter, while the boat was "on the hard", there was water intrusion from the forward hatch - a problem that is being fixed. But the damage was done or more accurately, added to, since the T&H deck in the v-birth has shown signs of de-lamination for a long time. The thought of prying up the deck and going through the replacement process, as described in this "Master Thread" had previously scared me off. After all, what's more fun? Sailing or replacing a T&H floor? But it's time for me to face the music.
IMG_1725.jpeg

So here is my de-laminated T&H which you can see is still wet and extends from the v-birth all the way aft to the seam which is just behind the mast. I'm going to do this process on section of deck at a time. I've already made most of the templates and will first cut the forward section out of 1/4" plywood so I can check the fit and provide for a temporary floor. I'll also make additional templates of the areas over the "hidden spaces" in the TAFG.

The information that has been presented here in this string has been extremely valuable so far but still I have some questions and am looking for opinions from those of you who have completed this project.

I've read a lot about using bronze square drive screws to hold down the T&H rather then glue, which is a great idea, but I also read about the use of a Combo drill tap
 

Loren Beach

O34 - Portland, OR
Senior Moderator
Blogs Author
I've read a lot about using bronze square drive screws to hold down the T&H rather then glue, which is a great idea, but I also read about the use of a Combo drill tap
By coincidence I just screwed down all of our sole pieces with new bronze square drives. I used a standard countersink bit to clean up each hole. I also, for the first time, slightly increased the hole sizing in the sole so that the screws do not bind (they only have to hold well in the FRP substrate. )
The new varnish looks good, with three coats on the bottom of each piece and five on the top. I could have kept on sanding and varnishing to achieve the last 2% of "perfection" but it was taking too many days...
I finally made an agreement with myself and the Admiral that it is now "good enough". :)
 
Last edited:

Filkee

Sustaining Member
It’s worth the trouble. I did find the bronze screws to be a bit brittle and if I do take it up again, I may go with something a little less fragile.
 

Bolo

Contributing Partner
It’s worth the trouble. I did find the bronze screws to be a bit brittle and if I do take it up again, I may go with something a little less fragile.
I was actually thinking of hand tapping into the TAFG but I'm not sure how thick it is and if it'll "hold" the threads without ripping out although most of the resisting forces would be side to side not up and out....I think.
 

bigd14

Contributing Partner
Blogs Author
hand tapping into the TAFG
Tapping worked well for me. There seemed to be enough thickness in the TAFG although there were 3-4 screws that didn't hold well. Hand tapping might work better than my high speed combo drill and tap to preserve threads. I have taken the floor off once since installing 4-5 years ago. No issues with screws coming loose in the meantime. I would say that most of the force is up and down not sideways. The TAFG is not perfectly level so the sole flexes ever so slightly in some areas as you walk around on it. Glue would bond more of the sole to the TAFG than the screws do, creating a more solid feel, but I prefer being able to remove the sole easily.

I also used Minwax polyurethane finish in matte rather than the traditional varnish. It took much less time and has held up nicely.

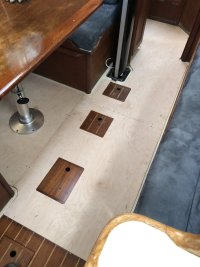
Recent photo of sole- I still haven't got around to making proper size bilge access covers... I also added a seam in the middle to make removal of the sole manageable.
E7F89F70-80E0-4868-A8F6-5E77D3B5962B.jpeg
 
Last edited:

Bolo

Contributing Partner
Tapping worked well for me. There seemed to be enough thickness in the TAFG although there were 3-4 screws that didn't hold well. Hand tapping might work better than my high speed combo drill and tap to preserve threads. I have taken the floor off once since installing 4-5 years ago. No issues with screws coming loose in the meantime. I would say that most of the force is up and down not sideways. The TAFG is not perfectly level so the sole flexes ever so slightly in some areas as you walk around on it. Glue would bond more of the sole to the TAFG than the screws do, creating a more solid feel, but I prefer being able to remove the sole easily.

I also used Minwax polyurethane finish in matte rather than the traditional varnish. It took much less time and has held up nicely.

Recent photo of sole- I still haven't got around to making proper size bilge access covers... I also added a seam in the middle to make removal of the sole manageable.
View attachment 42803
Good to know about tapping treads. When I pull the first section off I think that I'm going to try a "test tap". The "sole flexing ever so slightly in some places" might be fixed by applying some double sided tape to the TAFG, just enough to reduce the flexing but not too much to damage the T&H when you have to remove it??? I watch "Captian Q" on YouTube who does reviews on boats for sale mostly in New England. A great channel for learning about different boats. On a few of his vids he prefers a matte finished T&H because of the danger of slipping on a wet deck when the boat is healed. Makes sense to me.
 

JSM

Sustaining Member
I've already made most of the templates and will first cut the forward section out of 1/4" plywood so I can check the fit and provide for a temporary floor.
After making "test pieces" out of 1/4" styrofoam insulation board I realized that I was basically doing double work.
I made my templates from clear plastic film that I purchased from an art supply house and used a sharpie to mark the holly lines and screw holes. After cutting the pieces I used a belt sander to adjust the fit.

I've read a lot about using bronze square drive screws to hold down the T&H rather then glue, which is a great idea, but I also read about the use of a Combo drill tap
I used the bronze screws with the idea of leaving them exposed but didn't like the look and ended up counter sinking and plugging them. The bronze screws were a pain to work with and I broke quite a few.
Had I known about the combo drill / tap bit I would have gone with that.
 

Bolo

Contributing Partner
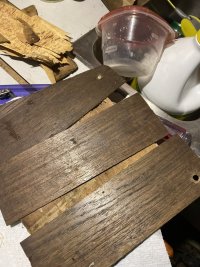
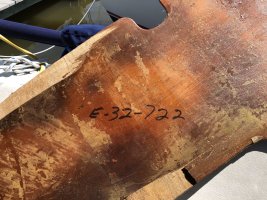
Just started the process of replacing the T&H which is ripping up the old floor and found a note on the bottom of one section. 722 is my hull number.
6E586A50-57FF-42AD-813D-79D66E97B242.jpeg
 

Loren Beach

O34 - Portland, OR
Senior Moderator
Blogs Author
Yup! When our sole sections were cut out in 1988, someone wrote "O-34 108" on several of them underneath. When refinishing recently, I used a black marker pen to renew those. I also put my name nearby on one of them.... (Probably never happen, but if stolen and recovered I can prove the boat is mine.) :)
Three coats of new varnish on the bottom sides, now.
 

Bolo

Contributing Partner
Yup! When our sole sections were cut out in 1988, someone wrote "O-34 108" on several of them underneath. When refinishing recently, I used a black marker pen to renew those. I also put my name nearby on one of them.... (Probably never happen, but if stolen and recovered I can prove the boat is mine.) :)
Three coats of new varnish on the bottom sides, now.
I’m also going to “tag” the bottom of my sole sections too which will be much easier to find since I’m screwing it all down. Have some temporary sole / template down now and it just looks strange.
68DFAD15-983A-4B49-8662-D2127BA6D789.jpeg
 

nquigley

Sustaining Member
Hey Bob,
While you're at that stage, can you please work out what paths can bring water to the bilge where the forwardmost keel bolt is? After leaving the boat for a while, I can suck a good bit of water out through the weep hole at the forward end of the keel step that leads to the bilge area. The bilge just aft of the mast is where my down-the-mast water collects. I can't work out how water gets into the bilge forward of the mast.
If I ever replace my cabin sole, I'll make an access panel in the sole above that area to give access to that keel bolt.
 

Bolo

Contributing Partner
Hey Bob,
While you're at that stage, can you please work out what paths can bring water to the bilge where the forwardmost keel bolt is? After leaving the boat for a while, I can suck a good bit of water out through the weep hole at the forward end of the keel step that leads to the bilge area. The bilge just aft of the mast is where my down-the-mast water collects. I can't work out how water gets into the bilge forward of the mast.
If I ever replace my cabin sole, I'll make an access panel in the sole above that area to give access to that keel bolt.
The labyrinth called the TAFG on our E32-3s have always been sort of a mystery and written about many times on this site. Water seems to appear and disappear before and after a sail. I have a leak, someplace aft...I think, that delivers water to the main bilge but only sometimes. It can rain like the devil and the bilge will remain bone dry, or a light rain can leave a half inch of water but I suspect that it maybe water from another part of the hull that gets into where I can see it in the main bilge after a spirited sail.

The area you're questioning is one of those mysterious places in the TAFG where reaching the forward keel bolt is a bit problematic. While on the hard this winter I had a small "smiling" crack in forward part of the keel where it meets the hull. After some examination by me and the yard we determine that it wasn't anything that needed nothing more the some patching but as part of the process the yard suggested that I have the keel bolts tightened to specs. I'd do this sort of thing myself but I live two hours from the boat and its much easier for the yard to do the job.

I warned them about the hidden forward keel bolt which they accessed by way of a small removable panel in the port settee next to the mast. Unfortunately I have no photos of that area. All bolts were tightened and no problems were found and there was no report of water in that forward area of the TAFG. I can't speak as to how water is gaining access to this part of your boat aside from suggesting that maybe that forward keel bolt needs tightening and keel connection needs to be examined. However, it could be just water sloshing around the TAFG and ending up far from a place where it entered the boat.

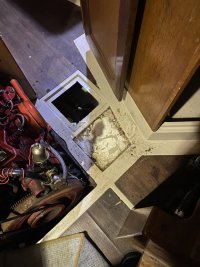
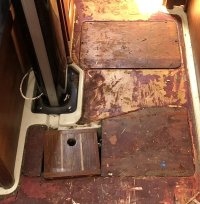
I've attached a photo of the areas where I pulled the old T&H up and as you can see there is a "pan" in the TAFG adjacent to the area where the forward keel bolt is located covered by a wooden panel. After examining the wooden covers over these areas I determined that they were solid and showed no signs of delimitation or rot so I'm gonna let them be. Like my dad use to say, "If it ain't broke don't fix it." But with my plans of screwing the new T&H sole pieces down, if there is ever a problem it'll be much easier to access them.

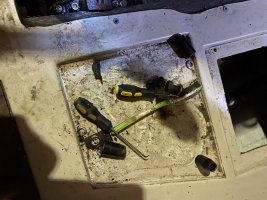
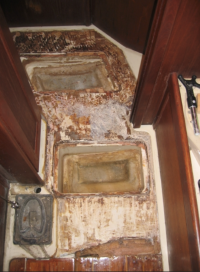
The other photo I've attached is the TAFG more exposed (and the mast removed) with the wood "pan" covers off and this BTW is NOT my boat but that of Geoff Johnson, another E32-3 owner who I hope forgives me for pirating his image. As you can see the pan area next to the forward keel bolt is sealed but I suppose that you could make an access hole there (maybe) which maybe closer to the keel bolt and allow you to see this area better?
IMG_1754.jpeg

Screen Shot 2022-05-13 at 10.35.09 AM.png
 

Bolo

Contributing Partner
Just a bit more info about using machine screws for holding down the T&H sole to the TAFG: While continuing with the process of replacing the sole I did a "tap test" on the TAFG. The recommended drill size for a 10-24 tap is 5/32" but I found that after I tapped the hole the screw felt a bit loose. But wait...maybe that's because you're tapping into fiberglass, Bob, and not metal! So I drilled another hole with the small 9/64" bit and after tapping that with the 10-24 the screw was definitely snugger.
 

nquigley

Sustaining Member
Your description, and those pics, help hugely.
I discovered that access panel in the port foreward settee locker a few years ago, but I always thought that bolt would be visible under the T&H in that area - not so! It’s under that pan, and as you said, one would need to cut a hole somewhere in that pan to access the bolt from above. That would presumably let water into that pan, which could sit there and rot the cabin sole from underneath.
You’ve cured my curiosity about access to that forward water catchment area - I’ll just keep sucking it out via the hole just in front of the mast :)
Thank you!!
 
Top