• Untitled Document

    The 2024-2025 Fund Raising Season has Opened!

    EricsonYachts.org has opened the season for raising funds to support the expenses of the site. If you would like to participate, please see the link below for additional information.

    Thanks so much for your continued support of EricsonYachts.org!

    2024-2025 Fund Raising Info

E27 Head plumbing.

agraziano23

Member II
Hello,

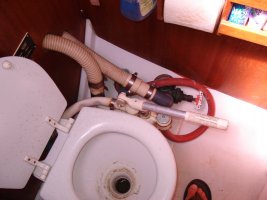
I'm a new owner of a '76 E27 that although very sound needs a lot of esthetic attention. Hopefully I attached the picture correctly. My first of many questions is about the head. It does not have a deck connection for pump out. There are 2 through hulls I beleive that the larger one is for discharge, but what is the second one? There are two water tanks in the V berth compartment one is for the toilet water I assume, also there is a bottle resembling a clorox bottle, I also assume that's where the tank treatment chemicals go. I have not seen the waste tank itself in my inspection of the boat ( I will pick it up this week end) There is also a manual pump in the V berth that the PO say is for puimping the waste overboard. Also there is a electronic panel that shows when the waste tank is full (not sure if it works)
Can some one please give me guidence on how this system works? how do I get it pumped out? I'm now used to all this hoses and thru-hulls, my previous boat being a Humter 23 with outboard and porta-potty.
THanks in advance.
TonyG in NJ.
DSC02337.jpg
 

treilley

Sustaining Partner
Congrats on the new toy and welcome!

That is what is called a smelly head. Seeing the condition of the bowl and the hoses used I can smell it through the computer monitor!

Tony, we cannot help you much with the existing system without knowing exactly where each hose runs. You will need to open up lockers and crawl into tight spaces with a light to determine this. Get used to doing this as it is normal operating procedure for owning a boat.:rolleyes:

Most all heads are plumbed to pump water in from the outside for flushing, not from a dedicated tank. Also, the best treatment you can use is Odorlos which goes directly into the bowl.

Here is a common design which works well for these boats:

Courtesy of West Advisor
WA_Sanitation5.gif


It is advisable to install vented loops between 1&2 and 9&10. You can also replace the Y valve at 8 with a Tee to save bucks.

The best hose to use is not Sealand's Odorless but rather Trident's double wall sanitation hose parts Nos 101(black) or 102(white). It is much easier to work with than the sealand hose and will take a lot longer for odor to permeate.

Your toilet is a high quality Raritan PHII. It probably needs a rebuild but you would be better off just buying a new pump assembly that they now offer. The porcelain bowl can be cleaned up nicely fairly easily. Raritan also sells a household sized oval bowl for that model which makes the throne a lot more comfy.

Also, that scary gate valve has sunk boat written all over it. That appears to be your overboard pump out. The cheap red radiator hose is your intake for flushing the head. Whoever plumbed this did not believe in marinized products or ABYC standards. None of the hose pictured is suitable for below waterline use. Nor is the sch 80 elbow.

Hope this helps.
 
Last edited:

Loren Beach

O34 - Portland, OR
Senior Moderator
Blogs Author
Hi Tony,
I had to chuckle, seeing that a prior owner had put the flushing-water intake right beside the head discharge. Talk about a gross version of recycling! :rolleyes:
(In fairness, other boats I have been on over the years have the same problem.)
As already pointed out, DO replace any and all gate valves at your first haul out. Lots (!!) of threads here on that subject.

The Raritan in the picture is an oldie, judging by the style of the dry-bowl turn valve. Remove and clean it all up, and as suggested, replace the pump assembly if the bowl and base are in good condition. The dry-bowl valve on the newer ones is redesigned and works a lot easier.

Hoses -- several good choices out there. I used Shields #148 for my head re-plumb project.

Get used to searching for related threads here, and if you have trouble finding something, just ask us for guidance. Note that you can post up to 5 pictures with each post here.

The E-27 is a true classic racer-cruiser. Have fun!
:egrin:

Loren
 

agraziano23

Member II
Thanks guys. I hope to sail it a few times before the haul out, all these thru-hulls scare me. I the end I just might replace the toilet with a porta-potty and seal off the thru-hulls, but this is not my final decision. The previus owner never used the head for #2, so he just flushed to the outside (so he says) adding a pump-out outlet should be in the future if I keep and upgrade the present system.
 

agraziano23

Member II
Hi Tony,
I had to chuckle, seeing that a prior owner had put the flushing-water intake right beside the head discharge. Talk about a gross version of recycling! :rolleyes:
(In fairness, other boats I have been on over the years have the same problem.)
As already pointed out, DO replace any and all gate valves at your first haul out. Lots (!!) of threads here on that subject.

Loren

Hello all. I had time to check out the plumbing now that the boat is in my possession, and here is the deal. The intake and exhaust from the toilet does not matter that they are so close because the flushing does not go immediately out - lat me explain the water goes from the IN to the toilet and then to the holding tank that's it. the whole tank can be pumped out using the manual pump located in the bow straight to the out seacock.

there is no provisions for pumping out to a facility (no deck fitting) unless you pump out directly from the tank.

One more project to add to the list is the addition of a deck fitting. Granted I will have to drill a hole on deck and another one on top of the tank (correct?) my question is the hose to the tank does it have to stop to a fitting on the tank top or go all the way to the bottom of the tank.

I must apologise but I don't know how the pump out stations work, by vacuum?
 

treilley

Sustaining Partner
Tony, it can be difficult to properly attach a hose barb to a plastic tank let alone run a pvc pipe down to the bottom. The proper way is to weld it.

I am sure you are trying to save some bucks but I would look into a new tank from Ronco with all the proper fittings you need.

2 schools of thought on how to place the pumpout fitting.

Bottom of the tank provides better pumping out but introduces a potential for nasty leaks.

Top of tank with a pipe going to just above the bottom of the tank reduces the leak potential but your tank will not empty as much.

Most boats, like mine, are restricted and make it difficult put these fittings anywhere but where the original design meant them to be.

My pumpout is on the bottom of the tank. I have it double clamped with awab clamps. So it is clamped as well as all my through hulls. I also use doublewall sanitation rated hose.
 

Jeff Asbury

Principal Partner
Here is a link to West Marine's recommendations. http://images.google.com/imgres?img...hl=en&client=safari&rls=en&sa=N&start=21&um=1

I replaced the whole system on my E-27 seven years ago. Through hull valves, holding tank, head, hoses, "Y" valve, deck fitting, vent, anti syphon valve.

I have a "Y" valve with one hose going deck discharge fitting and the other going to a macerator that allows me to discharge off shore. When I got the boat there was no holding tank. The head simply pumped out the discharge through hull. The Coast Guard requires that you lock the discharge valve. Make sure your system is vented and has a anti syphon valve. I employed the help of a friend who is a professional. Parts & labor was about $1,200.

There is another option. Junk the whole system and get a port a potty.
 

agraziano23

Member II
thanks Trelley and Jeff. I think you answered my question. I think that I had it wrong thinking that I needed to put a hole in the holding thank for the new plumbing there, when in reality all I need is a "Y" fitting. one of the Y end will go to the ouside thru-hull and be locked while the other side will be the new hose to the new deck fitting. :) so all I need in parts is: 1) Deck fitting (what size?) 2) hose to Y, 3) Y fitting with lockable lever, 4) new ball type seacock.
the thru-hull fitting that's there is brass and in good condition so I'll keep it.
 

Jeff Asbury

Principal Partner
new ball type seacock.
the thru-hull fitting that's there is brass and in good condition so I'll keep it.

If it's the original 35 or so year old thru hull fitting I would really inspect it closely. If you scrape at it with a knife or file and it shows pink, it may be getting bad. One of the first things they check it the boat yard I use. Are you able to unscrew the sea cock from the thru hull? Mine were basically frozen together.
 

agraziano23

Member II
If it's the original 35 or so year old thru hull fitting I would really inspect it closely. If you scrape at it with a knife or file and it shows pink, it may be getting bad. One of the first things they check it the boat yard I use. Are you able to unscrew the sea cock from the thru hull? Mine were basically frozen together.
Good point, Jeff. The boat goes on the hard next month then I'll know what I'm up against. I know I HAVE to replace all the seacocks, I'll inspect the thru-hulls like you said and replace accordingly, I was hoping that the seacocks would not be frozen so that I can do all the work myself. The boat only cost me $2000 I'm allowing for another $1000 in parts that's still a good deal. I have spent more on new lines, life vests VHF and BoatUS membership just so I can puts around the bay - worth every penny.
 

treilley

Sustaining Partner
2 points Tony. You do not need a lockable Y-valve if your toilet does not discharge directly overboard. You can still lock the seakcock if needed. Use a Tee in place of the Y-valve to save money.
 

Glyn Judson

Moderator
Moderator
Locking the seacock.

Tony, Furthermore, you can simply disable the seacock when not in use by removing the handle. My handle is on an 1/8" Dacron tether about two feet long (West Marine) that slides down into the dry bilge when not in use. The other end is tied around the seacock body making it easy to retrieve when needed. I checked with the USCG about this method and they were fine with it as opposed to some locking means. It's quick, clean and easy and it satisfies the spirit and rule of the law. Glyn Judson, E31 hull #55, Marina del Rey, CA
 

Jeff Asbury

Principal Partner
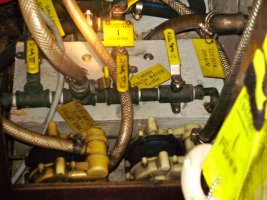
Glyn I actually took a photo of your valves and engine flushing system. Very organized!
 

Attachments

  • P5070056.jpg
    P5070056.jpg
    63 KB · Views: 114

treilley

Sustaining Partner
Organized yes but I see some things that could/should be changed in that picture if it were my boat.;)
 

Glyn Judson

Moderator
Moderator
Plumbing changes/ideas.

Tim, Pray tell, I'd love to know how you'd change and improve the system. I'm always open to improvements and simplifying operations. Thanks, Glyn
 

treilley

Sustaining Partner
So first of all, what is that manifold and rigid pipe made of? Copper? I would use bronze.

Is the manifold below WL?

Those hoses do not appear to be below waterline approved.

I see single clamps on some of those hoses.

Just for the record, I am very anal;)

I like the apollo valves though:egrin:
 

Glyn Judson

Moderator
Moderator
Fresh water management system.

Tim, Thanks for the questions. Yes, the manifold is below the water line located on a plywood platform I fitted in the space where a random selection of factory-installed gate valves once were. The idea behind the installation was to essentially clean up that area, inspired by my first removing a cockpit scupper drain hose that was T'd into the galley drain. That hose now leads to a dedicated 1 1/2" seacock that I added well aft of the galley. The plumbing hardware is made up of off-the-shelf brass and bronze pipe and fittings from West Marine. There are two fresh water tanks in the boat, a 45 gallon main tank beneath the cabin sole and an auxiliary 25 gallon tank under the V-berth. The right end of the manifold is plumbed to the smaller tank and the left end leads to the main tank. The Apollo ball valves allow control of all the water from one place, water that leads to the head and galley sinks as well as a 3-way valve designed to allow me to flush the engine (read heat exchanger) with fresh water by simultaneously closing the raw water intake and diverting to onboard fresh water. In no longer than 20 seconds with the engine at idle, I'm able to purge the heat exchanger of salt water and replace it with fresh. For safety, I time the flush at 30 seconds, using three gallons in so doing. So whether on a mooring at Catalina Island or returning to our slip, the engine is always at rest in fresh water. Three sections of engine raw water hose leading from the seacock is USCG approved supply hose. They lead from the seacock, through the Groco strainer, to the 3-way Apollo valve and finally to the engine raw water pump. All other hoses are reinforced vinyl and I secured them along with the three lengths of raw water hoses with AWAB hose clamps. Actually I've replaced every single hose clamp in the entire boat with these clamps. As you might know, AWAB clamps will not creep and loosen http://www.awabllc.com/markets/enginegenset.html obviating the need for double clamping as is necessary when using Ideal-type clamps. Years ago when speaking to an AWAB tech rep, he confided to me that they don't promote single clamp use simply because tradition dictates double clamping based on other lesser quality clamp designs. That said, I had to double clamp the shaft log hose using AWAB clamps in order to pass a surveyors inspection despite discussing the no-creep attributes of these clamps with him. Thanks for posting your concerns and thoughts, I hope I addressed them to your satisfaction. Glyn
 
Top