• Untitled Document

    Join us on March 29rd, 7pm EST

    for the CBEC Virtual Meeting

    All EYO members and followers are welcome to join the fun and get to know the guest speaker!

    See the link below for login credentials and join us!

    March Meeting Info

    (dismiss this notice by hitting 'X', upper right)

Replacement of Cabin Sole [Master Thread]

windblown

Member III
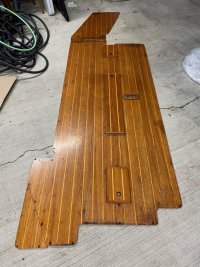
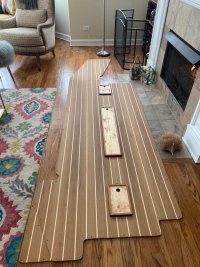
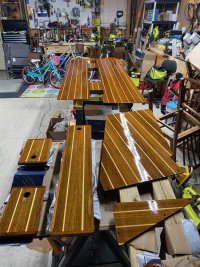
Another step in the process of replacing the T&H sole. All patterns are cut with templates A, B, C re-trimmed in places after I took them back to the boat to check their fit. D & E were cut using acetate tracings of the old T&H which still need to be checked for fit, but not before their corresponding old sole sections are pulled up. Eventually all of them will serve as a temporary sole until it's time to cut out the new T&H pieces. Strange to see them laid out on my garage floor like this.

View attachment 42894
By any chance, do have a picture of what the tafg looks like under your template section "E"?
 

Bolo

Contributing Partner
By any chance, do have a picture of what the tafg looks like under your template section "E"?
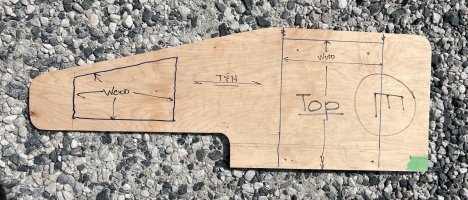
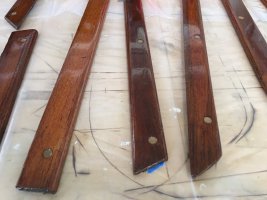
Interesting that you choose that particular section (E) because it’s the only one that needs the slightest bit of timing done to it which will be no big deal since I need to take it up to trim it. I don’t have photos of the TAFG in that section but I can show you a photo of the template/temporary sole that I marked up to show where the wood panels covering the voids in the TAFG are located. I did this so I could choose the best location for the screws since I wanted to fasten into the TAFG as much as possible and not the wooden panels.

Here you can see where I located the position and size of the panel marked “wood” with all other areas being part of the TAFG which is where I drill holes for the screws.


CEBEC299-866A-4AAE-99FD-B176621FABB9.jpeg

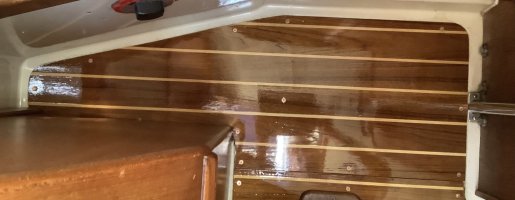
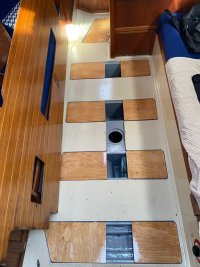
And here is that section in place.
A286F332-C0F1-4393-A3EA-05B89D9BD97C.jpeg
 

Christian Williams

E381 - Los Angeles
Senior Moderator
Blogs Author

1990 Ericson 28-2​

(copied from https://ericsonyachts.org/ie/threads/cabin-sole-how-best-to-remove-old-sole-master-thread.4927/)

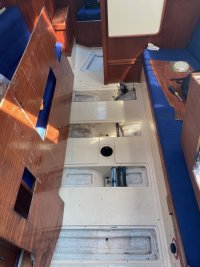
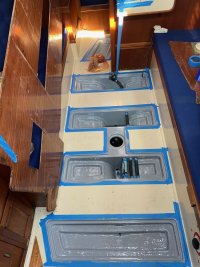
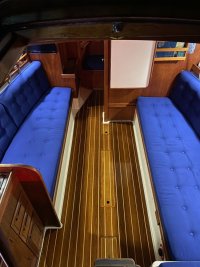
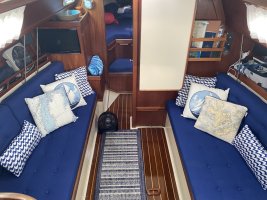
Hi all... I will eventually get around to a blog entry but for now a forum post. I completed the cabin sole on Danu and could not have done so without the help of many of you making posts, offering advice, and providing feedback. The old sole was tired, had some delamination from water damage, and it was time for an upgrade. I removed the old sole (thankfully it was not glued down), used the old as a template to make new pieces out of marine grade teak and holly plywood, epoxy sealed everything (all sides) with TotalBoat Clear Penetrating Epoxy Sealer, and then varnished with TotalBoat Gleam 2.0 Marine Spar Varnish (gloss). For the bilge boards, I actually routed out the old sole parts saving the frames and backings and epoxied in new, matching pieces of teak and holly plywood. While everything was out I cleaned, painted the bilge areas with TotalBoat TotalBilge Epoxy Sealer, and also traced and made new "subfloor" pieces out of marine grade plywood (also epoxy sealed). The fasteners were sourced from Fair Winds Fasteners and for the sole I went with silicon bronze flat heads with a square drive type. I used their "Screw Lube" product during the install and none broke on reassembly. Pictures throughout the process are added to the post.

  • IMG_4081.jpg
    IMG_4081.jpg
    137.9 KB · Views: 24

  • IMG_4266.jpg
    IMG_4266.jpg
    208.9 KB · Views: 20
  • 66827643676__A1E79369-5E3E-482B-8CC6-7F7FCD57CF2F.jpg
    66827643676__A1E79369-5E3E-482B-8CC6-7F7FCD57CF2F.jpg
    181.5 KB · Views: 20
  • IMG_6146.jpg
    IMG_6146.jpg
    117.8 KB · Views: 19
  • IMG_6153.jpg
    IMG_6153.jpg
    153.2 KB · Views: 19
  • IMG_6237.jpg
    IMG_6237.jpg
    145.3 KB · Views: 20
  • IMG_6910.jpg
    IMG_6910.jpg
    229 KB · Views: 22
  • IMG_8011.jpg
    IMG_8011.jpg
    128 KB · Views: 24
  • IMG_8040.jpg
    IMG_8040.jpg
    277.7 KB · Views: 24
William (Bill) Haas
Danu, 1990 Ericson 28-2, Universal M2-12
Chicago, Illinois
 
Last edited:

Christian Williams

E381 - Los Angeles
Senior Moderator
Blogs Author
A question when replacing the sole:

The new sections are likely sealed and varnished at home or in a shop. CPES, epoxy, seven coats and so on.

If there are many screws to be plugged, how to finish the plugs?

Since the top of the plug gets nicked off, it can't be varnished in advance. And new layers of varnish applied to the plugs after installation would show proud on the otherwise perfect new surface.

Must be a good answer, I just don't have one.
 

Loren Beach

O34 - Portland, OR
Senior Moderator
Blogs Author
If there are many screws to be plugged, how to finish the plugs?
Believing that access to the areas under the sole is important, I plugged all the factory holes where EY had counter sunk and plugged them. I laid out a new pattern with counter sinks just enough to leave the heads just a tiny bit recessed, and accessible. I used bronze square-drive screws. All the heads are in the teak strips and the bronze ages nicely to a dull color and does not stand out.

I would not advocate hiding the screws underneath plugs again.
 

Prairie Schooner

Jeff & Donna, E35-3 purchased 7/21
@Christian Williams @Loren Beach
The rationale for leaving the exposed screws is compelling. I even bought some bronze square drive screws and used them as described. But gosh-darnit, I just really like the look of bung filled holes and want to do so in some places. If someone does have a technique, I'd love to hear about it.
 

Christian Williams

E381 - Los Angeles
Senior Moderator
Blogs Author
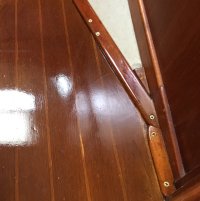
I used bronze screws in the head area when fixing delaminated floorboards. Fill trim pieces, countersink. They do the job for trim, although after several years now they're no longer shiny and don't look all that great. (The factory plugged every one of those trim screws).

.sole battens filled BBB.JPG..E38 trim w bronze screws.JPG

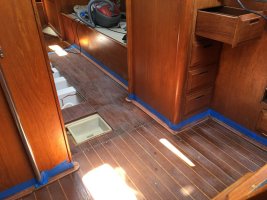
The E38, and other models, used a lot of screws into the TAFG to hold down the wide areas of 3/4 ply/veneer (actually measures 11/16ths) . You can see the rows of them in this picture taken during a refinishing a couple of years ago.

That's too many exposed screw heads, even in bronze, in new, pristine teak and holly. Apparently they're necessary. I think exposed screws will be OK for the two dozen total trim pieces, though. This particular sole is a vast lot of work.
...
...cabin sole B.JPG
 

Christian Williams

E381 - Los Angeles
Senior Moderator
Blogs Author
Question: Was the sole on any of our boats of 1/2" Teak and Holly ply laminate?

Some, like the 32-3, were 1/4". The 38s, my run at least, were 3/4" T&H.

Three-quarter is not available to me in California but 1/2" is. I think it would provide sufficient mass and strength for the E381, but it would be nice to have confirmation.
 

Christian Williams

E381 - Los Angeles
Senior Moderator
Blogs Author
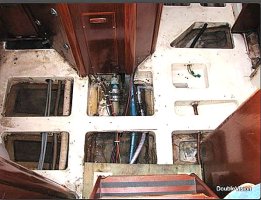
Good. Your picture of TAFG (photo left) shows narrow spacing with good support of the sole. The photo of an E38-200, less so. I haven't found a photo of the TAGF for E38 or E381, which is probably much different. So now the question is, will 1/2" bridge those larger voids. Ericson factory probably used 3/4" for a reason.

O34 sole.JPG...e38-200 tafg.JPG

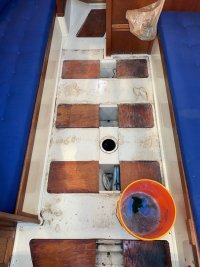
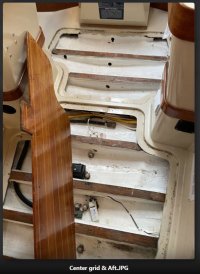
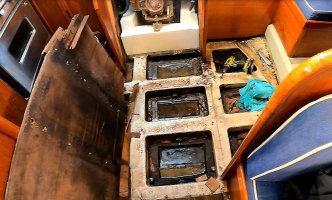
Update: here is a photo of the 381 TAFG:

E381 sole removed.JPG
 

Loren Beach

O34 - Portland, OR
Senior Moderator
Blogs Author
At the upcoming Oct 27 Zoom EY.org meeting we could all compare our.... Soles...! :egrin:
 

ConchyDug

Member III
Has anyone tried Coosa Bluewater panels for their sole? This stuff is commonly used in powerboat construction so I assume it's crazy strong.
 

Pete the Cat

Member III
@Christian Williams @Loren Beach
The rationale for leaving the exposed screws is compelling. I even bought some bronze square drive screws and used them as described. But gosh-darnit, I just really like the look of bung filled holes and want to do so in some places. If someone does have a technique, I'd love to hear about it.
In the yard I work in (seasonally--mostly high end old wood boats East Coast) they try to recess the screws and very carefully insert a bung with varnish only--sometimes a tiny bit of wood glue, but sparingly around the edges and never epoxy. One of the old guys puts a tiny bit of paper on the screw head before the bung. The idea is that you might want to access this again without destroying the floor--so the bung process can be repeated. They get them to look quite nice but have patient and very experienced varnish folks. But I have done two floors and realize a couple things: 1.) It is a floor, not a table top. You are not going to see minor imperfections unless you get down and really, really try. and 2. if you get OCD about it, you are likely to ruin an otherwise nice day when your vise grips fall off the table and ding your masterpiece. I have learned that pursuit of perfection is fun, but only if you accept that nothing is ever perfect, and that my natural eye will not look for defects unless my OCD kicks in. I learned a lot about this eye issue from doing gelcoat repair--I walk away from a job thinking I will have to redo it the following day--and then cannot locate my repair. I sense fellow OCDers in this group.
 

Prairie Schooner

Jeff & Donna, E35-3 purchased 7/21
In the yard I work in (seasonally--mostly high end old wood boats East Coast) they try to recess the screws and very carefully insert a bung with varnish only--sometimes a tiny bit of wood glue, but sparingly around the edges and never epoxy. One of the old guys puts a tiny bit of paper on the screw head before the bung. The idea is that you might want to access this again without destroying the floor--so the bung process can be repeated. They get them to look quite nice but have patient and very experienced varnish folks. But I have done two floors and realize a couple things: 1.) It is a floor, not a table top. You are not going to see minor imperfections unless you get down and really, really try. and 2. if you get OCD about it, you are likely to ruin an otherwise nice day when your vise grips fall off the table and ding your masterpiece. I have learned that pursuit of perfection is fun, but only if you accept that nothing is ever perfect, and that my natural eye will not look for defects unless my OCD kicks in. I learned a lot about this eye issue from doing gelcoat repair--I walk away from a job thinking I will have to redo it the following day--and then cannot locate my repair. I sense fellow OCDers in this group.
Truth, Ray. Truth.
OCD gas.jpg
 

G Kiba

Sustaining Member
"Perfection is overrated" has been my mantra for about 8 years now. It started with a fender bender in traffic. Guy in work truck bumped my rear bumper of my then 2 month old new vehicle. We both pulled off to a side street to inspect the damage. His truck left a perfect hex impression centered nicely in my bumper from one of the four license plate bolt heads. I suddenly realized that I could live perfectly fine with it and told him to forget it. It was not worth him getting into trouble. Since then my car has the usual door dings, scrapes and marks of 8 years of use and that hex is still my favorite!
 

Christian Williams

E381 - Los Angeles
Senior Moderator
Blogs Author
I went round and round on this issue, swinging myself like a rat on a string.

I wound up just putting bungs in 50 holes (sole only, not trim) and it wasn't too bad. But now I have to nick them off with a sharp chisel. In the past I have screwed this up by nicking below flush, which means picking out the bung and starting over.

I spent nearly an hour this morning sharpening my chisel, a sure sign of hope reigning over probability.

Almost finished the 381 sole replacement, which has been a bear. Thirty-seven work days so far, two coats of varnish-in-place remain. When it stops raining.
 

Loren Beach

O34 - Portland, OR
Senior Moderator
Blogs Author
Good. Your picture of TAFG (photo left) shows narrow spacing with good support of the sole. The photo of an E38-200, less so.
I just had a minor epiphany about the spacing of the margins in many of the EY "TAFG" openings. Note that the Olson has a narrower and easier support on one axis. If the distance across the longest side is an engineering concern..... Perhaps you could just glass in a connecting piece of G10, about 1" X 1" by about 3/8, across the center part of the longer gap. Then the new 1/2" T&H Plywood would rest without noticeable give.
 
Top